Fixed Speed, Timed Scrolling and Words Per Minute Scrolling are all available on iOS, macOS, Android and the web browser version. All three move your script down the screen; they just decide the pace differently. Picking one comes down to what you already know about your read.
VoiceGlide, Fixed Speed, Timed Scrolling and Words Per Minute Scrolling all sit side by side in the same mode selector, so switching takes one gesture.
Fixed Speed and VoiceGlide need nothing typed in; the other two modes each need one number.
You set a constant speed and the script moves at that pace. On the recording screen the control is the scrolling speed bar in the middle of the screen, so you can nudge it mid-take without opening a menu. The full steps are in How Can I Control the Scrolling Speed of the Script?
Choose this if you have rehearsed the script, you know your rhythm, and you want one control and nothing else to think about.
You tell the app how long the read should take, and it works out the scroll speed needed to finish exactly on time. Swipe to Timed Scrolling, tap Edit, and set your target duration there. Trim a paragraph later and the pace adjusts itself.
Choose this if you have a hard duration to hit: a 30-second ad, a 60-second social cut, a news read, or a conference slot with a countdown clock on it.
Instead of a duration or an abstract speed number, you set your speaking rate. Swipe to Words Per Minute Scrolling, tap Edit, and enter your words per minute. Most people sound natural somewhere between 120 and 160, so once you know your number, every read feels the same.
Choose this if you record regularly and want a consistent delivery pace, or if a client has given you a word count and a runtime.
All three modes above scroll whether you are talking or not. If you ad-lib, pause for effect, or get interrupted, you end up chasing the text. VoiceGlide listens as you speak and scrolls only as fast as you actually talk, so the script waits when you do. It works on all four platforms too. See How to Use VoiceGlide Auto Scroll to set it up.
Whichever you use, turning on the remaining-time display helps you see whether you will land inside your slot. See How Can I Display the Remaining Time While Recording?
The Visual Timer is available on the iOS, macOS and Android versions. It is not available in the web browser version.
Not every part of a video is scripted. There are stretches where you want to talk freely — an intro, a demo, an answer to a question — but you still have to land inside a set length. The Visual Timer is built for those stretches: a large, easy-to-read timer with nothing else competing for your attention.
It is a standalone feature with its own tab in the app's tab bar, alongside your scripts. It is not a prompter mode and it does not take the place of your script inside the prompter, so switching to it is a matter of moving to a different tab rather than changing anything about a script.
Elapsed time suits rehearsals, where you mainly want to know how long you have been going. Remaining time suits a hard slot — a 60-second social cut, a three-minute conference segment — where what matters is how much is left. The timer fills the screen, so you can prop the device next to your lens and read it with a glance.
The Visual Timer is standalone: it is not part of video recording, so it cannot sit on top of a take you are filming in the app.
If what you want is to track your progress while recording, use the prompter's own pacing tools instead. Turn on the progress bar and pair it with Timed Scrolling, which paces the script to the duration you set — see Which Scrolling Mode Should I Use? Together they show how far through your script you are and keep you on track for your target length, right on the recording screen.
Three features in the app deal with time and they are easy to mix up:
Put simply: Countdown happens before you speak, Remaining Time sits next to your script as you read, and the Visual Timer is for when there is no script at all.
It suits interview answers, product demos, live-event segments and rehearsals where you are practising delivery rather than wording. It is also useful before you write anything: talk a topic through freely, see how long that took, then write the script to fit the slot.
Need a hand? Email support@teleprompter.com or use Settings > Contact Support in the app.
Tap to Scroll is available on the iOS, macOS and Android versions. It is not available in the web browser version.
This is one of those features nobody finds on their own, because it never occurs to you to tap your own script. But you can. Tapping the script starts the scrolling, and tapping it again pauses it. It is a play and pause button the size of your whole screen.
To be clear about what it does not do: tapping does not skip ahead, jump a line or advance you through the script. It only starts and stops the scroll.
Precision Settings is where most of the reading and pacing options live, so it is worth checking the toggle there before your first take rather than discovering mid-recording that tapping does nothing.
The on-screen controls are small, and they are somewhere specific. Mid-take that means looking away from the lens, finding the right button and hitting it — all of which the camera sees. A tap can land anywhere on the script, so your hand moves once, briefly, and your eyeline barely shifts.
It also saves you from the classic fumble: you reach to pause, miss, and the script keeps rolling while you are no longer reading it. With Tap to Scroll there is nothing to aim at.
Tap to Scroll works especially well alongside Hide Controls While Scrolling, which clears the buttons off the screen the moment your script starts moving.
With both settings on, a single tap does both jobs at once: it pauses the scroll and brings the hidden controls back. You do not need one gesture to stop the script and another to get the buttons back — one tap leaves you with a paused prompter and the full control panel in front of you. Tap the script again to hide the controls and carry on reading.
Tap to Scroll starts and stops the scroll, but it does not change how fast the script moves. Set that before you record using the scrolling speed bar — see How Can I Control the Scrolling Speed of the Script? for the details, or Which Scrolling Mode Should I Use? if you are deciding between the app's scrolling modes. Get the pace right first, then use tapping purely to start, pause and restart around it.
Still have questions? Reach us at support@teleprompter.com or go to Settings > Contact Support in the app.
The floating prompter window is macOS only. Opening the prompter in its own window, pinning it above every other app and making it semi-transparent are three separate settings that work best together, and between them they turn your Mac into a desktop teleprompter for webinars, video calls and multi-monitor setups.
On macOS the prompter can pop out of the main app into a separate window that you drag anywhere on your desktop, including onto a second display or beside your slides.
Once it is open you can drag and resize the window freely, and the main app window stays where it is.
Without this, the prompter slips behind your browser or your video call the moment you click on them.
Transparency lets you read your script and still see the slides, faces or app underneath it. In the same Window Settings panel you will find a transparency slider. Move it left or right until you can read the text comfortably and still make out what is behind it. Full steps are in How to Adjust the Transparency of the Scrolling Window (macOS).
The combination that works for most people is a transparent, always-in-front window placed near the camera:
For a walkthrough aimed specifically at Zoom, including where to place the window during a meeting, see How Can I Use Teleprompter.com with Zoom on macOS?
If you have a second display, drag the prompter window onto the screen nearest your camera and keep your call or slides on the other one. Keeping the window pinned in front still matters here, because clicking between displays can otherwise send it behind whatever you just clicked.
Need a hand with your setup? Contact us at support@teleprompter.com or go to Settings > Contact Support in the app.
The Teleprompter.com MCP is the official bridge between your Teleprompter.com account and any MCP-compatible AI assistant. MCP (Model Context Protocol) is an open standard that lets an AI app talk directly to a service you already use, so instead of copying and pasting scripts back and forth, your assistant can open, edit, and create scripts in your account for you.
Setup takes under a minute, it works on any plan including the free one, and you can see the full walkthrough on the Teleprompter.com MCP page.
A few things you can ask for once it’s connected:
You decide. When you generate a key you choose exactly which permissions it grants:
There is no delete capability at all. Even with full write access, an AI assistant cannot remove a script or a folder from your account, so nothing can be lost by accident. Your scripts stay in your Teleprompter.com account. For more on how your content is handled, see How Can I Keep My Scripts Private?
No. The Teleprompter.com MCP is free and included with your account. Any plan works, including the free one, so it isn’t a paid feature or an upgrade. All you need is a Teleprompter.com account and an MCP-compatible AI app.
Ready to set it up? Head to the Teleprompter.com MCP page for the full instructions.
Zero Data Retention (ZDR) is an opt-in setting available to Teleprompter.com teams on team plans. When enabled, ZDR ensures the AI features you use through our platform do not retain your inputs or outputs. This page explains what ZDR does, what changes when you turn it on, and what stays the same.
ZDR is configured by team admins in Team Settings and applies to every member of the team across web, iOS, and Android.
ZDR is a guarantee about what AI sub-processors don't store on your behalf. When ZDR is enabled for your team:
ZDR does not change how Teleprompter.com itself stores the content you explicitly save in the product (your scripts, recordings, and account data). Those are governed by our standard Privacy Policy.
Three things change when ZDR is turned on for your team:
By default, Teleprompter.com generates scripts using our default AI provider. When ZDR is enabled, script generation is routed to a ZDR-compatible provider that operates under a zero-retention policy: your prompt and the generated script are not stored by the provider
beyond the time needed to return the response, and they are not used to train any model.
By default, Teleprompter.com may use cloud-based speech-to-text providers for transcription. When ZDR is enabled, transcription runs only on local models on your device. Your voice and audio never leave the device for the purpose of transcription.
Any AI feature that calls a third-party provider on behalf of a ZDR team will only use providers that contractually meet ZDR requirements (no retention of inputs or outputs, no training on your data). If a feature cannot be served through a ZDR-compatible path, it is disabled for your team while ZDR is on.
ZDR governs how AI sub-processors handle your data. It does not change how Teleprompter.com itself stores content you create or upload. The following remain governed by our standard Privacy Policy:
If you need details on retention periods, sub-processors, or data location for any of the above, see the Privacy Policy.
A few things to keep in mind before turning ZDR on:
The change takes effect immediately and applies to every member of the team on every platform (web, iOS, Android). You can turn ZDR off at any time from the same setting.
Only team admins can change this setting. If you are a team member and want ZDR enabled (or disabled) for your team, contact your admin.
If you have questions about how ZDR is implemented, which sub-processors are involved, or how it interacts with your compliance requirements, contact us at support@teleprompter.com.
If you want a distraction-free experience while reading your script, you can automatically hide all player controls while the script is scrolling. This helps you stay focused, whether you're recording a video, giving a live presentation, or practicing.
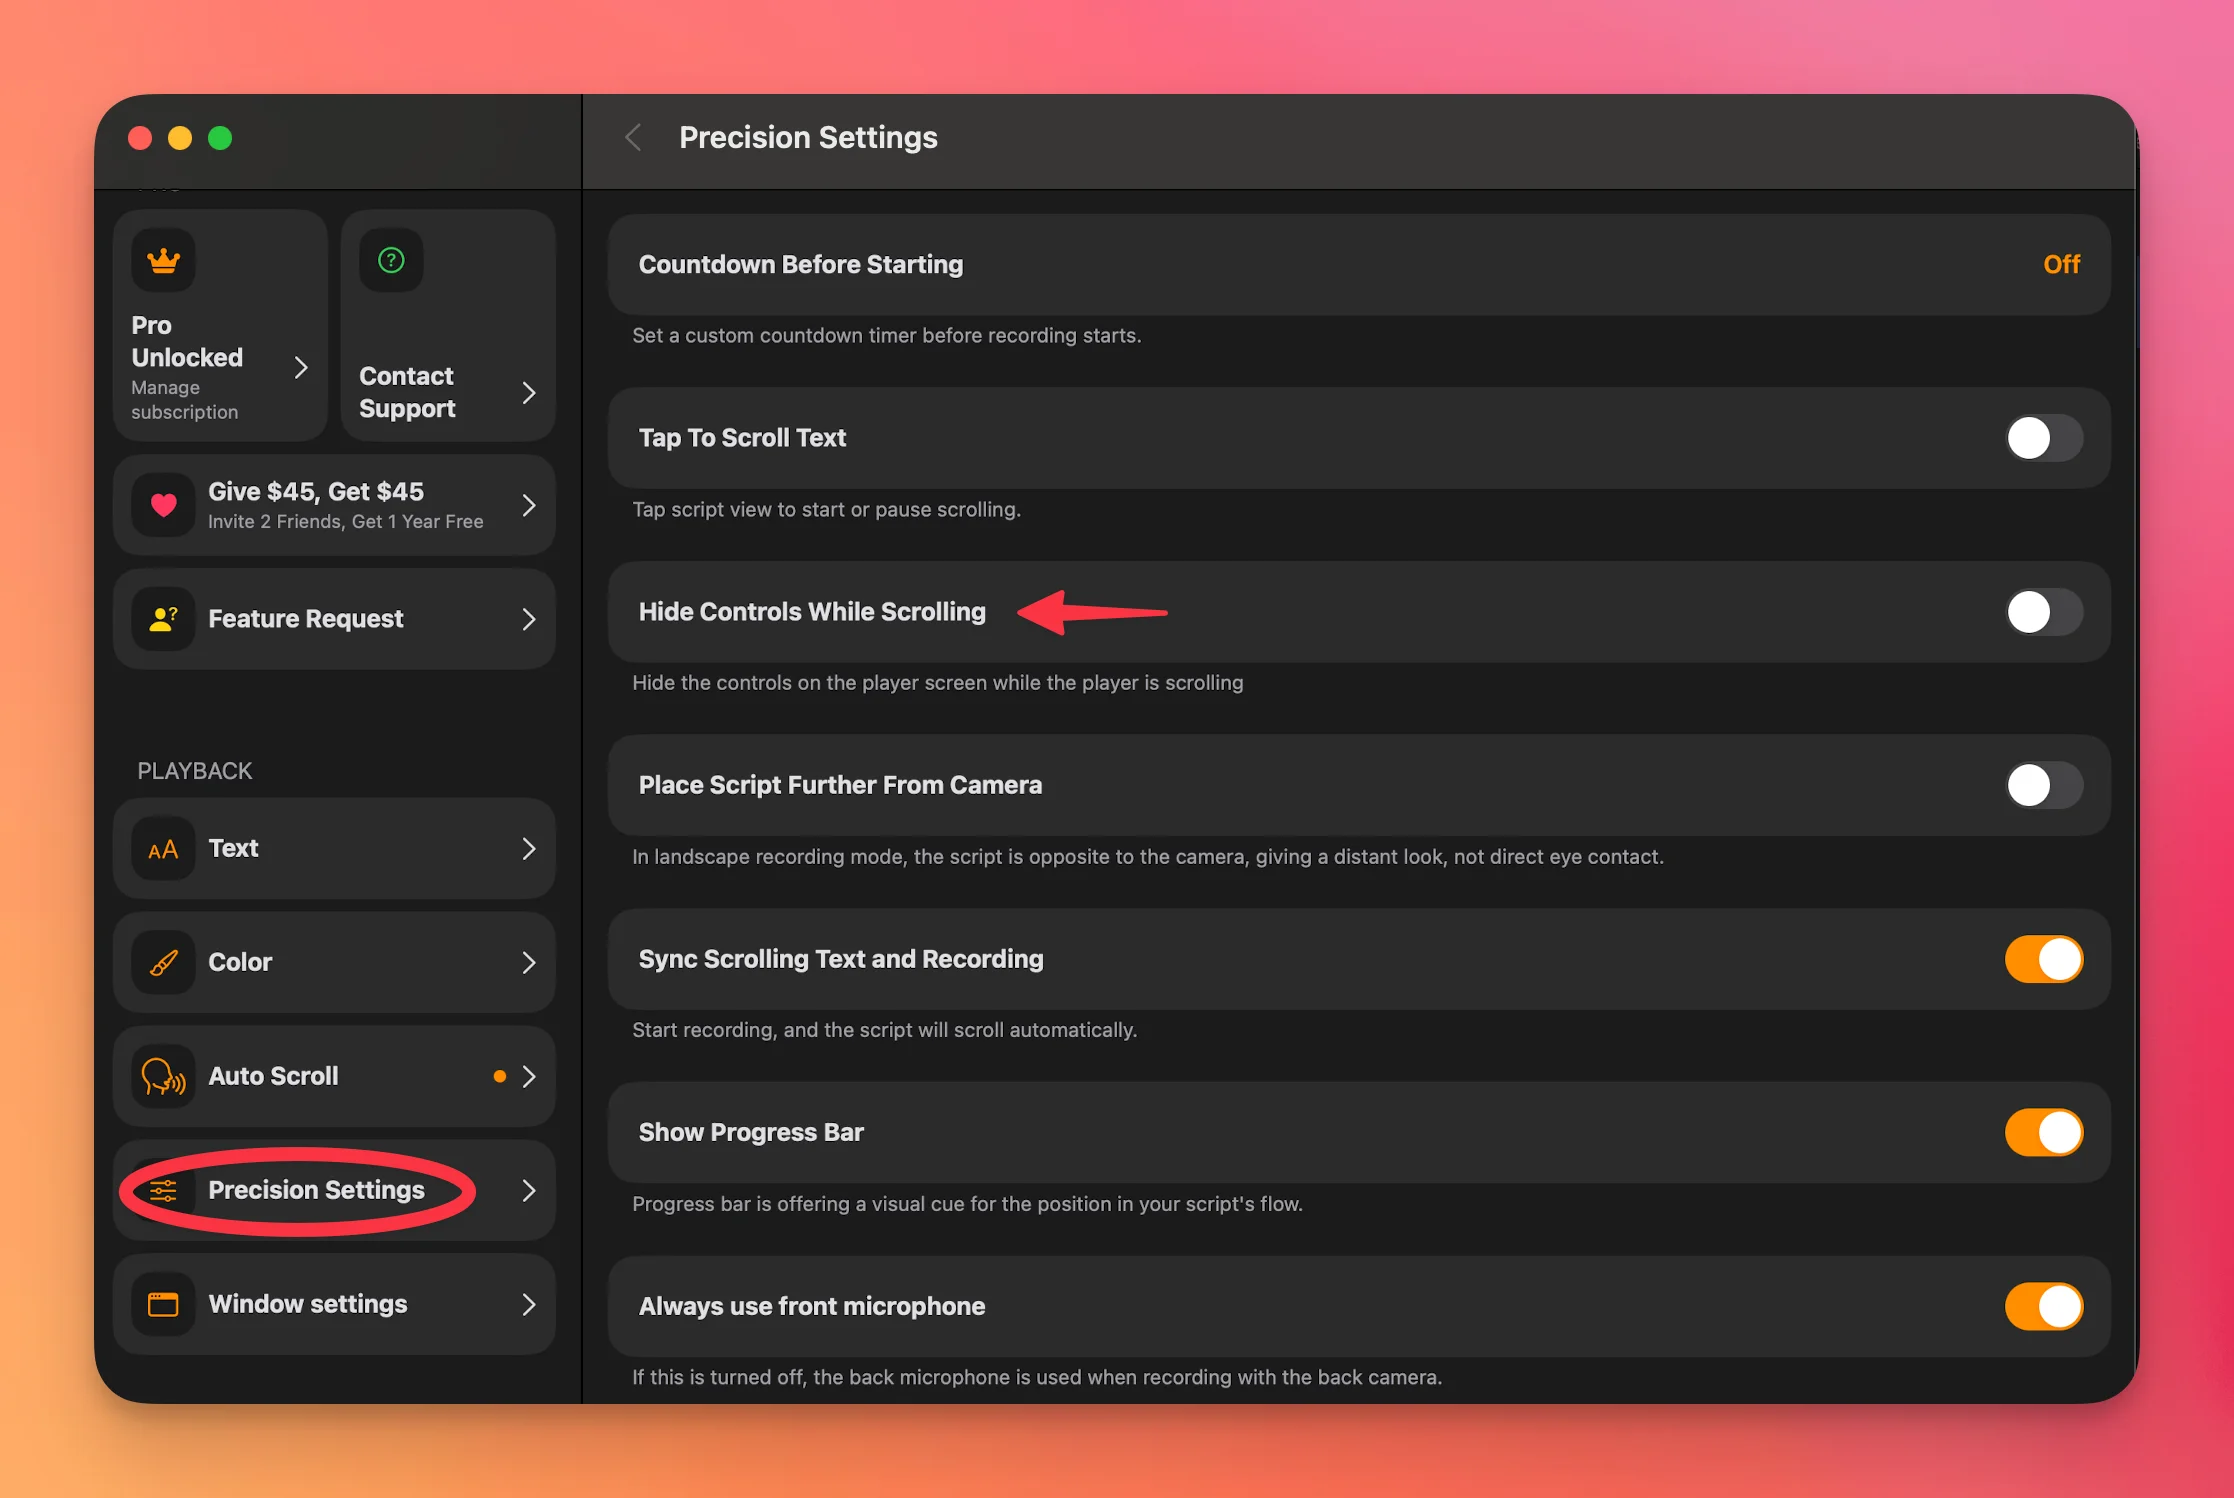
Once enabled, the control panel will disappear automatically while the script is scrolling and reappear once you pause the scroll or tap the screen. This provides a smoother, more immersive reading experience without any buttons or icons getting in the way.
Need your script text aligned to the left, right, center, or justified? With the Teleprompter.com app, you can quickly customize text alignment to fit your reading preference and presentation style.
Text alignment options are available on iOS, macOS, Android, and Web.
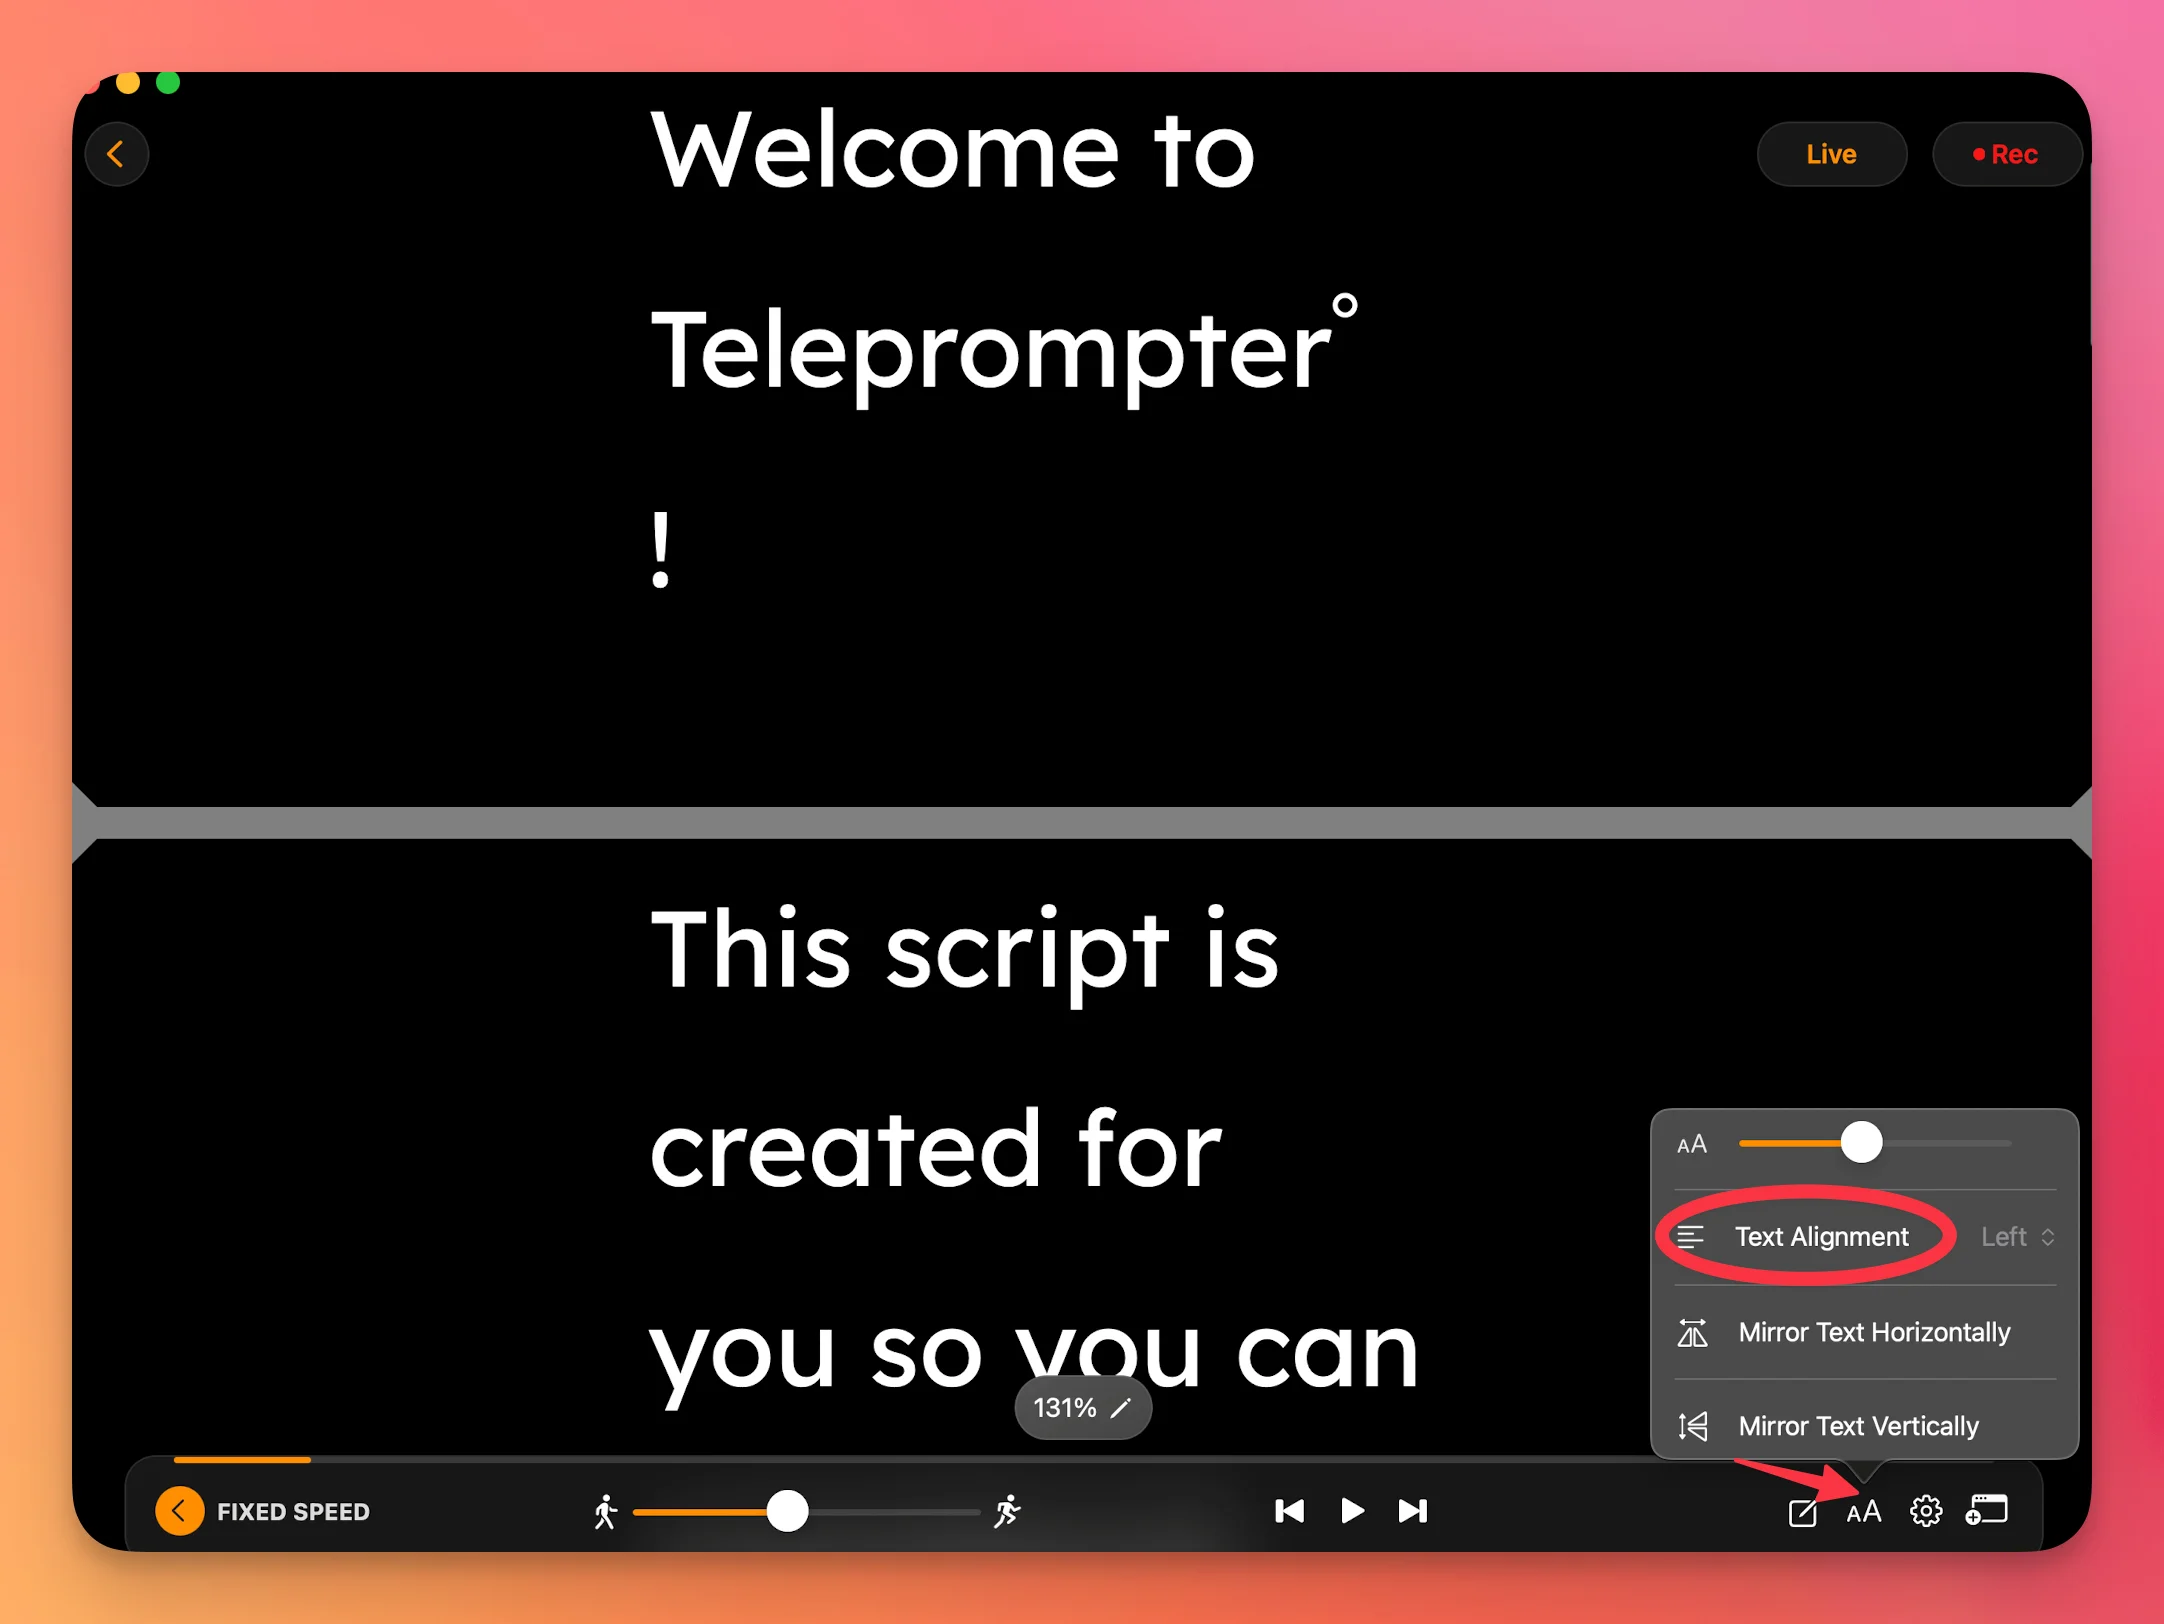
Click the icon and choose your preferred text alignment option.
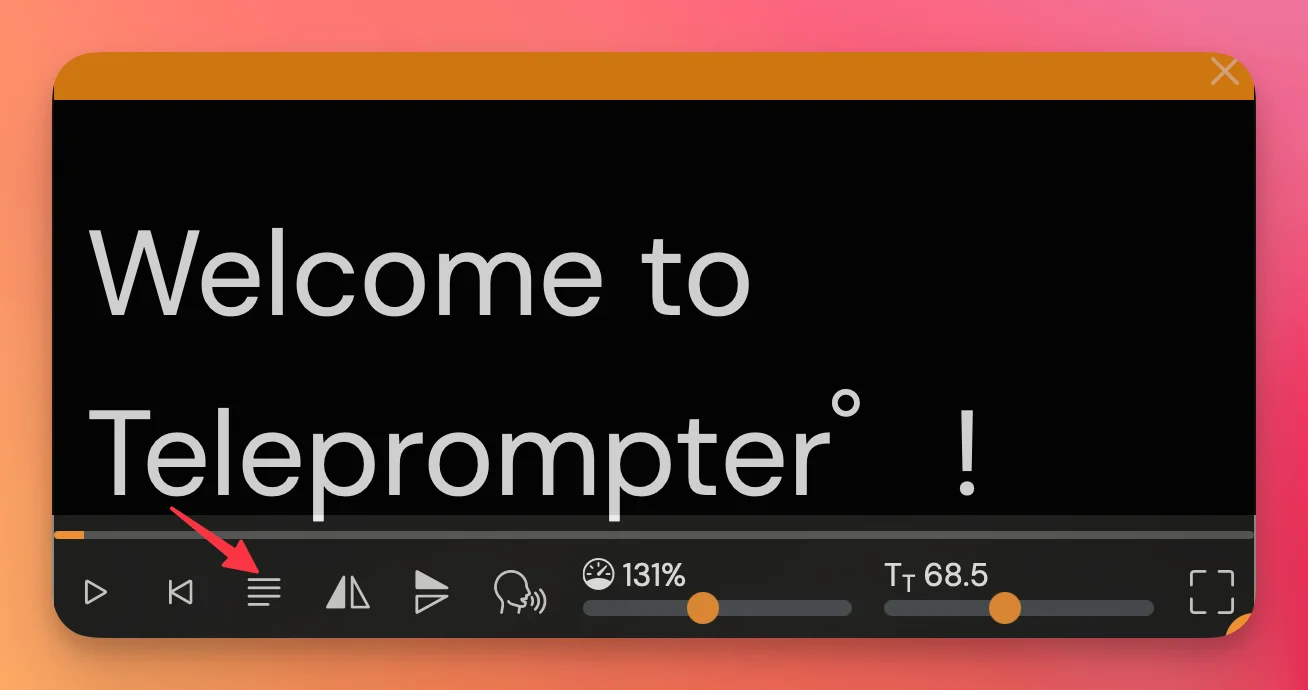
Need to back up your script, share it with others, or transfer it to another device? Teleprompter.com makes it simple to export your scripts in a couple of taps. On the Web Browser Version there is no export option yet, but you can still copy your script text out of the editor.


There is no export option in the browser version at the moment, so you copy the text out manually:
This gives you the script text, but not a .txt or .teleprompter file—for those, export from the iOS, Android or macOS app.

Exporting gives you control over your content—whether for editing, collaboration, or safekeeping.
Still need help? Contact us at support@teleprompter.com or go to Settings > Contact Support in the app.
Looking to stay on script while maintaining natural eye contact during your Zoom meetings or presentations? With Teleprompter.com for macOS, you can easily read your script on-screen while participating in a video call—without anyone noticing you’re using a teleprompter.
Here’s how to make it work smoothly:
Start by downloading the Teleprompter.com app for Mac:
Once installed, open the app and create or import your scripts—you can write them directly in the app, paste text, or upload files using the import feature.
To have your script appear over Zoom without blocking your view, you’ll want to make the teleprompter window semi-transparent:
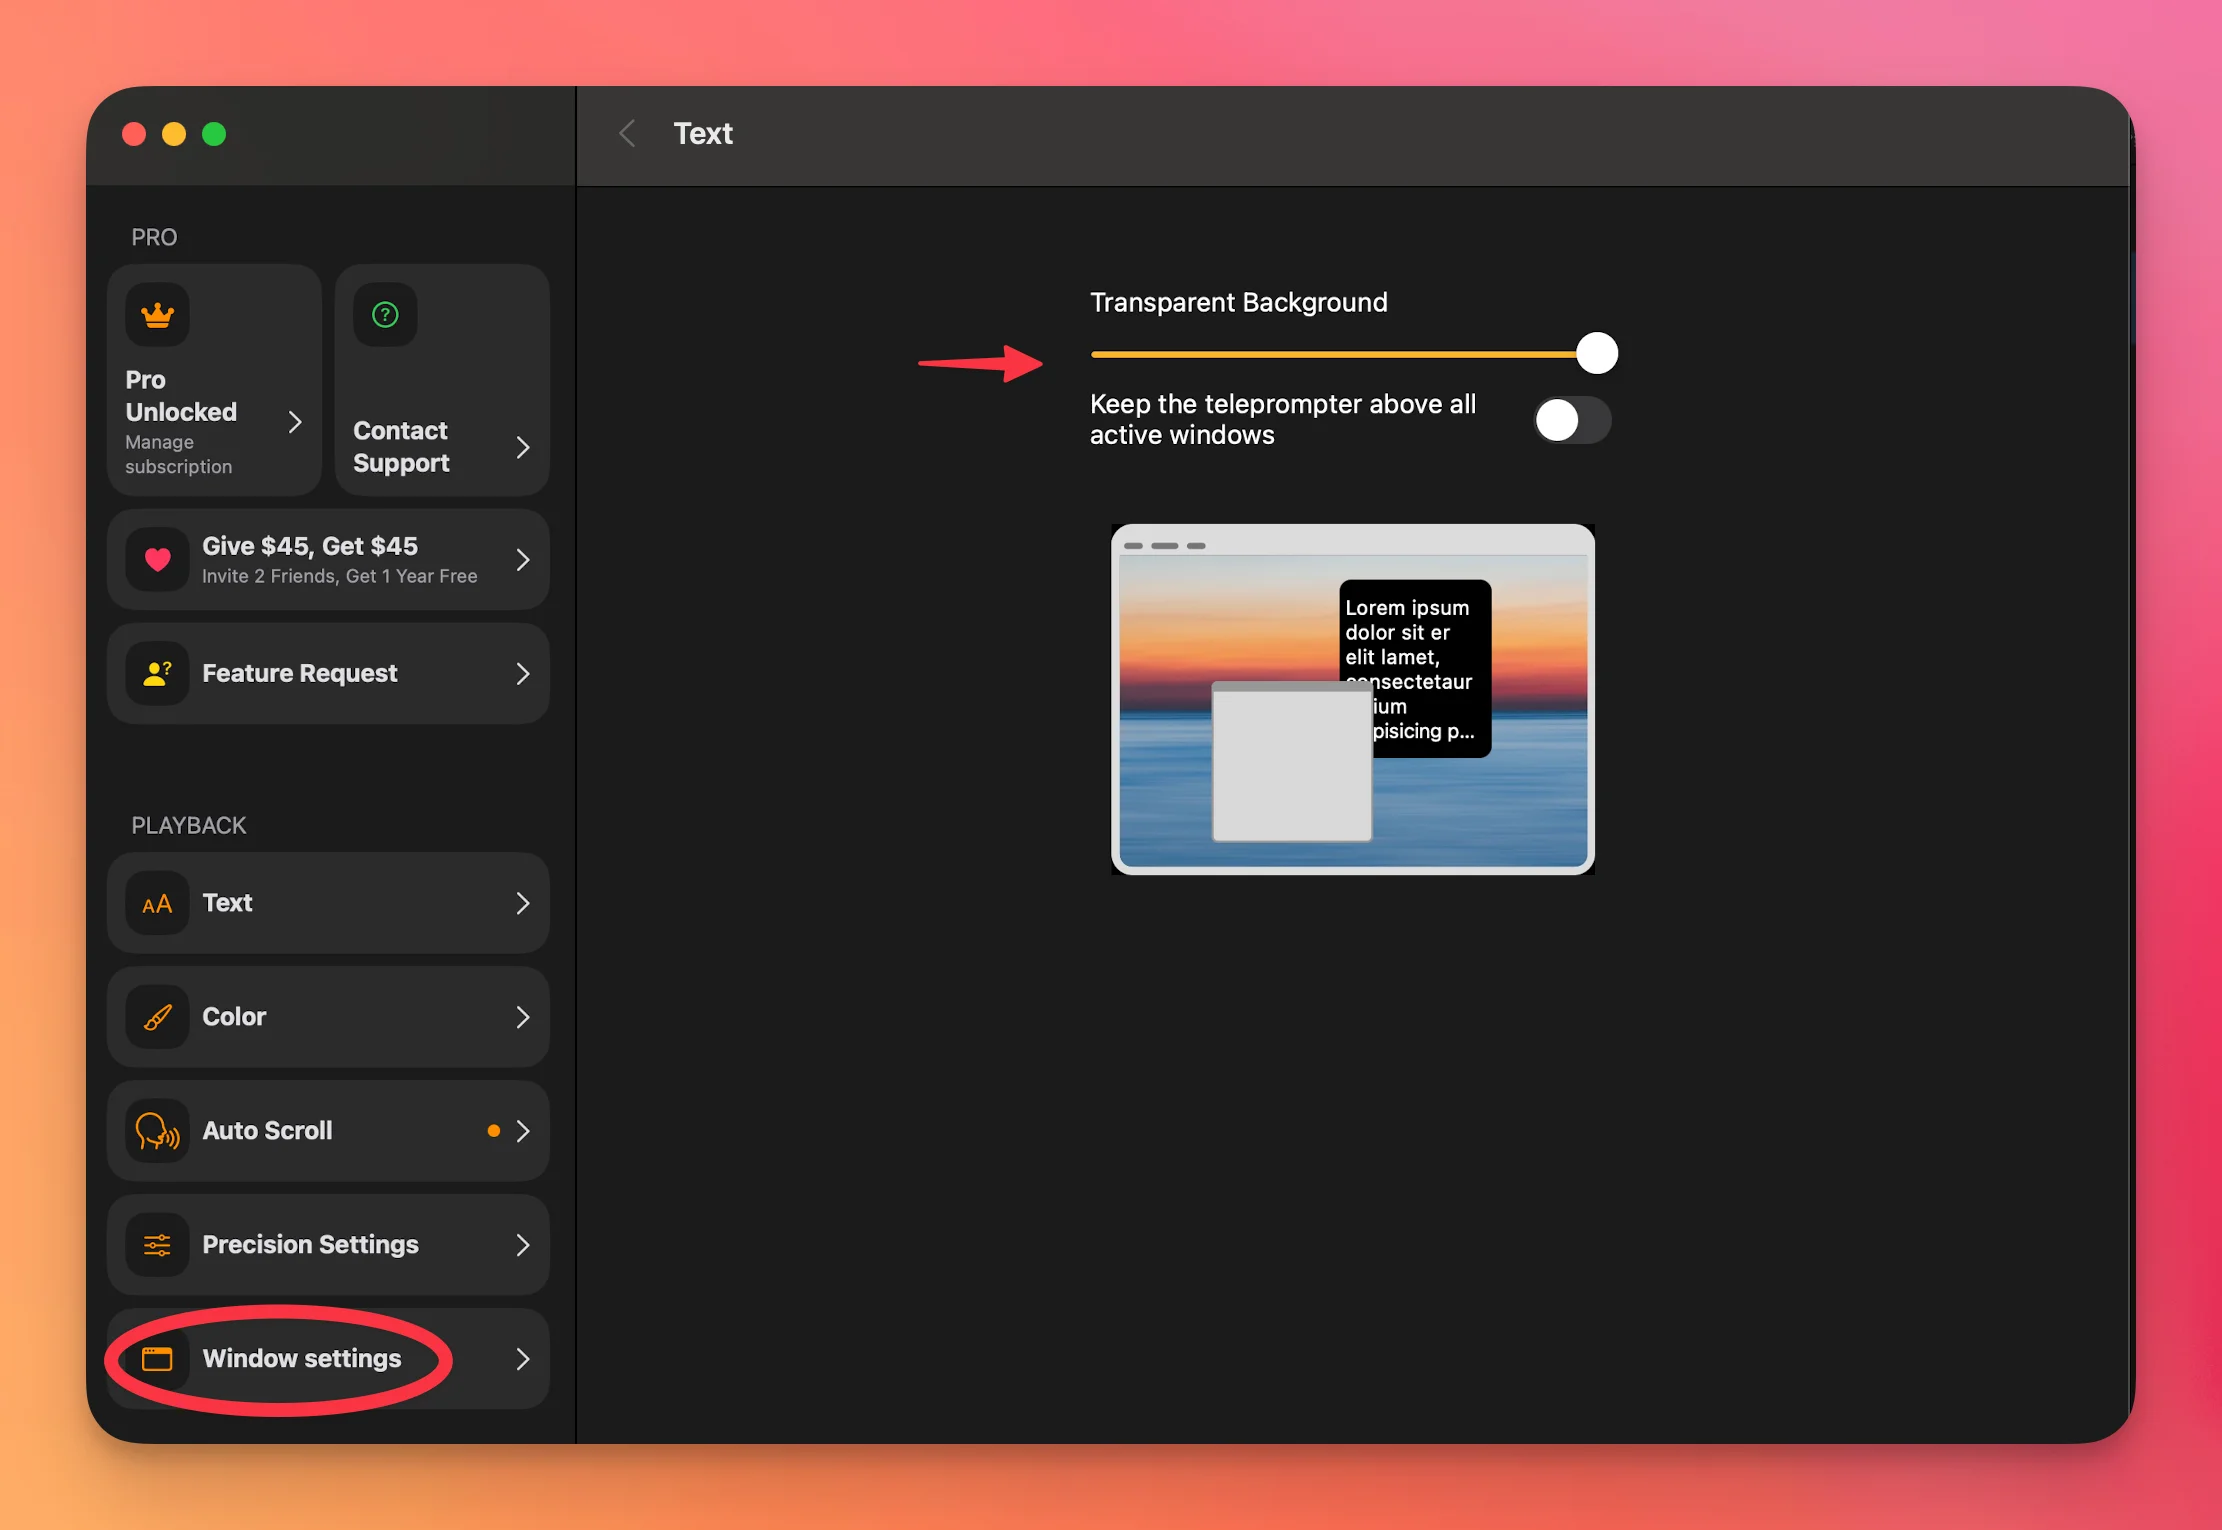
Open Zoom and either start or join your meeting.
Once you’re in the call, return to Teleprompter.com and position the prompter window on your screen.
We recommend placing the teleprompter window near your Mac’s camera—usually centered at the top of your display—so you can read your script while still looking toward the lens, keeping your delivery natural and engaging.
You can drag and resize the teleprompter window freely to fit your preferred layout.
On macOS you can also open your script in a separate floating prompter window: Floating prompter window on macOS.
Before going live in an important meeting, take a few minutes to rehearse your setup. This helps you get familiar with the script pacing and window placement so everything flows smoothly during the real call.
Have questions or need help fine-tuning your setup?
Reach us at support@teleprompter.com or go to Settings > Contact Support inside the app. We're happy to assist!
If you're using Teleprompter.com on your Mac and want to switch between different cameras—like your built-in FaceTime camera or an external webcam—you can easily choose your preferred input right from the recording screen.
Follow the steps below to change your camera input:
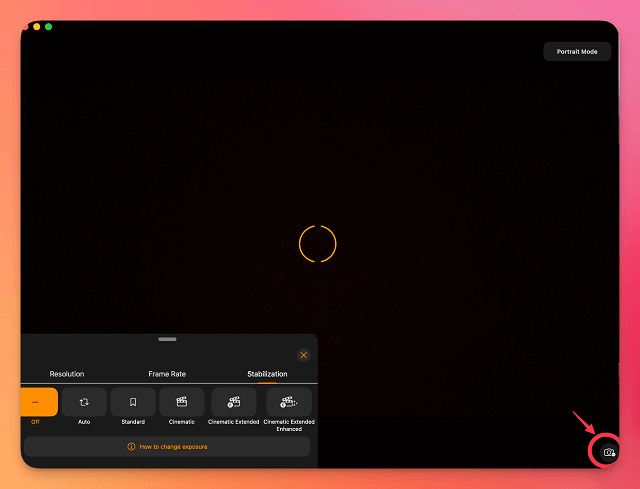
Once selected, your preferred camera will be used for that session’s video recording.
If the camera doesn’t switch or doesn’t appear, make sure it’s properly connected and recognized by your system.
Still need help? Reach out to us at support@teleprompter.com or through Settings > Contact Support in the app.
With so many teleprompter apps available on the market—many with similar names—it’s important to make sure you’re using the official Teleprompter.com app, developed by Teleprompter LLC.
Using the correct app ensures you have access to our full set of features, regular updates, customer support, and cloud sync capabilities across platforms.
Our official Teleprompter.com app has a distinctive icon:


If your icon looks different, you may be using a different app by another developer. This is the one and only Teleprompter app our company, Teleprompter LLC, has developed. Support official email address: support@teleprompter.com.
Video and audio recordings now sync across your devices, just like your scripts. Cloud Sync covers recordings on all four platforms — iOS, macOS, Android and web.
So if a recording isn’t showing up somewhere you expect it, something is usually holding up the sync rather than the feature being missing. Here’s what to check.
Recordings only sync within a single Teleprompter.com account. Open Settings > My Account on each device and compare the email addresses. If they don’t match, sign out of the wrong account and sign back in with the correct email. The full steps are in How can I sync my scripts between all my devices?
Cloud Sync needs to be enabled on both devices — the one you recorded on and the one you want to watch on. Go to Settings > My Account > Cloud Sync and check that the toggle is on. If you switched it off previously to keep your content local, nothing will sync until you turn it back on.
Recordings are much larger than scripts, so they take longer to upload — especially a long take, a 4K recording, or one made on a slow connection. Keep the app open on the device you recorded on until the upload finishes, then open the Recordings section on your other device.
Cloud Sync pauses while a device is offline. Anything you record without a connection stays on that device and uploads automatically once you’re back online, so if you recorded on a plane or away from Wi-Fi, reconnect and give it a moment to catch up. More on this in Does Teleprompter app work offline?
If you can’t wait for the upload, you can move the file across yourself. Export it first — open the Recordings section, select the recording and tap Share, as described in How can I share my video recordings? — then use one of these:
Still can’t see a recording on another device? We’re here to help!
Reach us at support@teleprompter.com or through Settings > Contact Support inside the app.
Yes! If you're working with confidential or sensitive scripts, Teleprompter.com offers a true offline mode to keep your content stored only on your device.
You can activate this in two ways:

This gives you maximum privacy and peace of mind. But keep in mind:
If your device is lost, stolen, or damaged, and you’re not using Cloud Sync, your scripts cannot be recovered.
For extra security, consider making local backups manually or switching Cloud Sync on only when needed.
Yes! Teleprompter.com is fully functional even when your device is offline. You can create, edit, rehearse, record, and play back scripts without needing an internet connection.
However, while offline, Cloud Sync (Settings > My Account > Cloud Sync will be temporarily paused.
This means you can work worry-free while traveling, during flights, or anywhere without Wi-Fi—and rest assured your updates will catch up once you're reconnected.
If you're noticing that your camera automatically adjusts to keep you centered while using Teleprompter.com, you're likely experiencing Center Stage—a built-in feature on some iPads and Macs from Apple.
This feature uses auto-tracking to pan and zoom the camera as you move.
To disable this feature, follow Apple’s official guide:
🔗 How to turn off Center Stage
Once turned off, the camera will remain static during your recordings and live streams, offering a more stable framing experience.
Have questions or need help? Contact us anytime at support@teleprompter.com or through Settings > Contact Support inside the app.
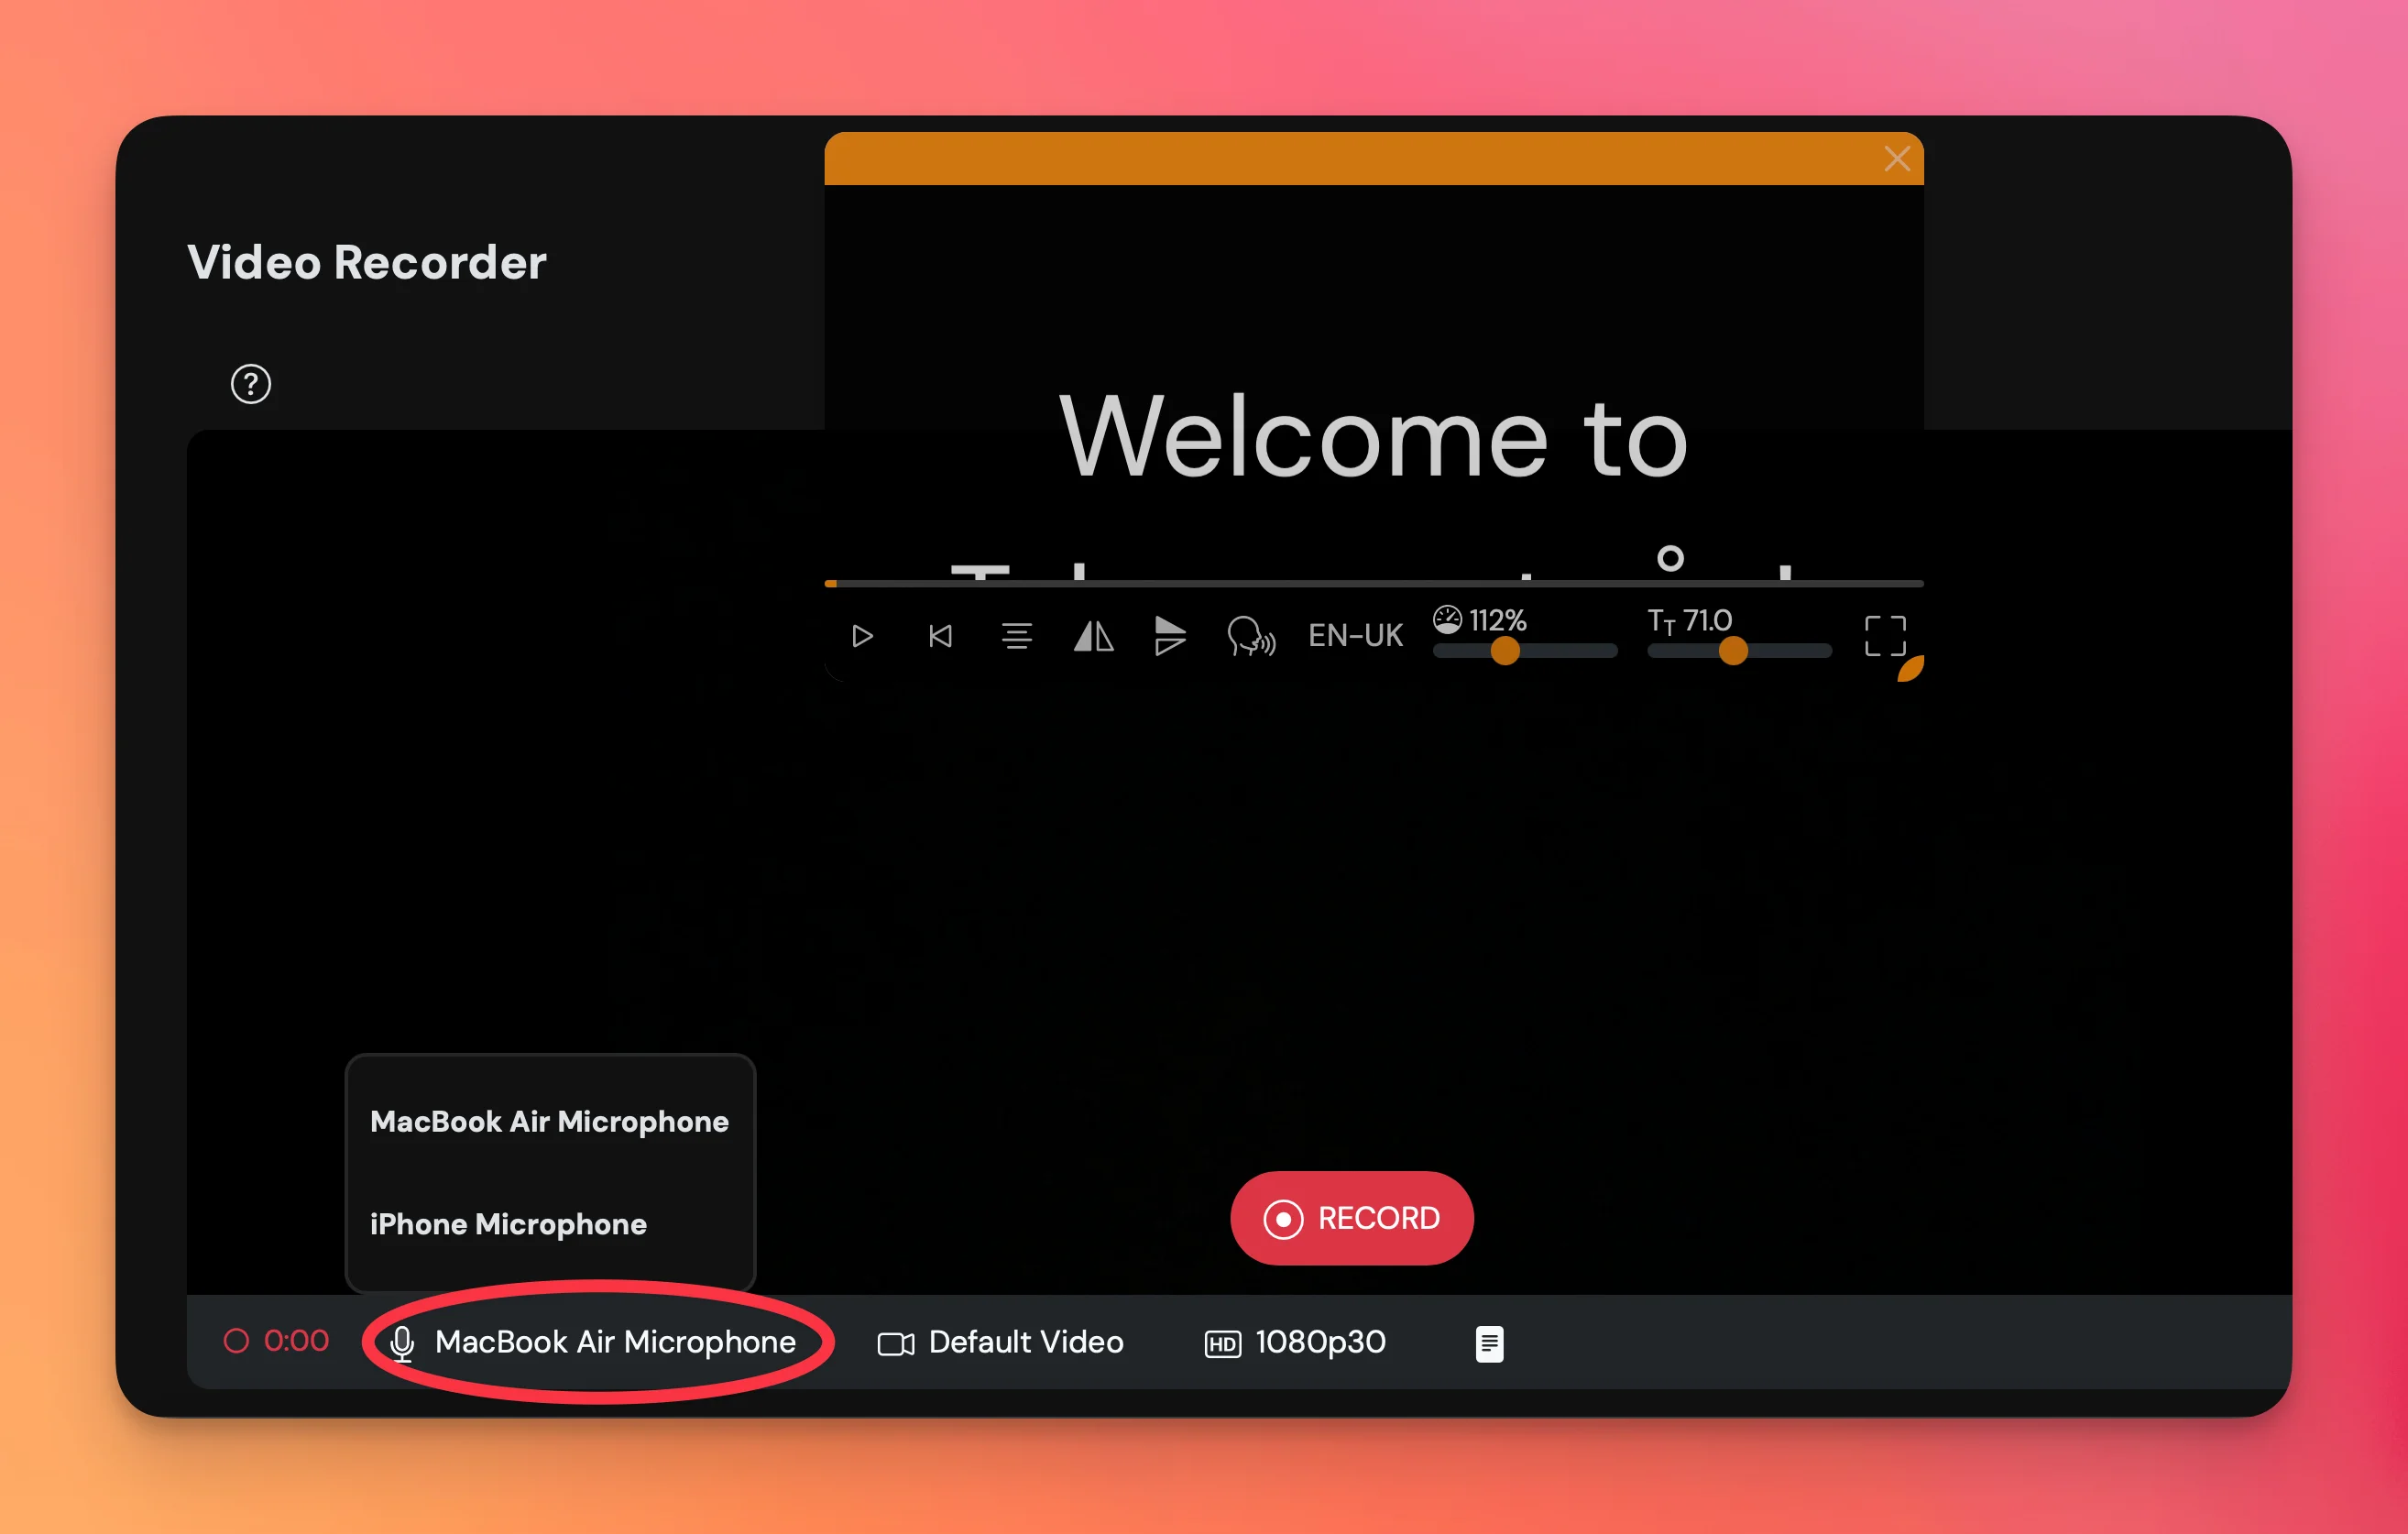
Want to use an external or Bluetooth microphone for better audio quality? Teleprompter.com allows you to choose from available mic options right from the recording screen.
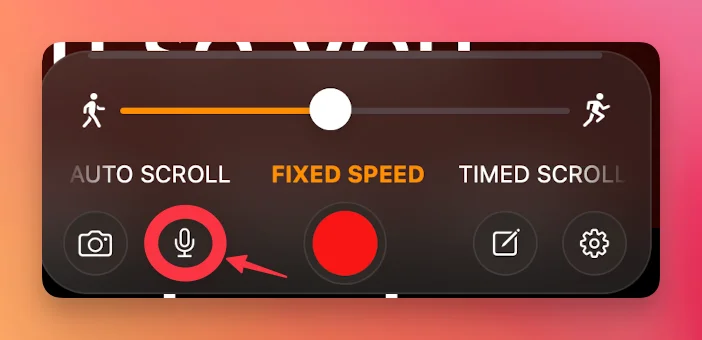
Make sure it’s properly connected to your device first:
Once connected, your Bluetooth mic will appear in the list of available audio sources within the app.
Still need help? Reach us at support@teleprompter.com or go to Settings > Contact Support in the app. We’re happy to assist!
Need to switch between your front and rear camera while recording? Teleprompter.com makes it easy to flip the camera even in the middle of your session—ideal for switching between presenter and product shots, or adjusting your setup on the fly.
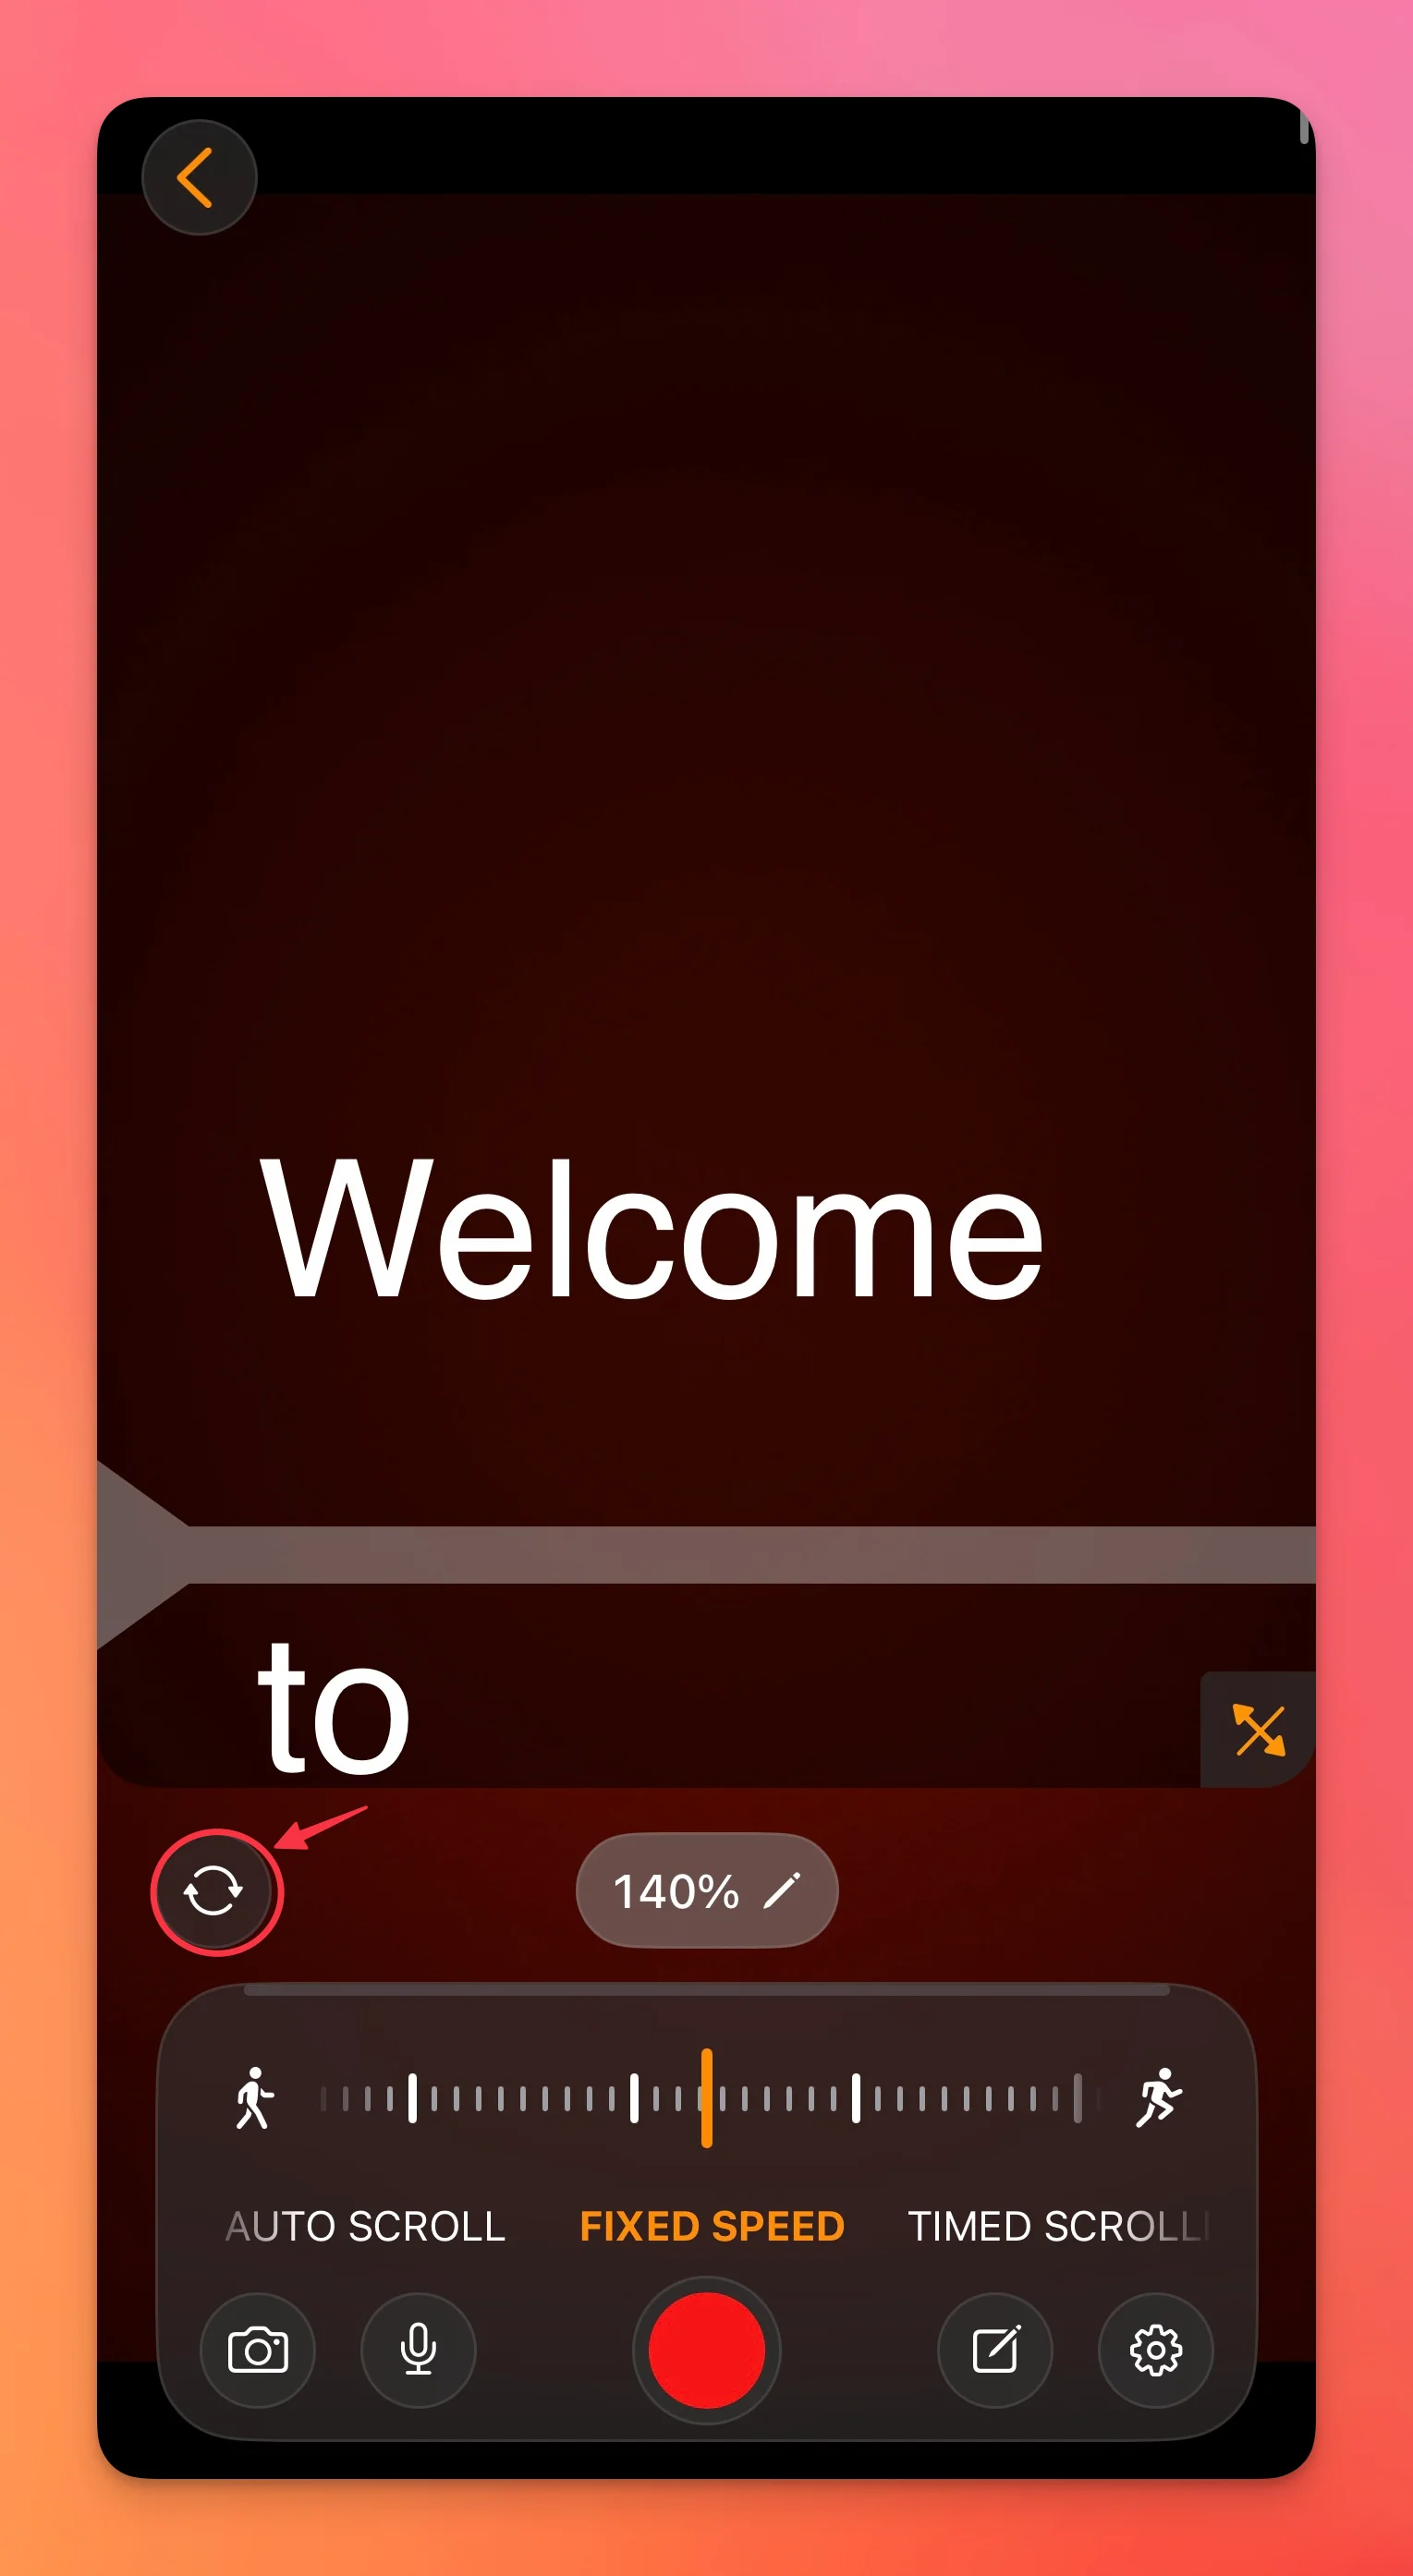
This feature works seamlessly, allowing you to stay in control without stopping the recording.
Getting the lighting just right can make all the difference in your recordings. With Teleprompter.com, you can easily adjust and lock exposure to ensure your subject looks perfectly lit.
Here’s how to do it:

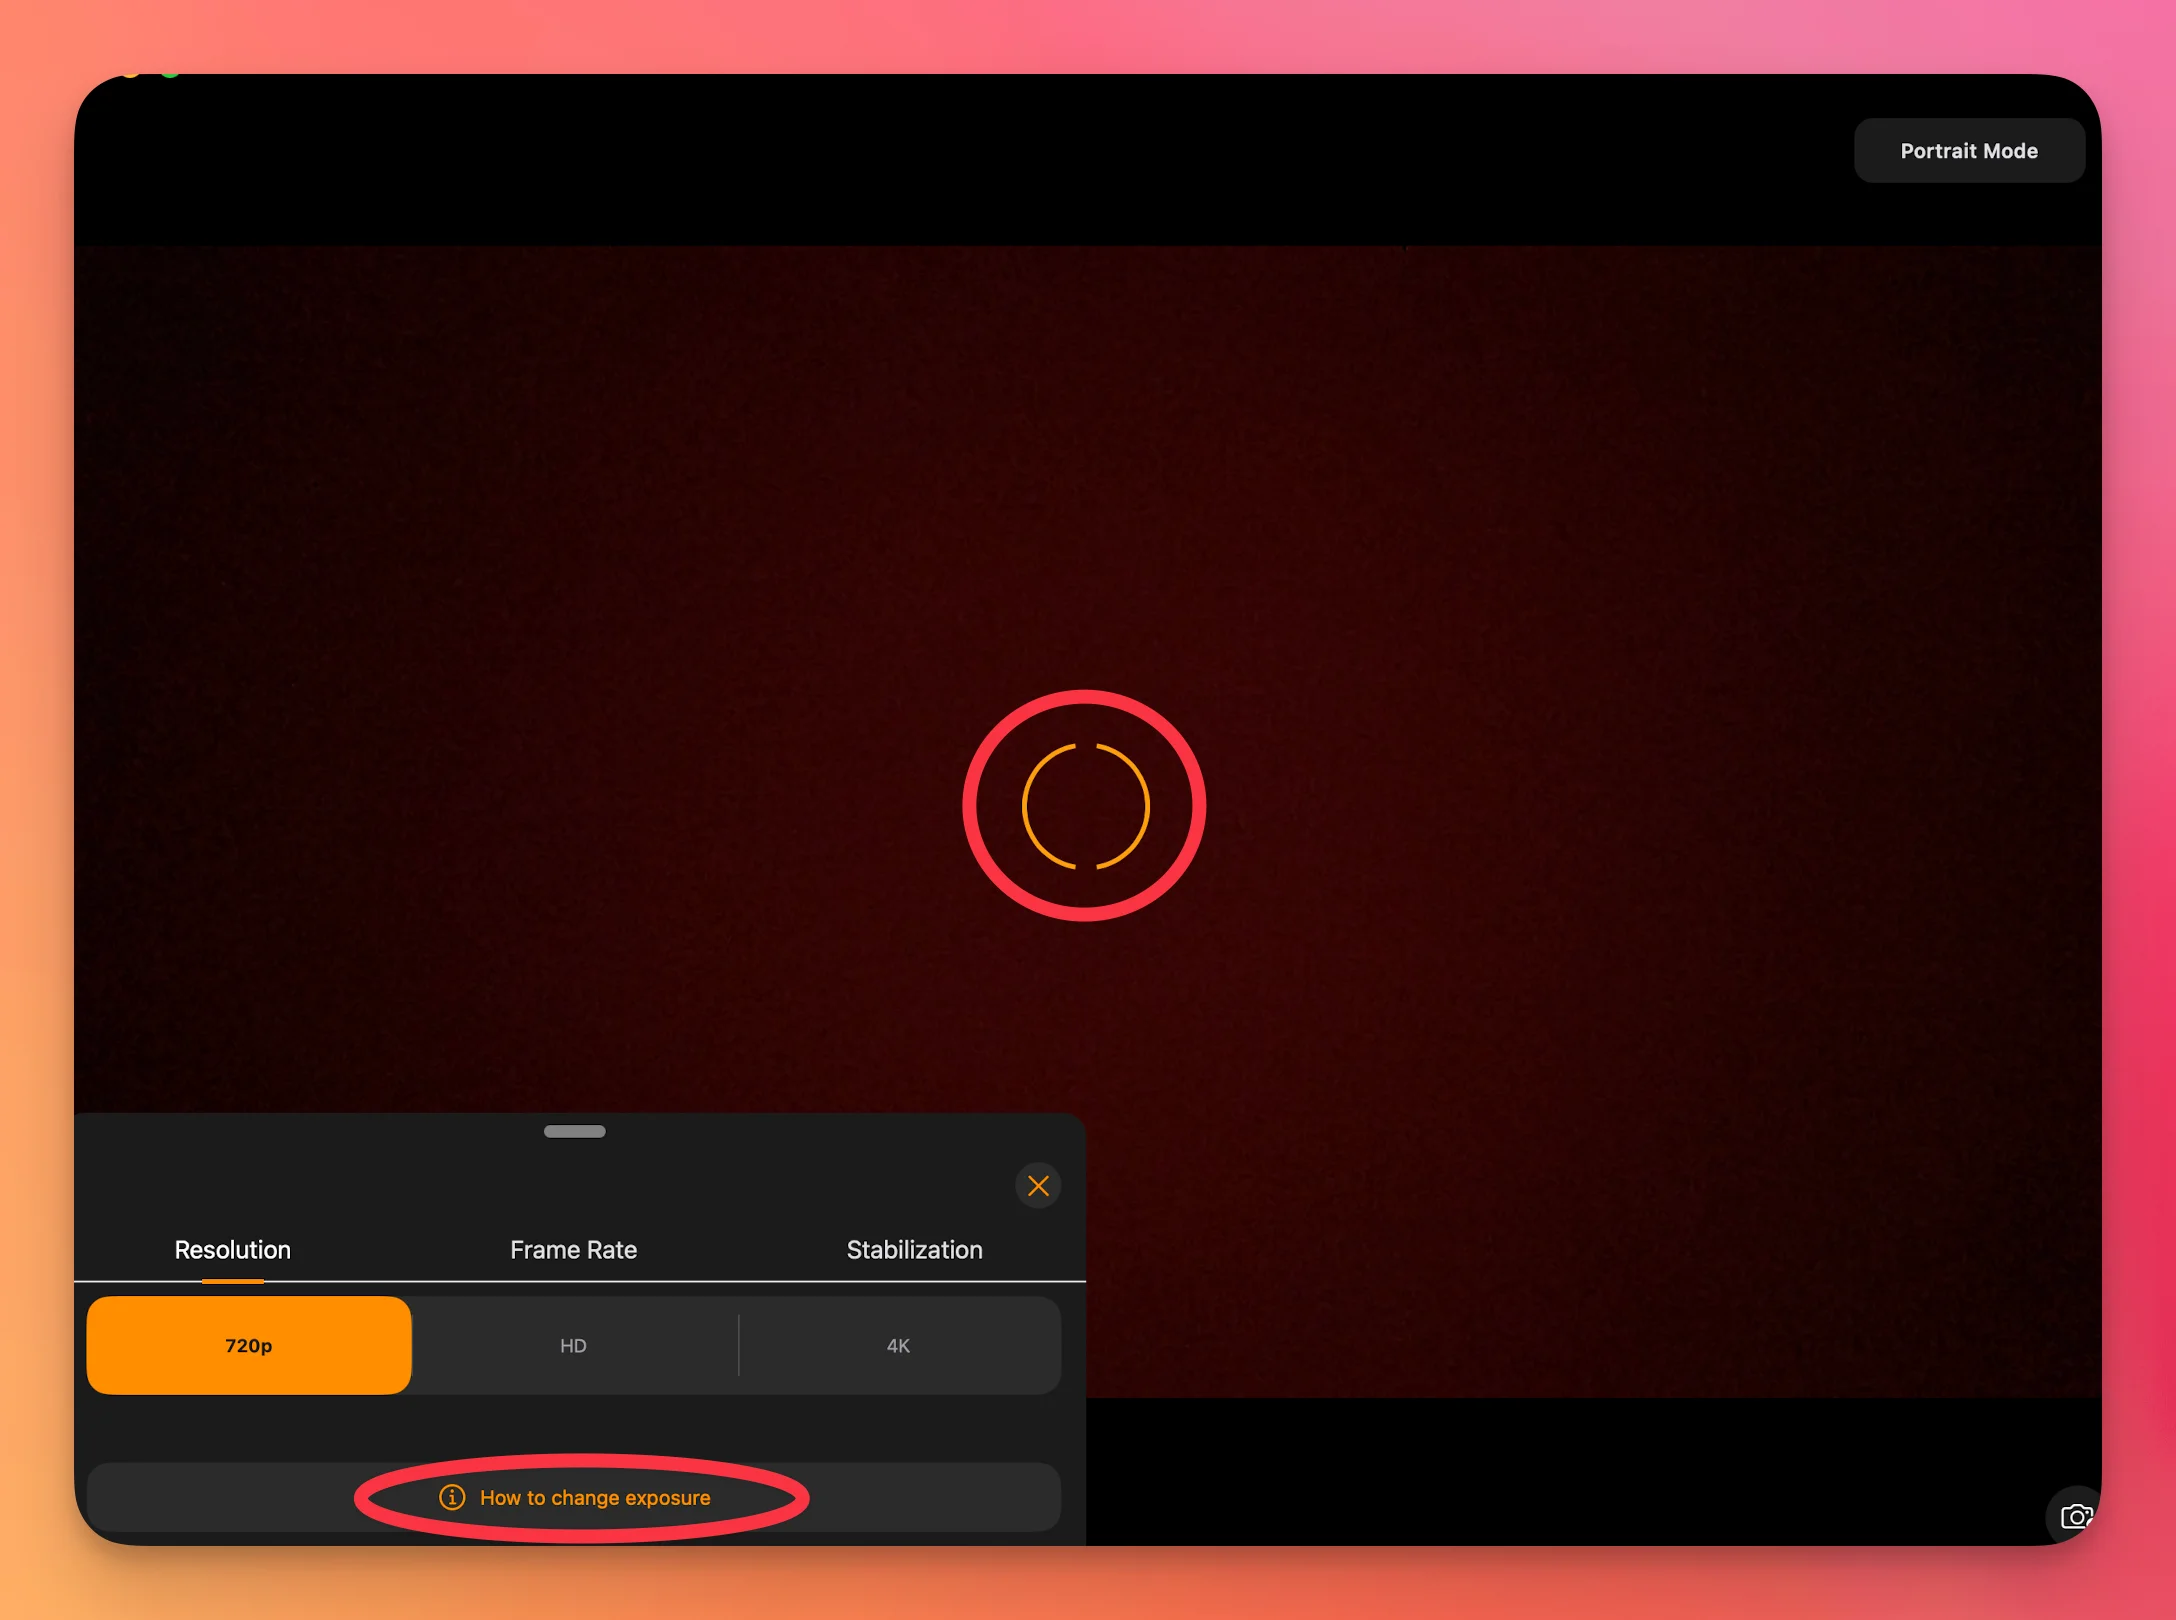
This gives you full flexibility over your video’s lighting, whether you’re working in natural light, under studio lights, or anything in between.
Forgot your password or having trouble signing in? Resetting your password on Teleprompter.com is quick and easy.
Follow these steps:
📌 Didn’t receive the link?
Your new password will help you securely access all features of your account again in no time.
Adjusting the font size can help you read your script more comfortably, whether you're standing far from the screen or using a smaller device. With Teleprompter.com, it's easy to customize the text size to fit your needs.
Here’s how to do it:


Use that control to adjust the font size live as you prepare or record
Customizing your script’s appearance can make it easier to read and better suited to your lighting or recording environment. The Teleprompter app lets you adjust both text color (the entire text) and background color, and even offers pre-made themes.
To change the colors:
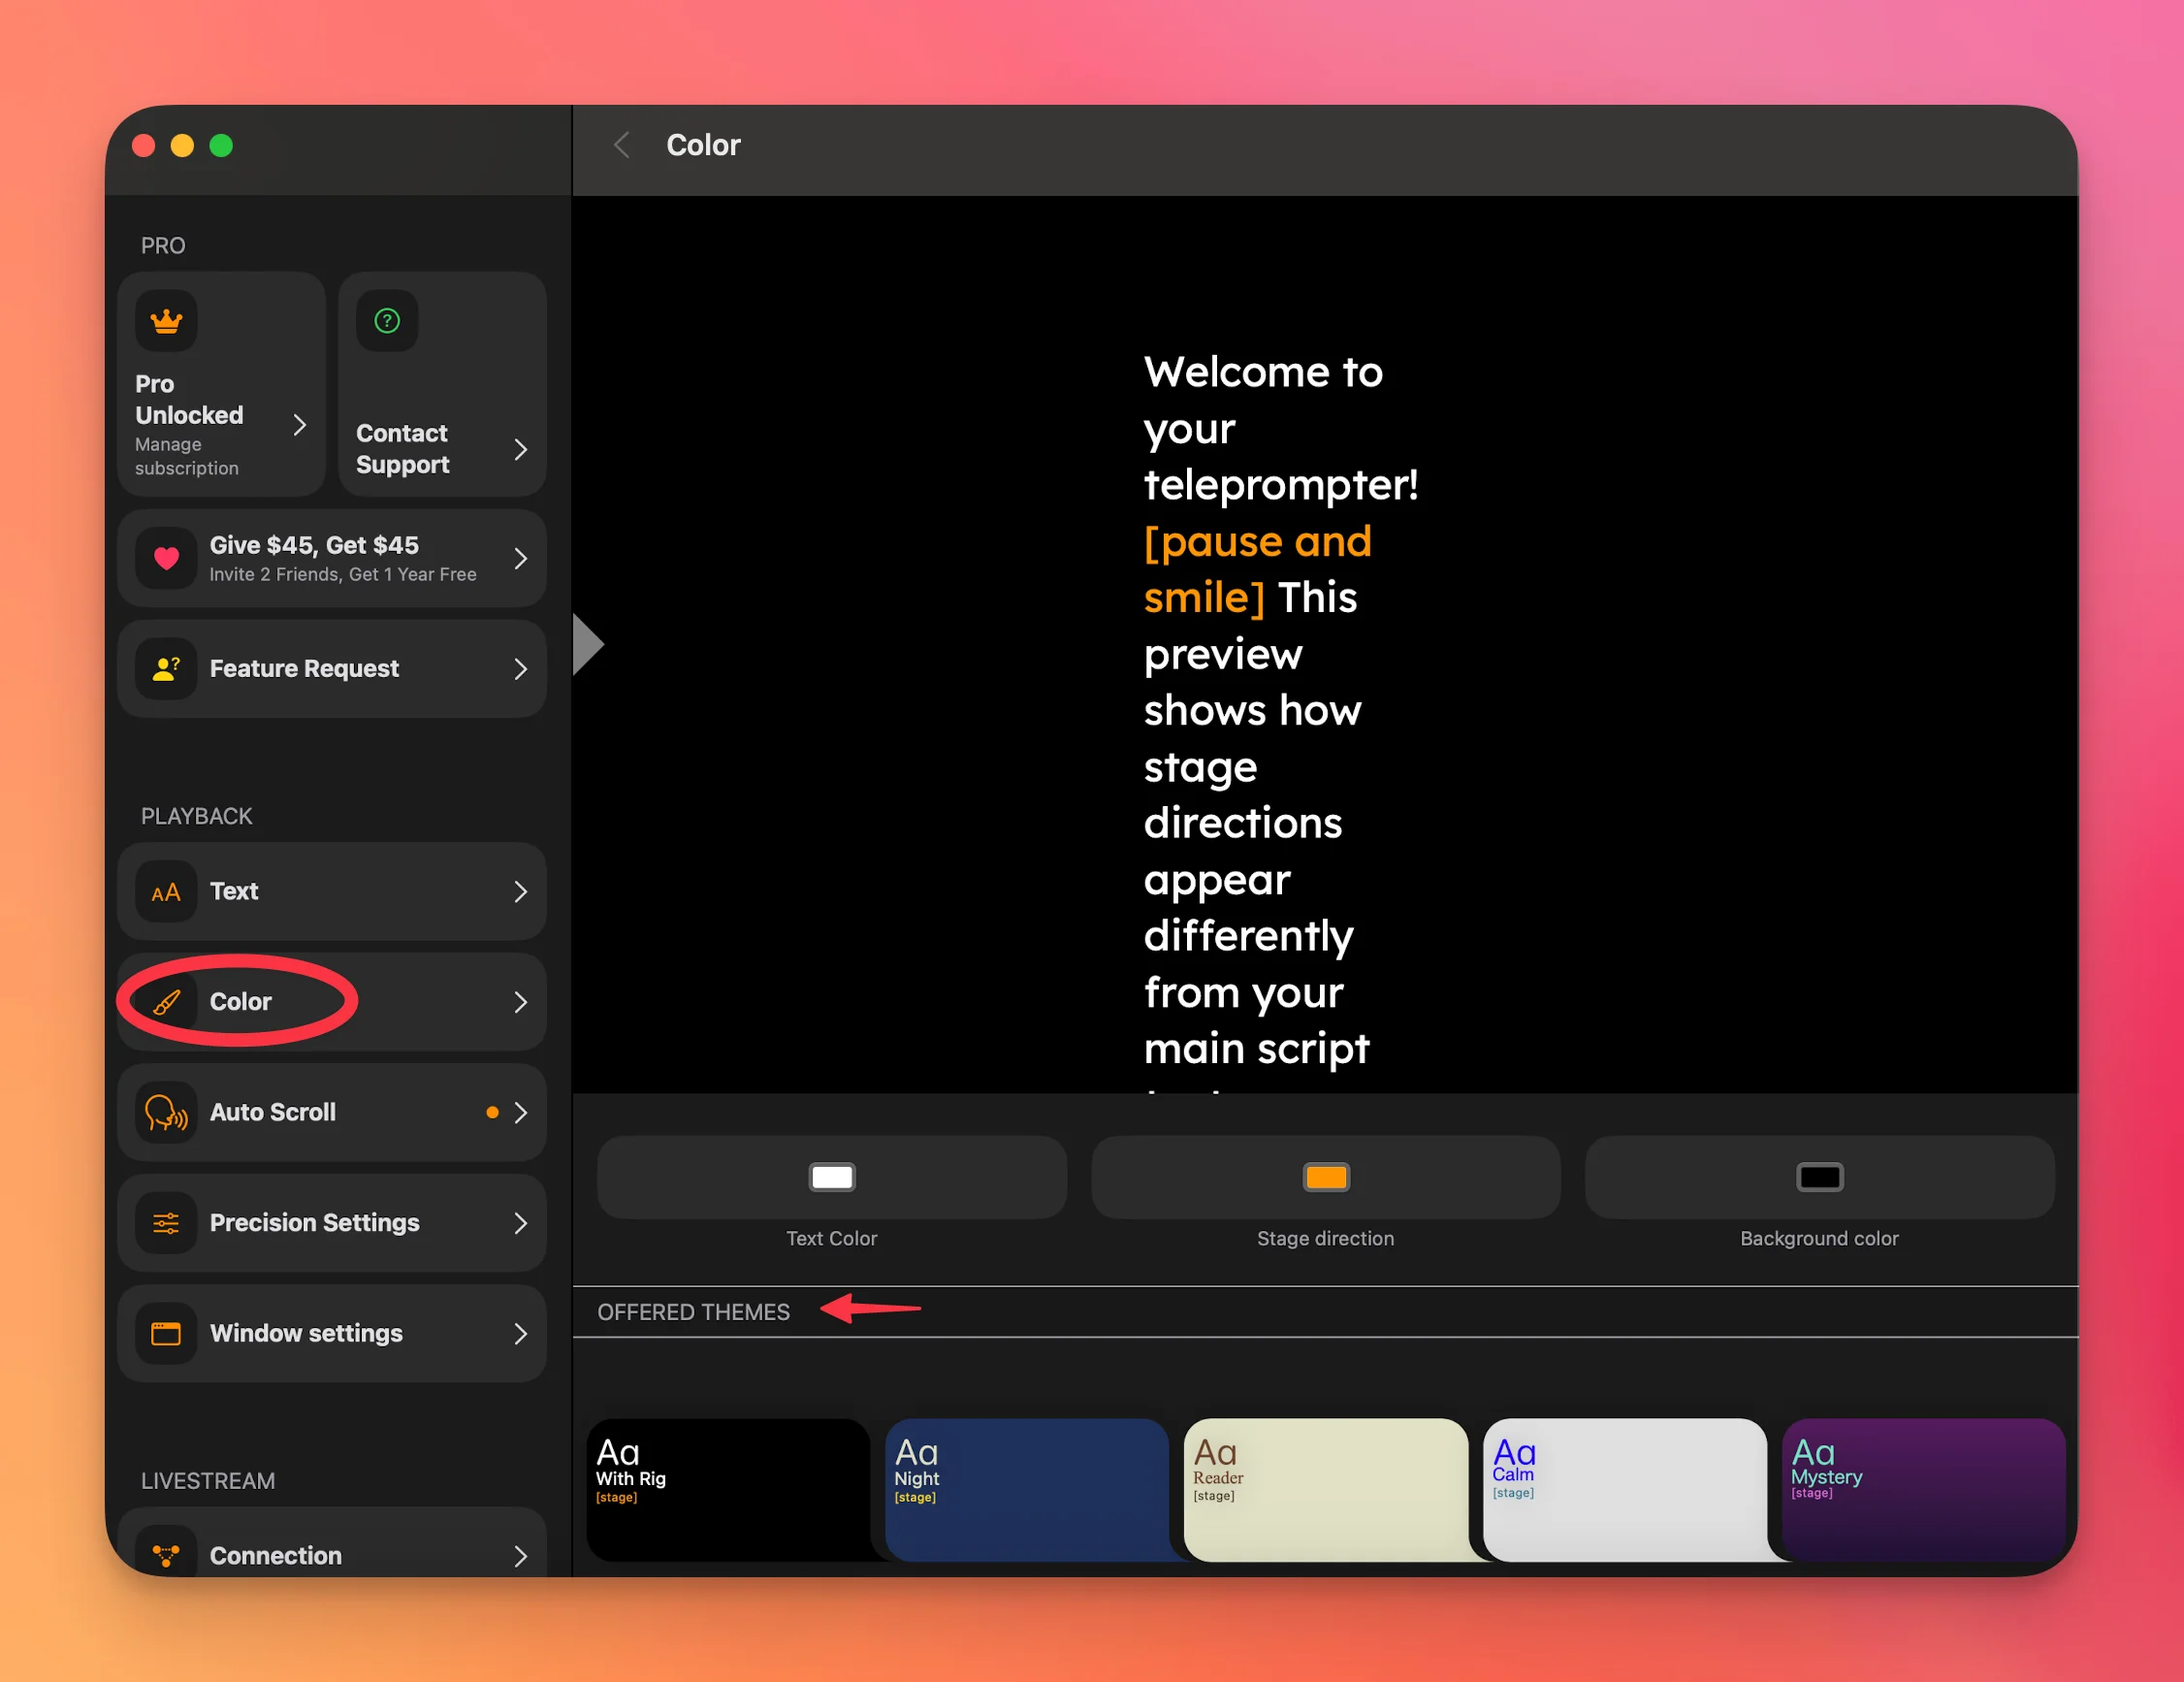
You can also explore different color themes available in the same menu if you want a quick setup with coordinated colors.
The Cue Indicator is a helpful visual guide that shows you exactly where you are in the script as it scrolls. It’s perfect for keeping your eyes aligned and improving the flow of your delivery.
To enable and customize the cue indicator:
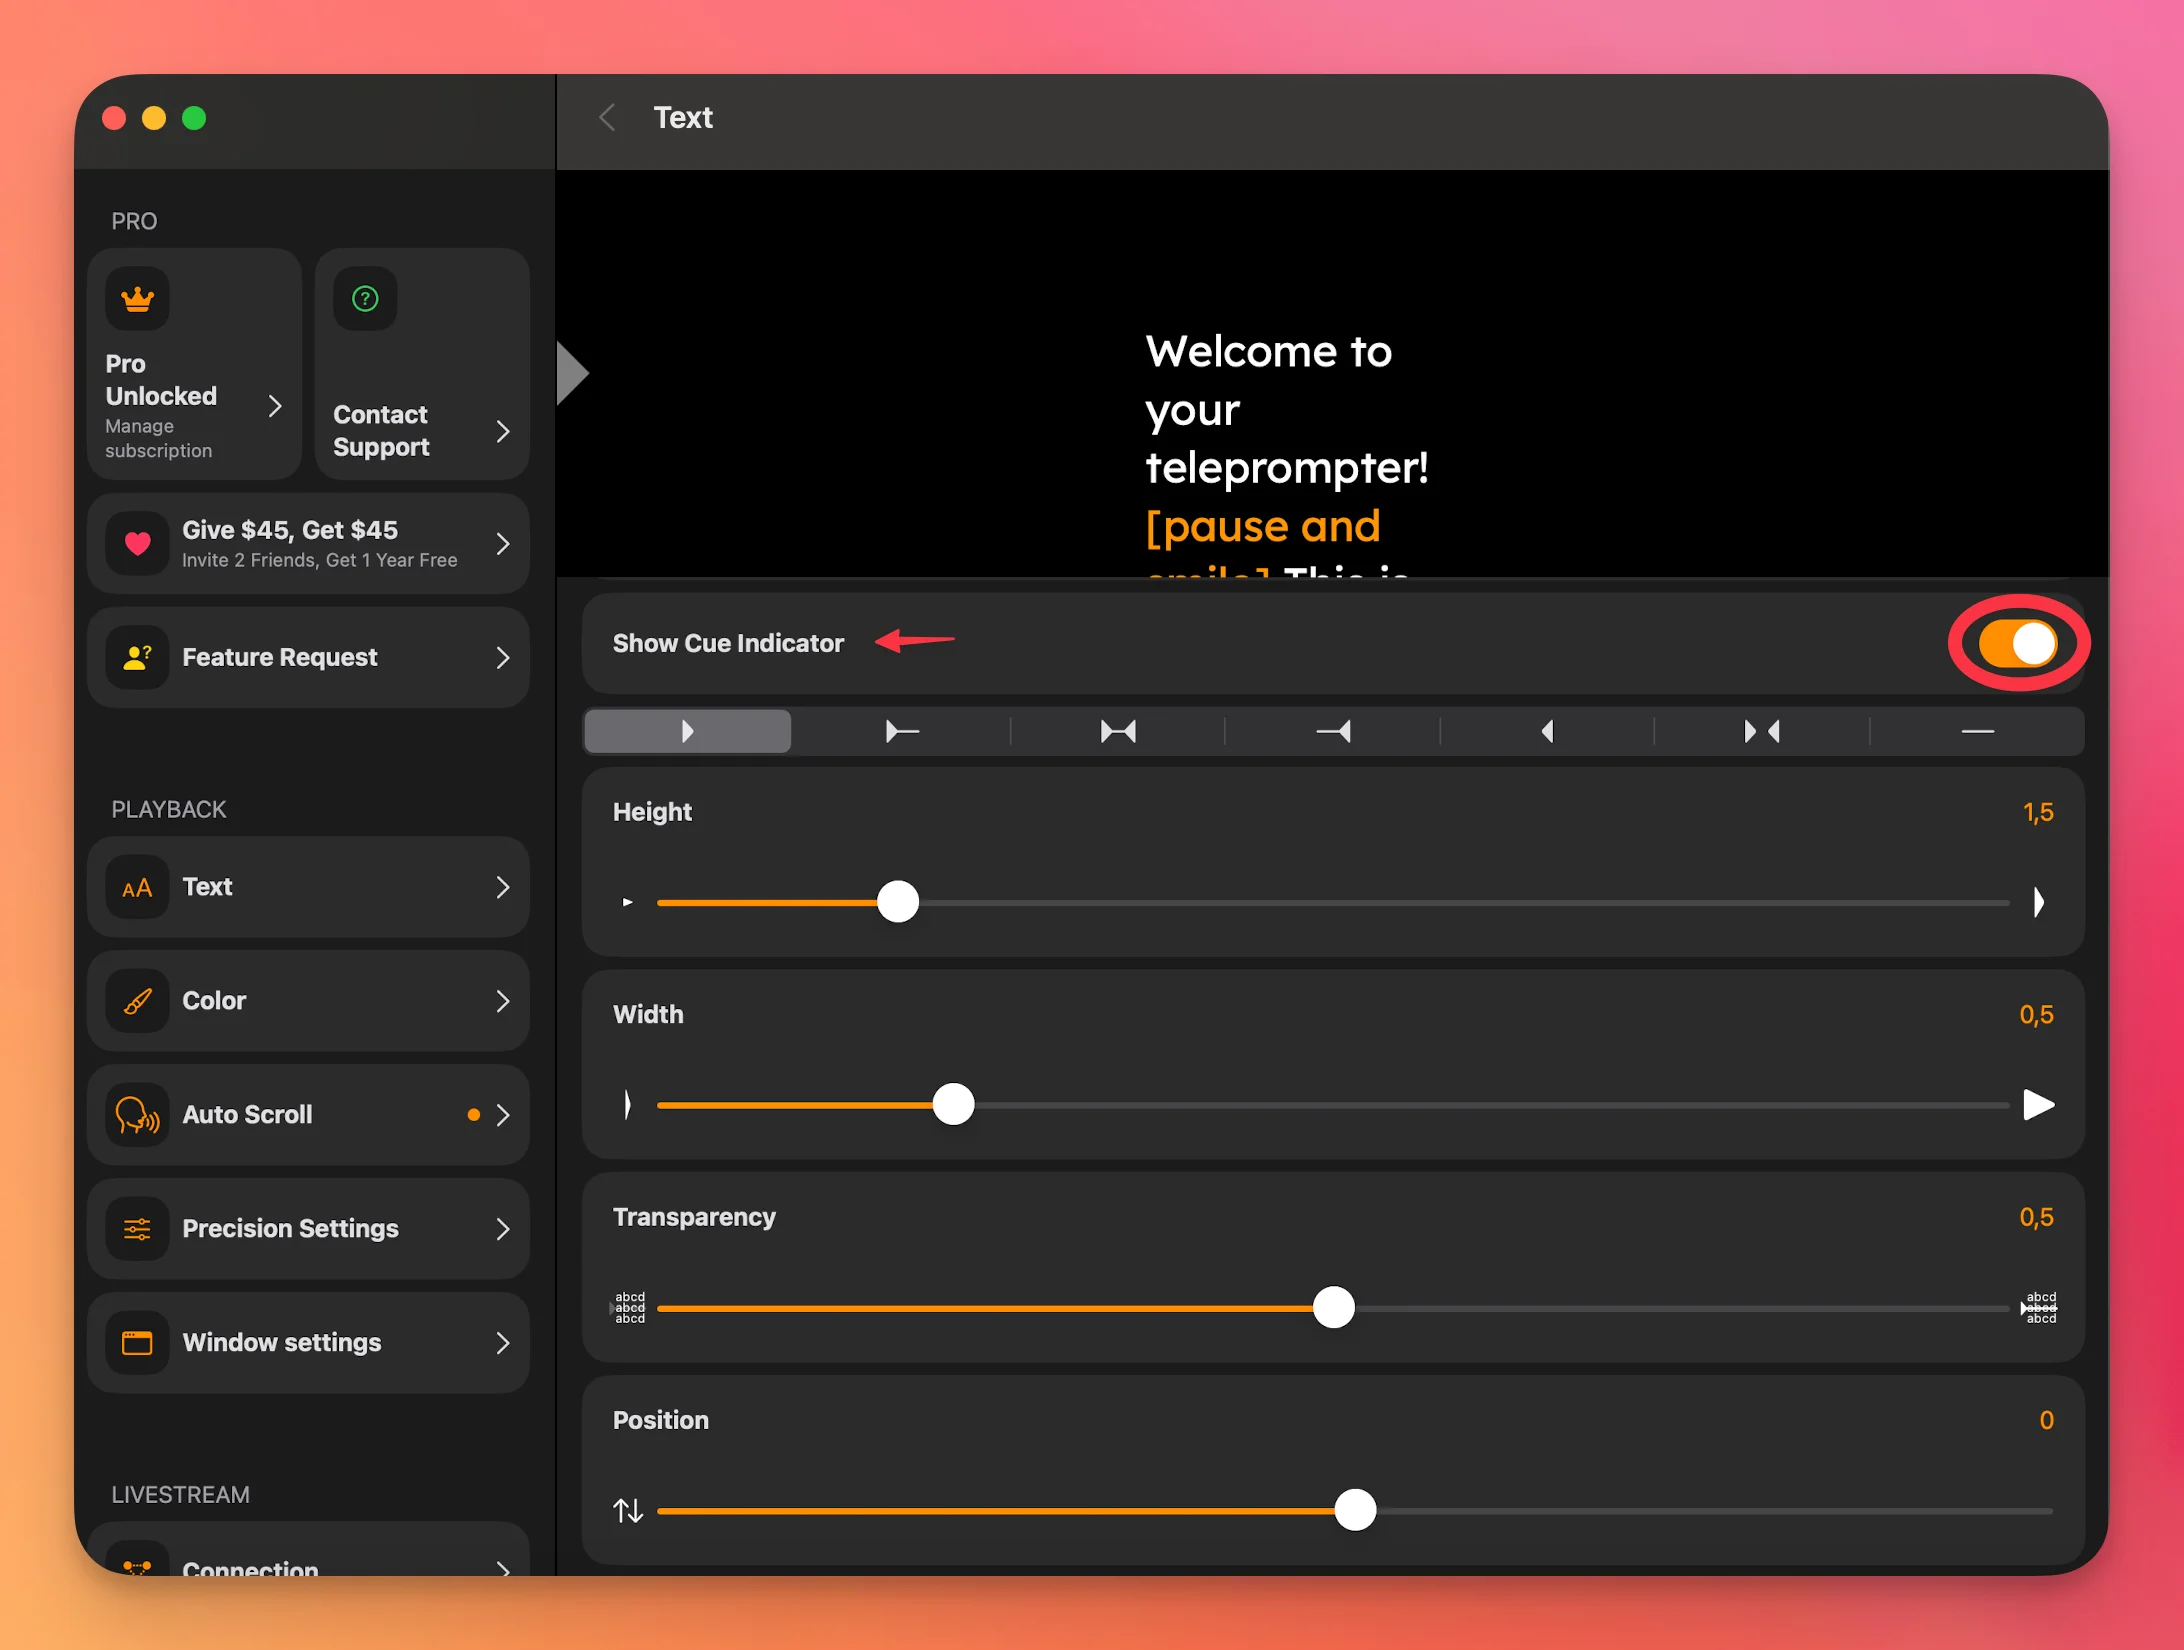
Once enabled, you can personalize it even further on the same screen by adjusting (Cue customization is currently available only for iOS/macOS at the moment).
These options allow you to make the cue indicator fit your preferences and recording setup.
Still have questions? We’re here to help—reach out to support@teleprompter.com or use Settings > Contact Support inside the app.
Adjusting line spacing can greatly improve readability, especially if you prefer more space between lines for a smoother reading flow.
To customize the line spacing:
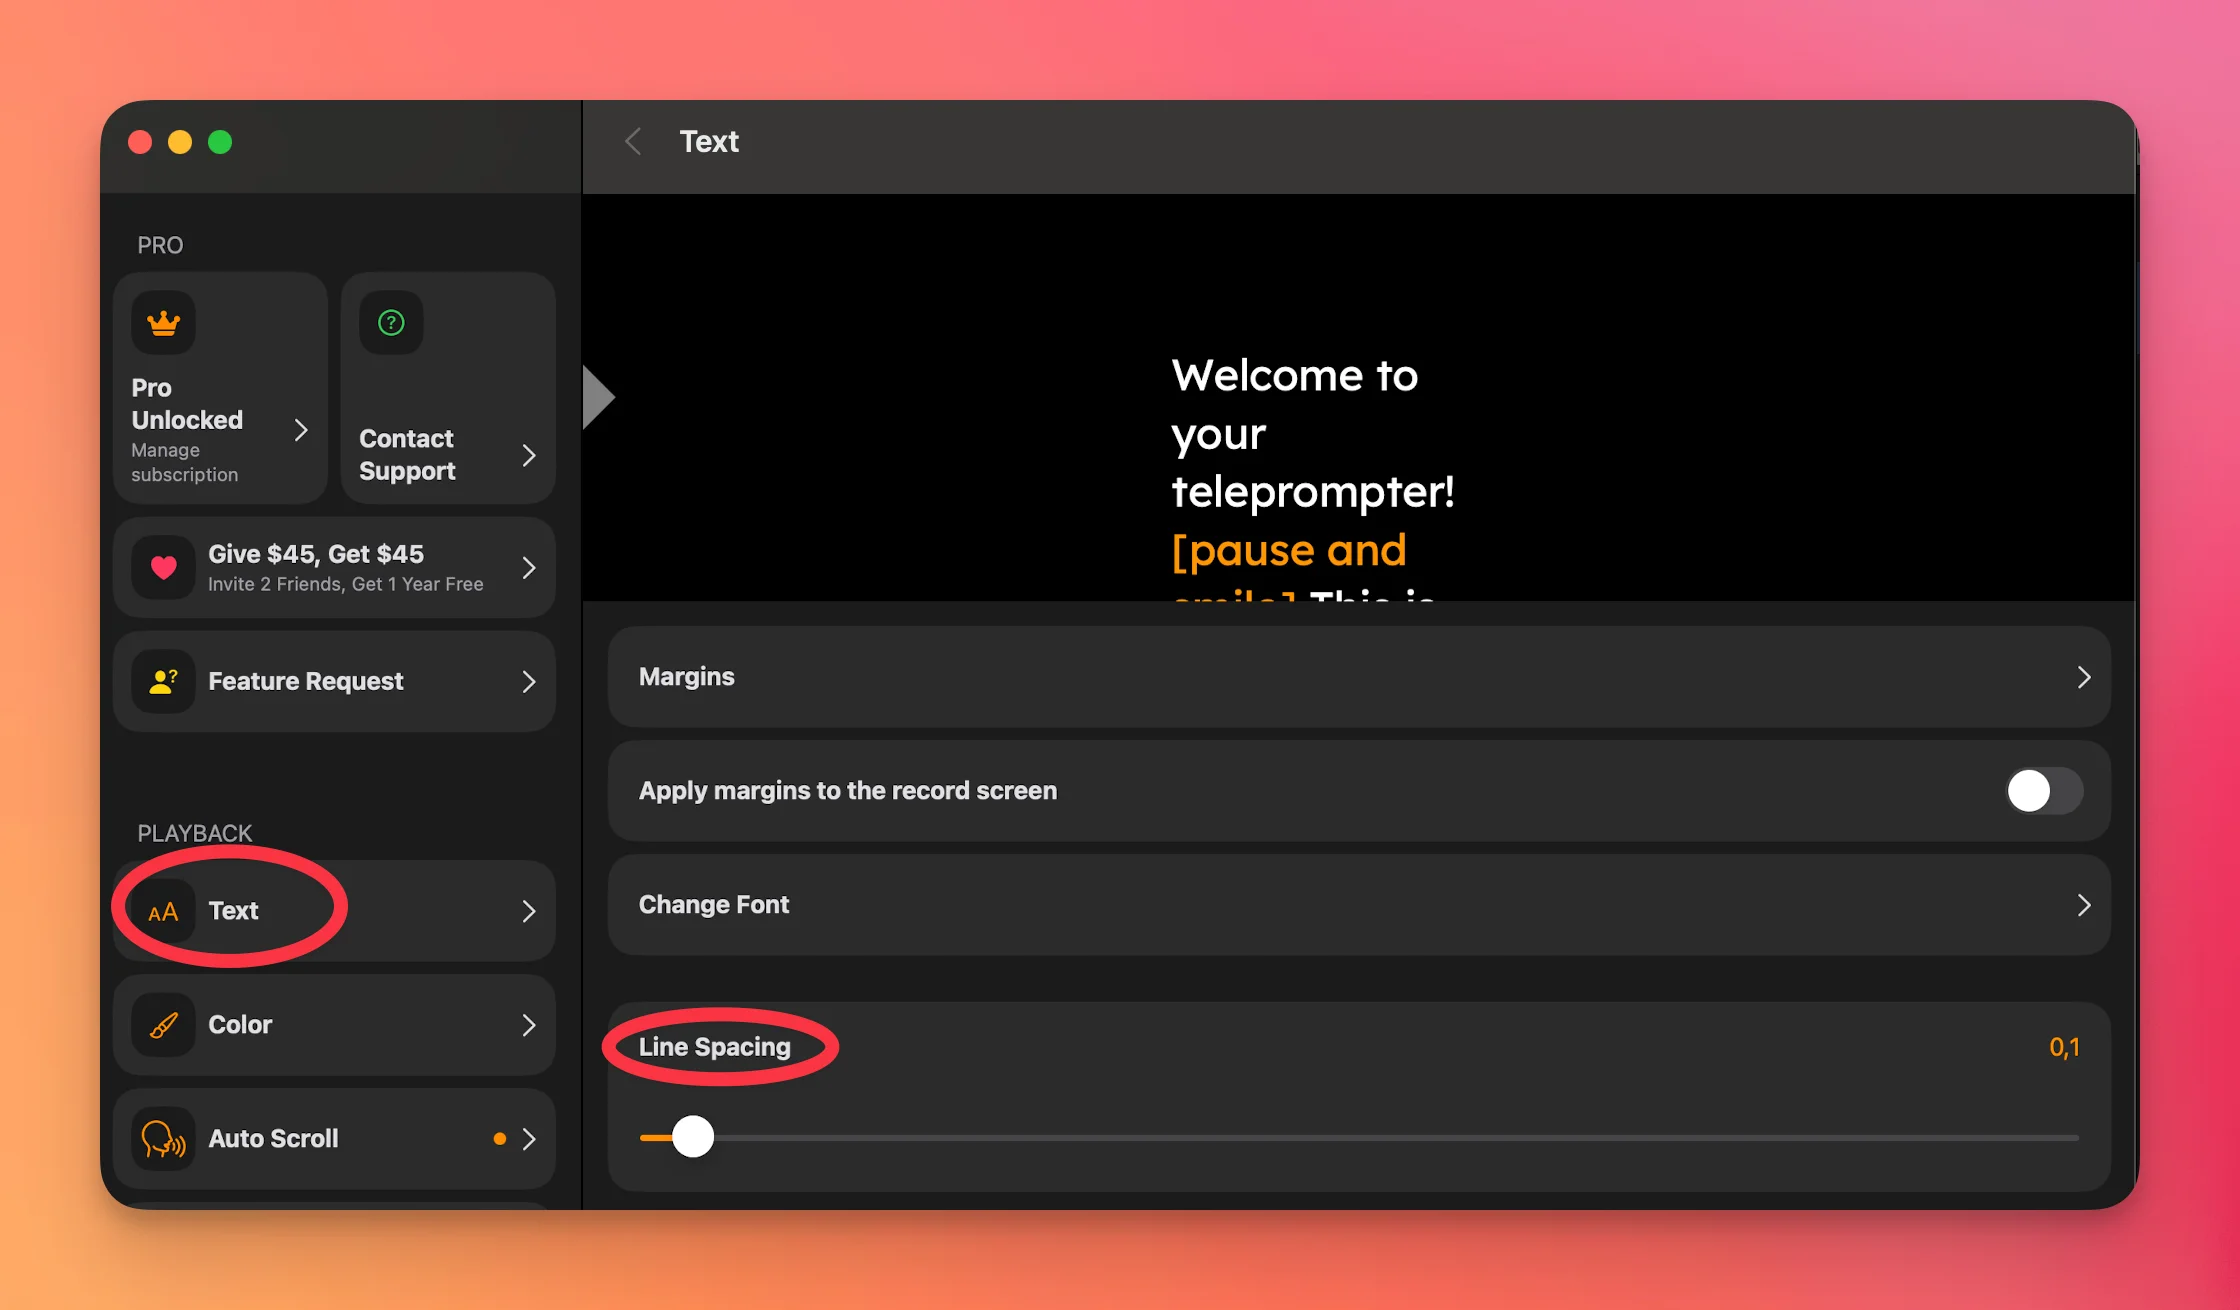
This lets you tailor your script's appearance to your personal comfort, whether you're reading from a distance or using a smaller screen.
Need more assistance? Contact us at support@teleprompter.com or go to Settings > Contact Support in the app.
Adjusting text margins can help you improve readability and control how the script appears on your screen—especially useful for different recording setups.
To edit the margins:


You’ll now be able to drag the left or right side of the text to set your preferred margin width.
If you want these margins to apply during recording as well:

This ensures your layout remains consistent and exactly how you want it while filming.
Still need help? Reach out to us at support@teleprompter.com or through Settings > Contact Support in the app.
Choosing the right font can make reading your script much easier and more comfortable. The Teleprompter app lets you customize the font style and even enables fonts designed to improve readability.
To change the font:

If you have difficulty reading standard fonts, you can also activate accessibility-friendly options:

These fonts are designed to support users with dyslexia or visual processing challenges, helping make your teleprompting experience more inclusive.
Need more help? Contact us at support@teleprompter.com or go to Settings > Contact Support in the app.
Want to keep track of how far you are into your script while recording or presenting? The Progress Bar is a simple visual cue that shows your position in the script, helping you pace yourself and stay focused.
To enable the progress bar:
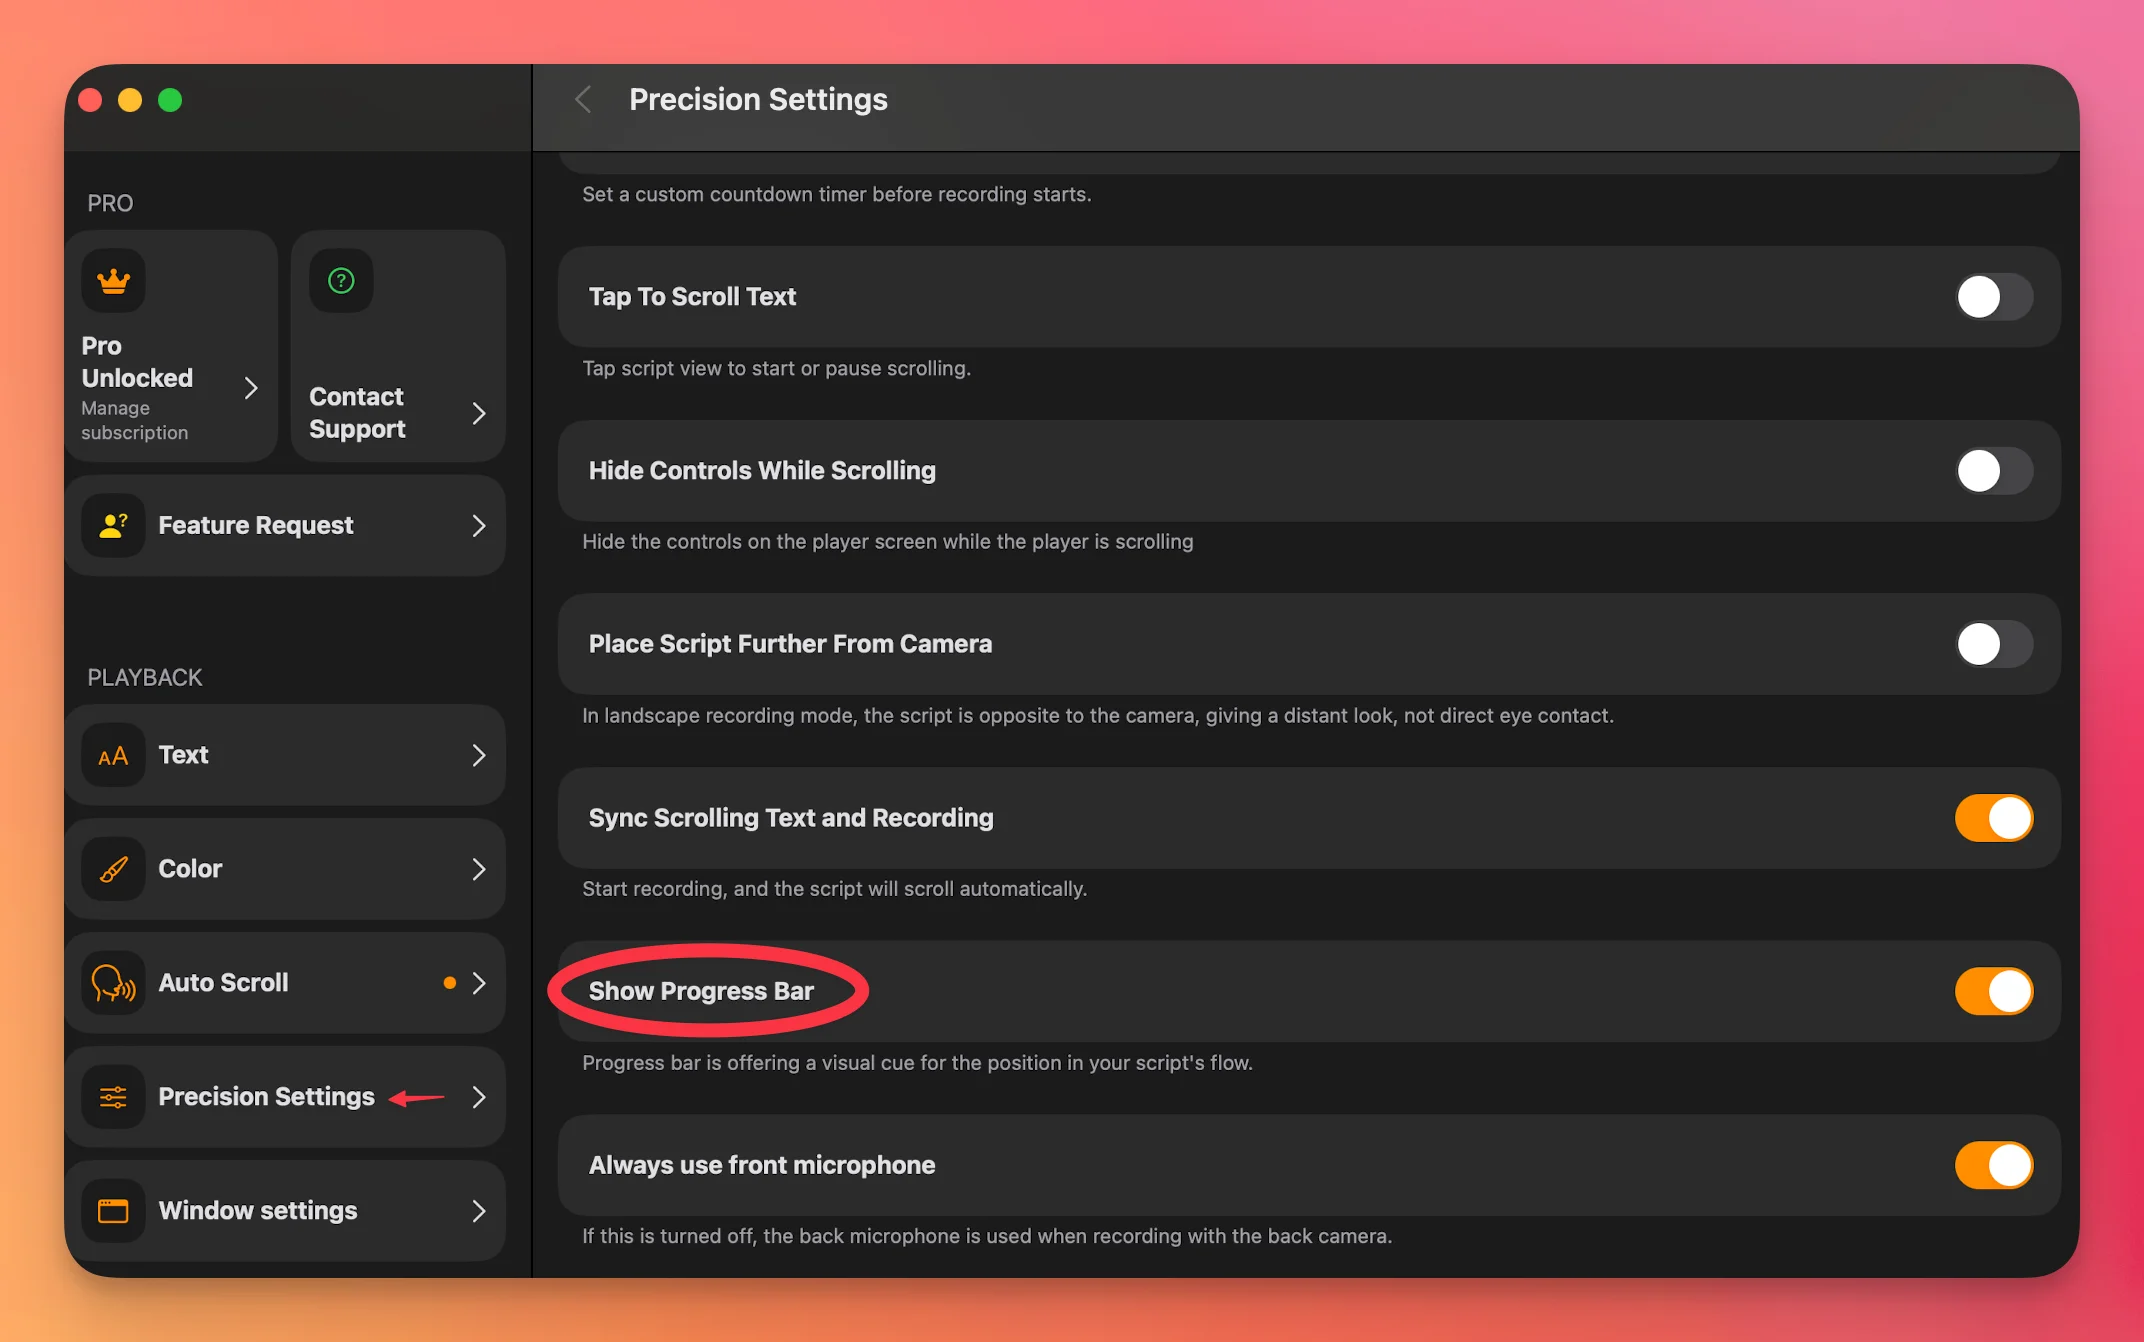
Once enabled, the progress bar will appear on your screen as your script scrolls, giving you a clear sense of how much content you have left.
If you prefer not to look directly into the camera or want a more distant gaze during landscape recordings, you can use the Place Script Further from Camera option. This shifts the script to the opposite side of the screen, creating a more natural eye-line for certain recording styles.
Here’s how to enable it:

This feature is especially useful in landscape recording mode, where the script will appear opposite to the camera, resulting in a subtle off-camera look.
Still need assistance? Reach out at support@teleprompter.com or go to Settings > Contact Support inside the app.
Changing the window transparency is available only for macOS version
Want to see your screen or video call behind the script while reading from the teleprompter? Adjusting the transparency of the scrolling window is a great way to keep your content visible while staying on track with your script.
Here’s how to make the scrolling window transparent in the Teleprompter.com app for macOS:
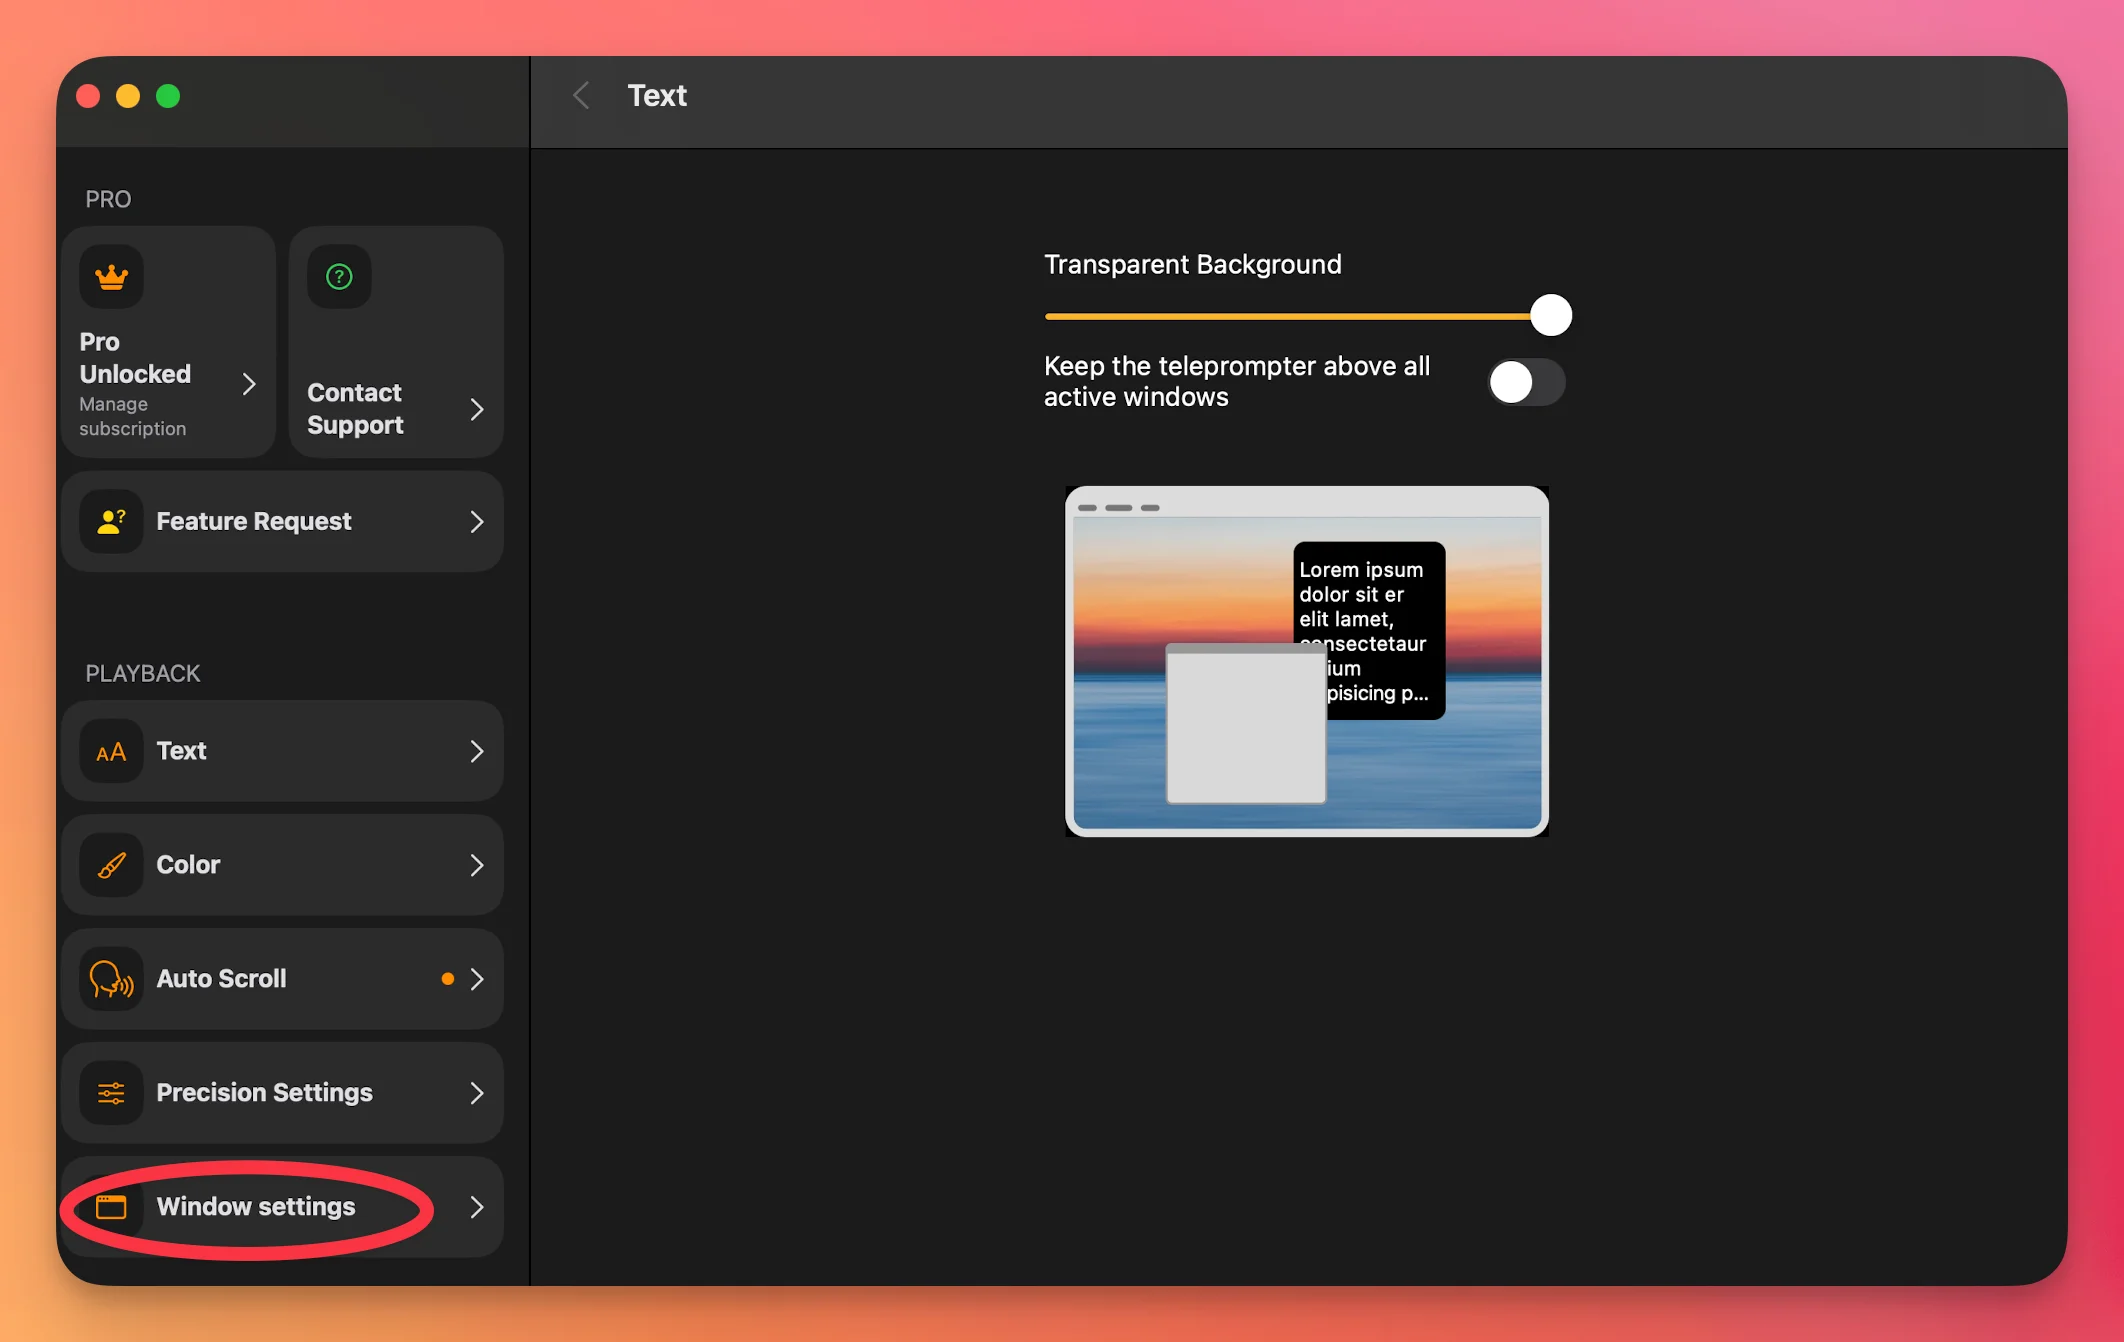
This feature is especially useful if you're using the app during virtual meetings or recordings and want to maintain eye contact while still being able to read your lines.
Importing your script into the Teleprompter.com app is quick and simple! Whether you're using the iOS or Android version, the process is nearly the same.
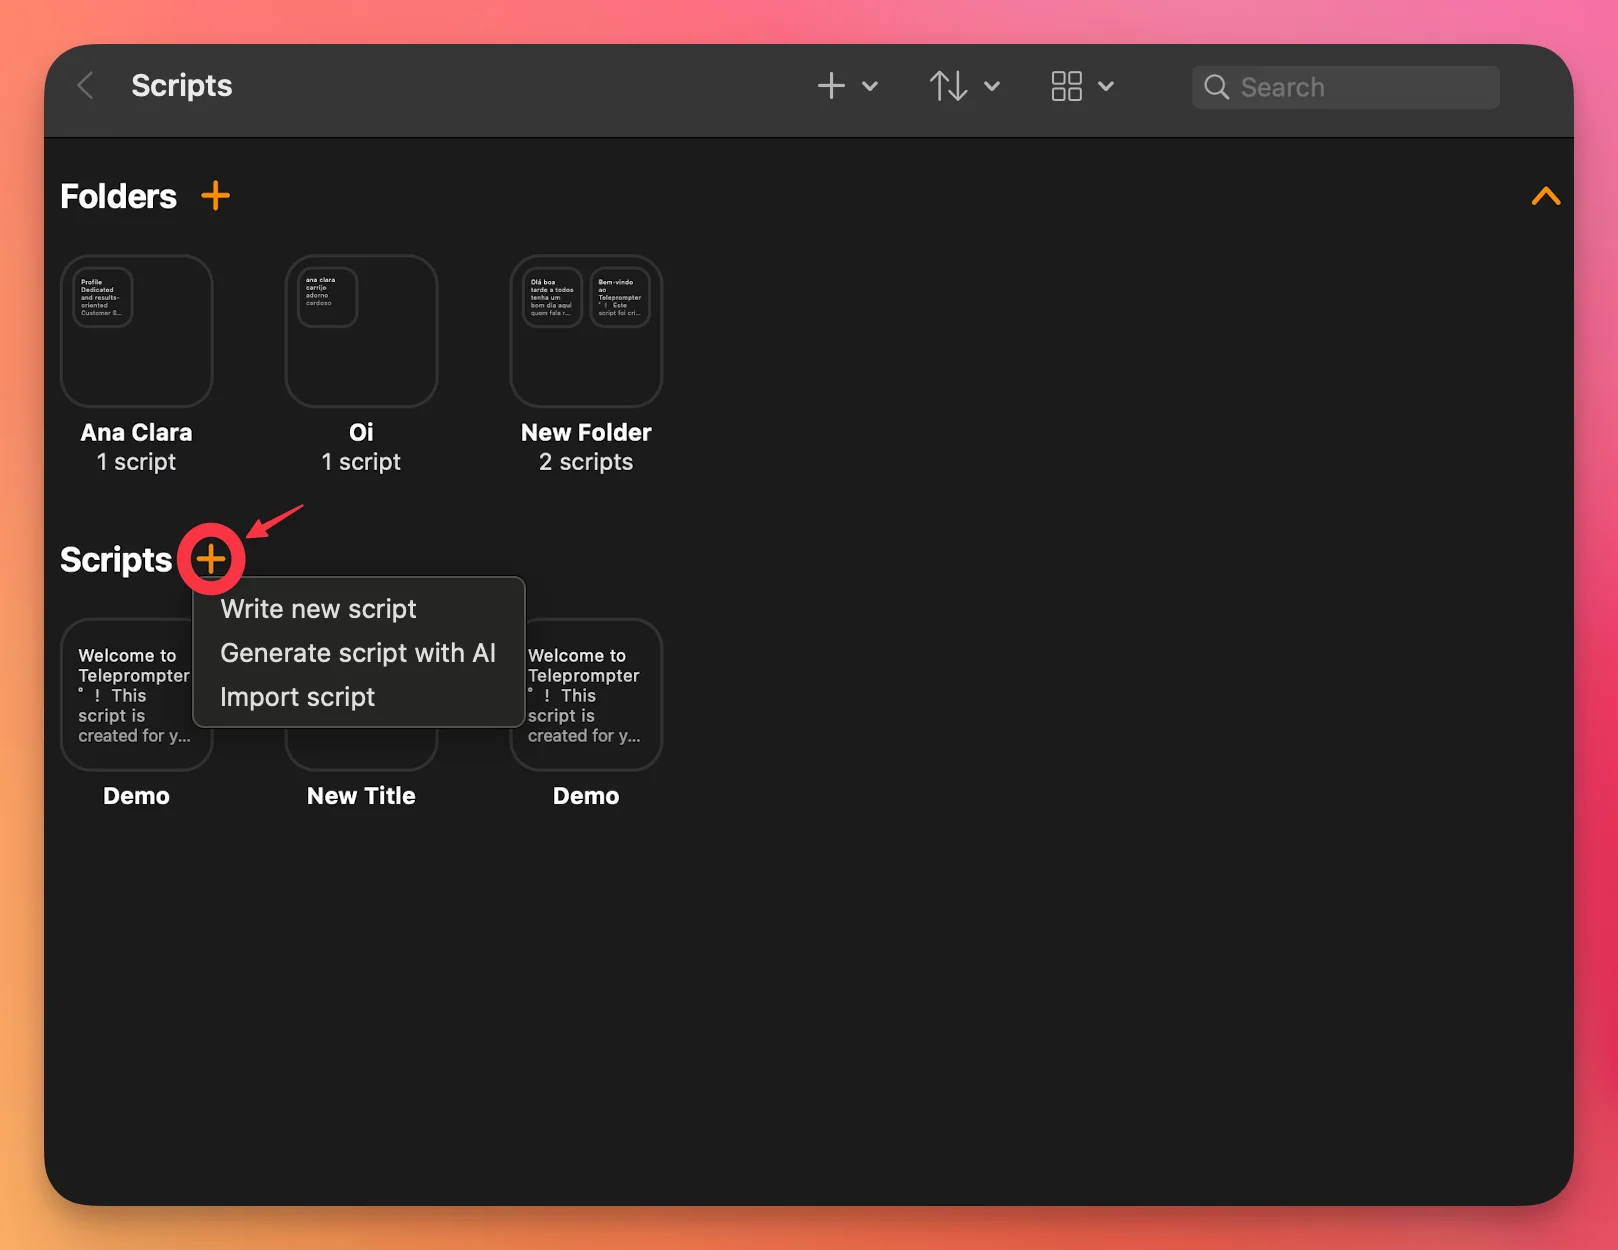
If you're using Teleprompter.com app on a Mac, you can also drag and drop your script file directly into the Scripts panel. It’s a fast and convenient way to upload documents without browsing through folders.

You’ll see three options for creating or importing a script:
.txt, .docx, and .pdf.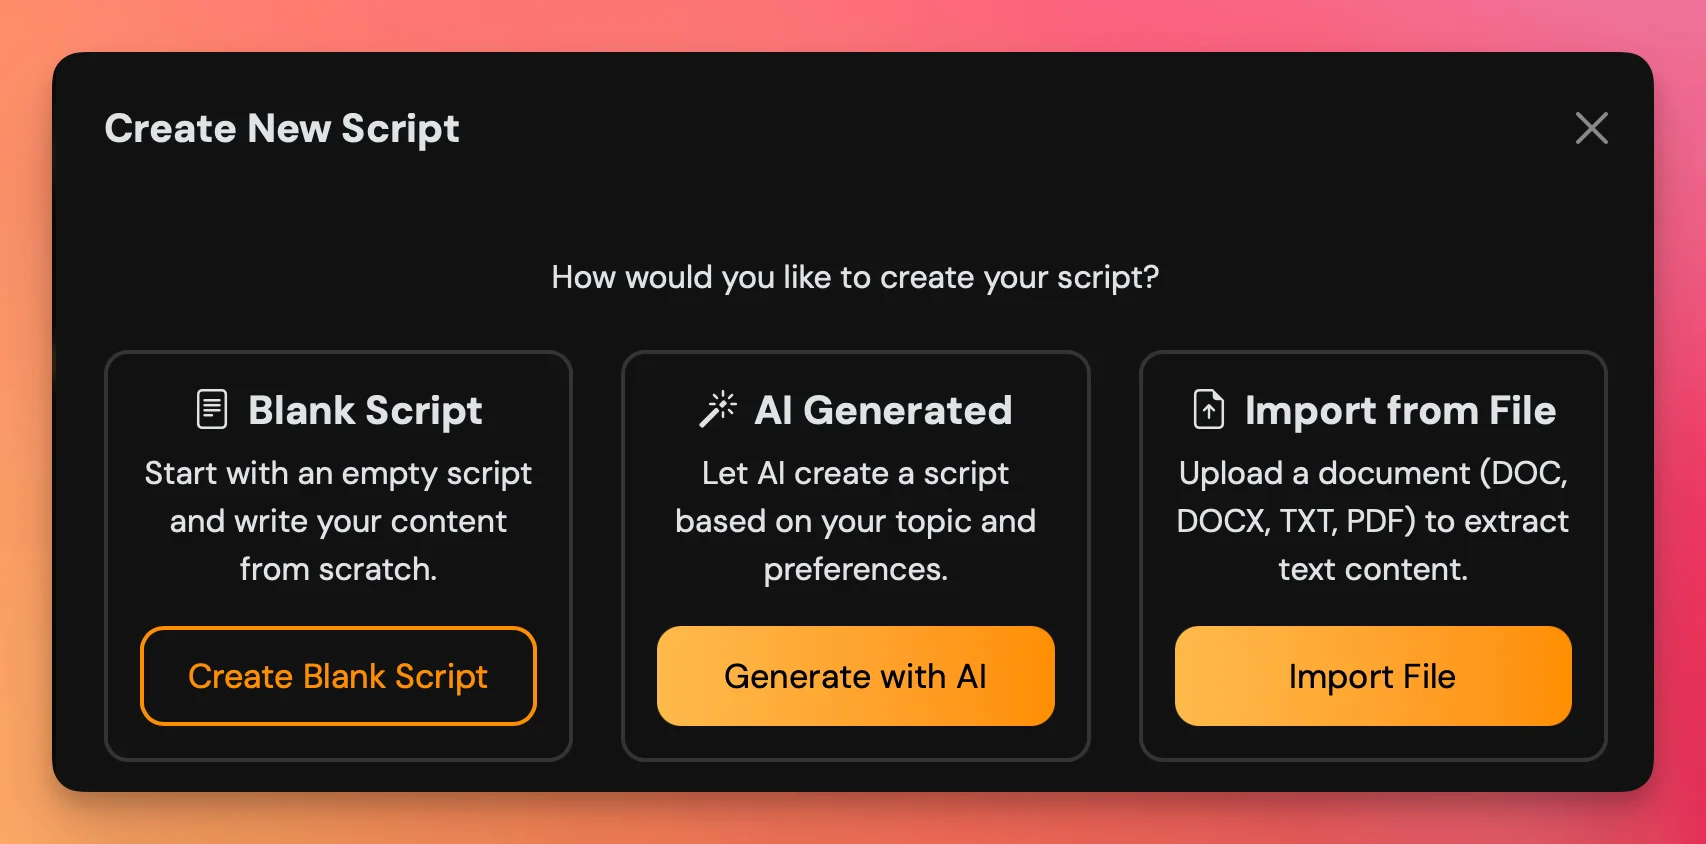
You can easily import scripts into the Teleprompter.com app from Google Drive, Dropbox, and other sources that integrate with the iOS Files app or Android’s file system. Here’s how to enable access and import your files step by step:
Note: The "Edit" option only appears under the "More" menu when you're at the root level of the Browse tab. If you're inside a folder, it won’t show.
You can now access files from these sources directly within the Files browser, including when importing scripts in Teleprompter.com.
Need help importing your files? Reach out anytime at support@teleprompter.com or go to Settings > Contact Support in the app. We're here to assist!
If you’re having trouble syncing your scripts across devices (iOS, macOS, Android, and web), please follow these steps to make sure you’re signed in to the same Teleprompter.com account on all platforms:
1. Check Account Email: Confirm that you are logged into the same account on all your devices by comparing the email addresses in the account settings. If you find that different accounts are used, you will need to align them.
2. Switch Accounts if Necessary: If you are logged in with different accounts, sign out from the incorrect account and then sign in with the correct email credentials.
3. Enable Cloud Sync: To ensure that your scripts are being synced, go to the Teleprompter mobile app settings:

Cloud Sync covers more than just text: your scripts, folders, video recordings and audio recordings all sync across your devices. If a recording hasn’t appeared on another device yet, see Why aren’t my recordings syncing between devices?
By following these steps, you should be able to seamlessly sync your scripts across all your devices, ensuring that you always have access to your latest work wherever you go.
Changing the language of the Teleprompter.com app allows you to enjoy a more personalized experience in the language you feel most comfortable with. The process depends on your device:
You can also refer to Google's step-by-step guide here:
👉 Change language settings on Android
Once selected, the app will automatically update to display in your chosen language.
Still need assistance? Feel free to reach out to us at support@teleprompter.com or go to Settings > Contact Support inside the app. We're happy to help!
We understand the importance of keeping your sensitive information secure and private. If you prefer to keep your scripts stored locally on your device rather than syncing them to our servers, you can disable the "Cloud Sync" option. This will ensure that your scripts are only accessible on the device where they are stored. Follow these steps to disable the "Cloud Sync" option:
By following these steps, your scripts will no longer be uploaded to our servers, and they will remain private on your device. This way, you can maintain control over your sensitive information and ensure it is not accessible from other devices.
This feature is available on iOS, macOS, Android, and the Web browser version of Teleprompter.com. Adjusting the scrolling speed allows you to match the pace of your speech for a smoother and more natural delivery.
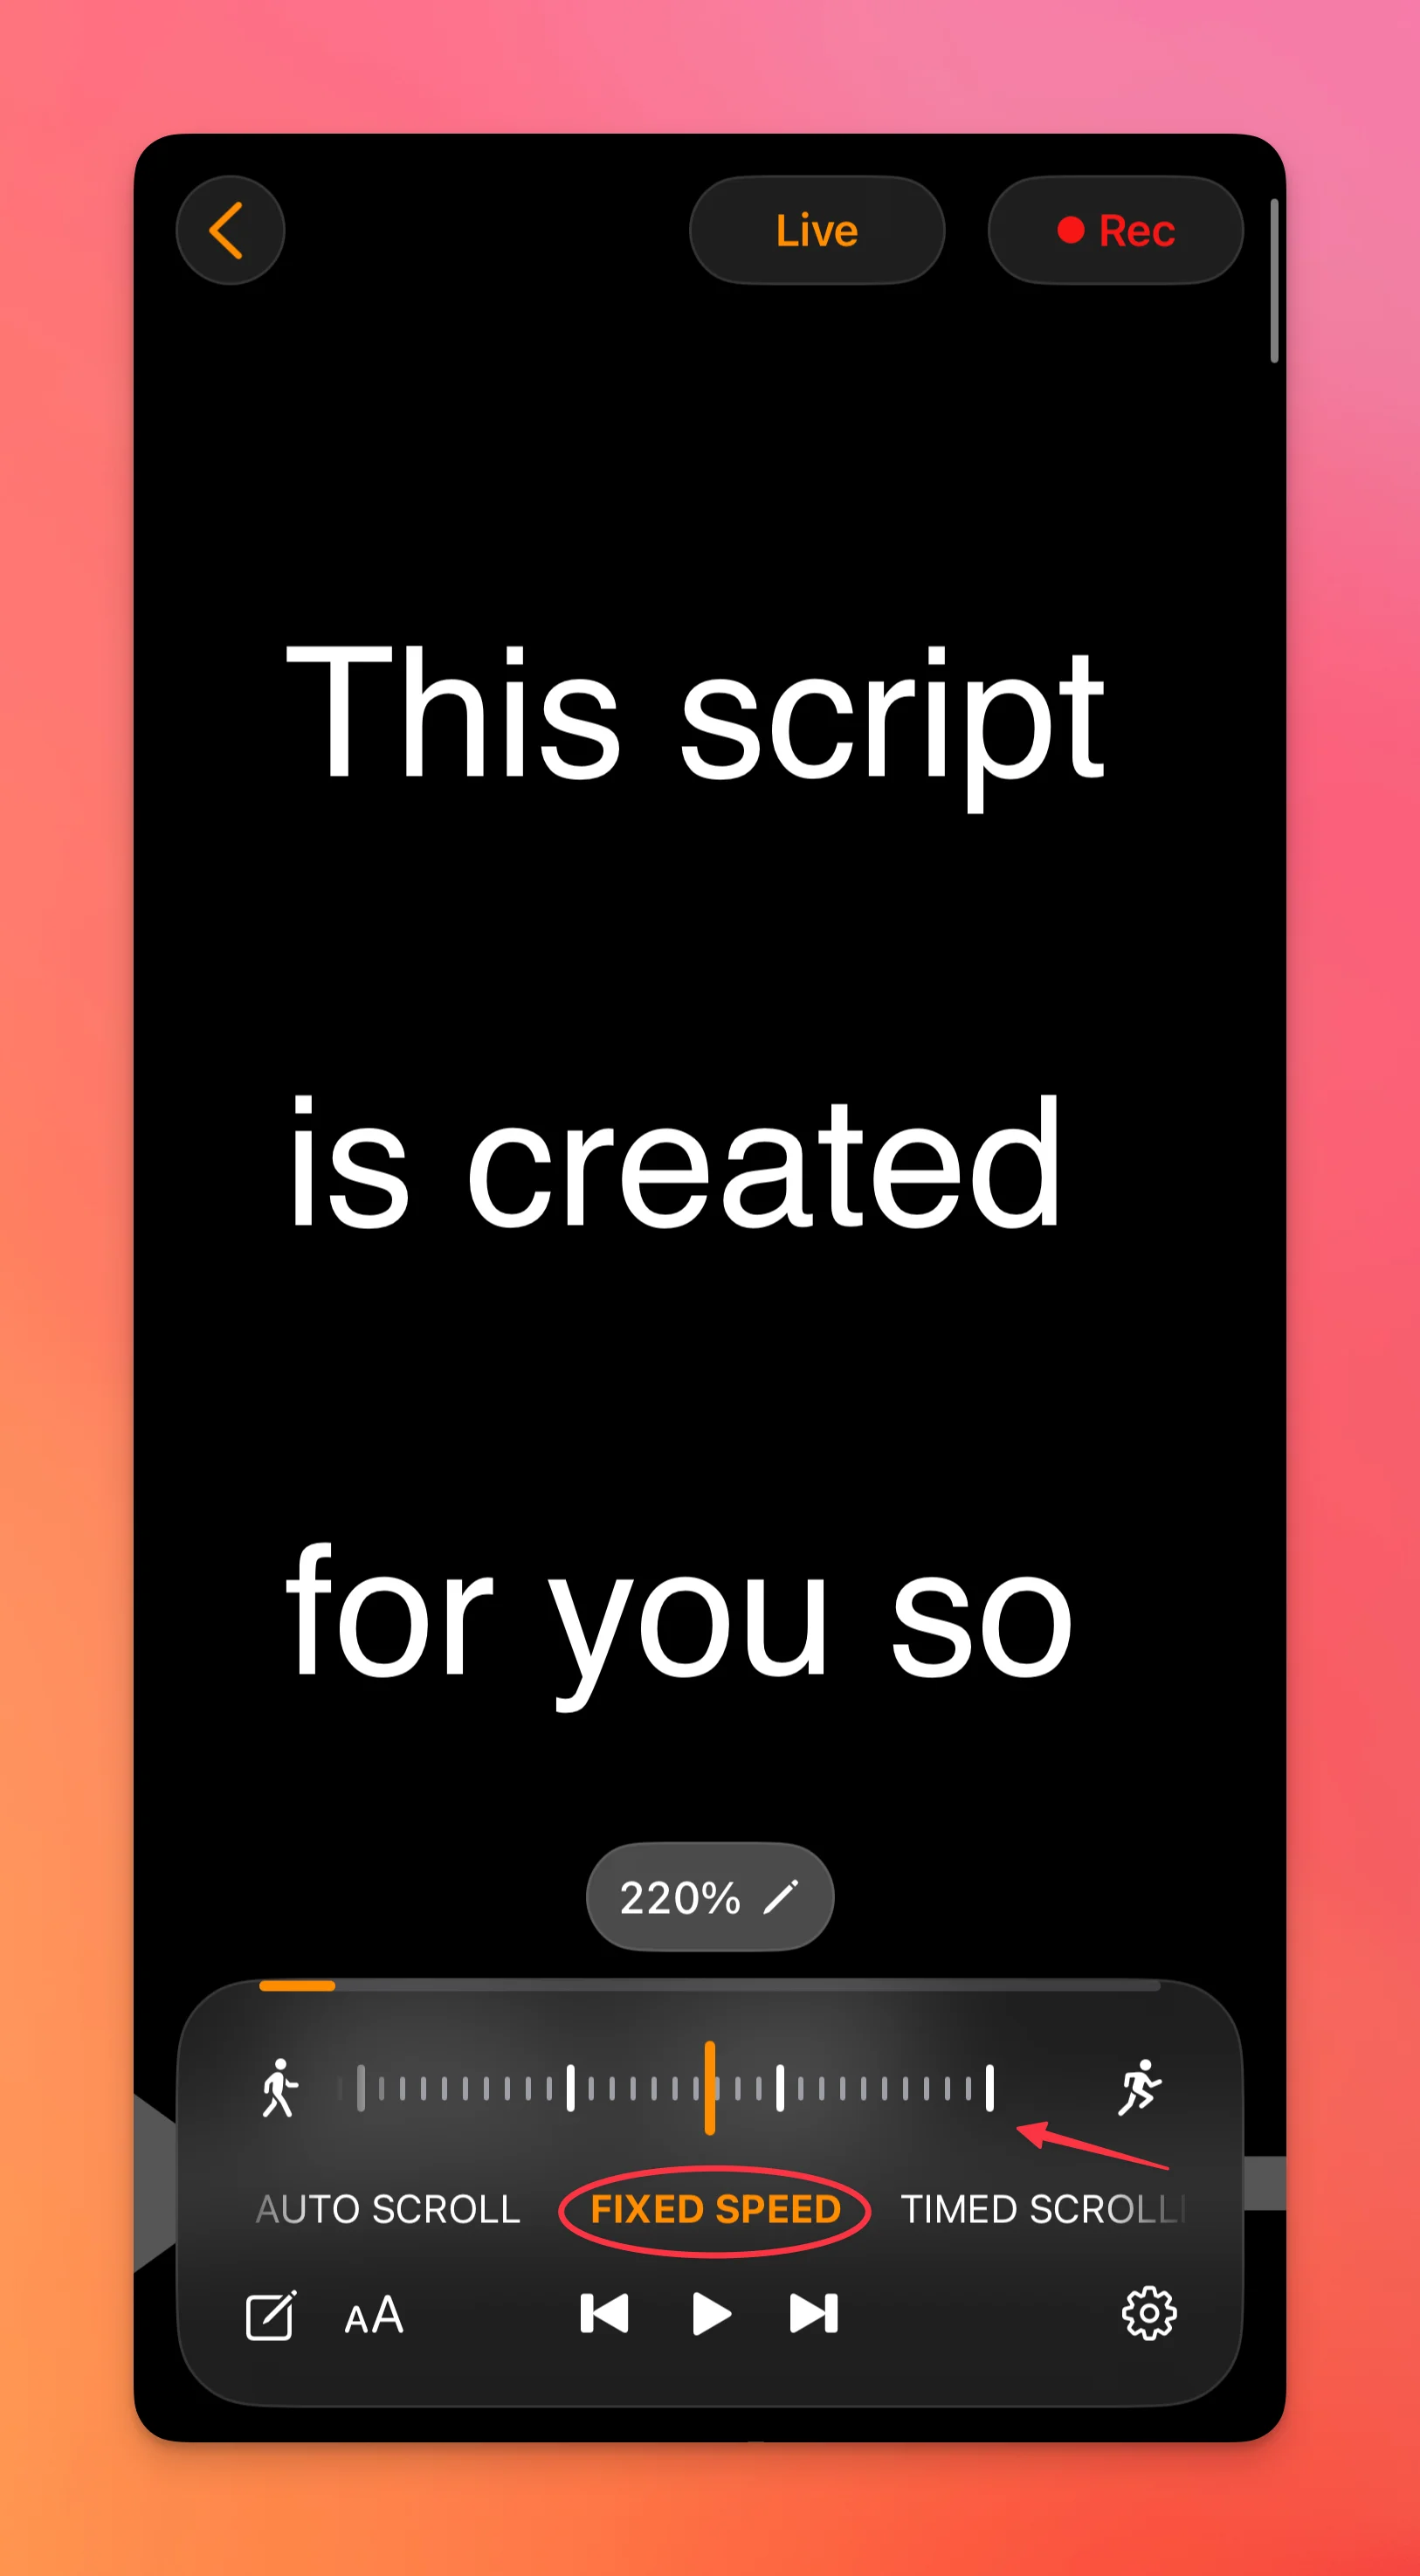
No need to open any additional menus—this control is always visible during recording for quick adjustments.
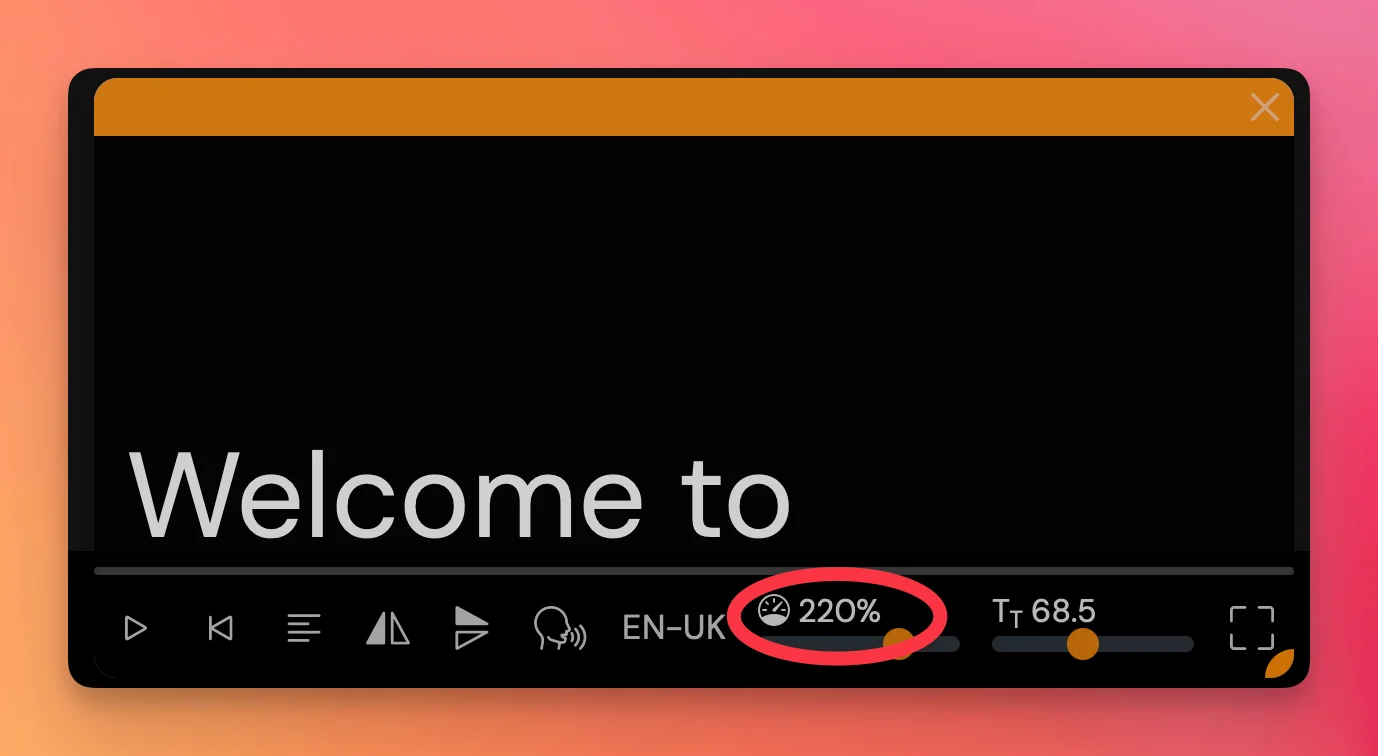
Fine-tuning the scrolling speed helps you stay in control of your delivery—whether you're presenting live, recording a video, or rehearsing.
Experiencing an immediate charge when subscribing to our service, instead of enjoying a 7 days free trial, can be perplexing. But don’t worry, there’s a common explanation for this, especially if you’re part of the Apple ecosystem.
In Apple’s ecosystem, users are permitted to have a free trial only once. If you have previously used your one-time free trial, Apple’s system will automatically begin your subscription and process a payment when you attempt to subscribe again.
While we don’t have control over Apple’s payment system, you do have the option of requesting a refund from Apple directly. They manage all transactions and have a system in place for handling refunds. To request a refund, follow Apple’s official guidelines.
If you subscribed directly through our website and experienced an immediate charge instead of receiving the 7 days free trial, please reach out to us directly. We will need to review your account details to ascertain the reason for the immediate charge.
You can contact us by sending an email to support@teleprompter.com. When you do, kindly include the email address associated with your account, and briefly describe the issue you’re encountering. Our customer support team will do their best to resolve your issue as quickly as possible.
Remember, your satisfaction is our top priority, and we’re here to ensure you get the most out of our services. Thank you for your understanding and cooperation.
We understand that sometimes users need to step away. If you’ve decided to delete your Teleprompter.com account, you can do so easily from the mobile app. But before you proceed, please take note of a few important details outlined below.

For security reasons, you'll be prompted to sign in again to confirm your identity before the deletion process begins. This ensures that only the account owner can make such a critical change. If you signed up using “Sign in with Apple” or “Sign in with Google,” make sure to sign in again using the same method before attempting to delete your account. This ensures that your identity is verified and the correct account is selected for deletion.
Deleting your account or removing the app will not cancel any active subscription tied to your Apple ID or Google account. This applies to all apps downloaded through the App Store or Google Play.
If you're only looking to stop charges or end a trial, please refer to the following guides:
Need help or have questions? Contact us anytime at support@teleprompter.com or via Settings > Contact Support in the app. We're here to support you every step of the way.
There are two options for how you can manage your scripts on your computer: using our Mac app or using our website.
If you are using macOS, the easiest way to manage your scripts is to download on Mac App Store from the App Store. You can log in with the same credentials and create and edit your scripts in the app. The changes will be immediately synced to all devices connected to the internet.
If you are on Windows or you are using someone else's computer, you can sign in on our website with your email address and password and edit your scripts there. In case you used Sign in with Apple, you can follow our guide on how to attach an email and password combination to your account.
Our app prompts you to use Sign in with Apple automatically, but if you would like to log in on our website or on devices that does not have your Apple ID, you need to create an email and password to your account.
In order to do that you need to do the following steps:
On that screen, you can create an email + password combination that you can use on the website.
Export Raw is a Pro feature, confirmed on the iOS, macOS and web browser versions.
Every edit you make in Teleprompter.com sits on top of your recording rather than replacing it. Trim it, add subtitles, swap the background, drop on a watermark — the original file is still there underneath. Export Raw is how you get that original back out.
Export Raw gives you the source recording exactly as it was captured, before any trims, subtitles, background changes, filters or watermarks. It's the file to reach for when you're finishing the edit in another app, handing footage to an editor, or keeping a master copy you might want to re-cut later.
If what you actually want is the finished version with all your edits applied, that's a different export — see How Can I Share or Save My Recordings in Teleprompter.com?.
Export Raw sits on the video recording screen, and it only appears if you're on a Pro plan. Rather than re-rendering anything, it links you straight to the raw recording, so what you get is the untouched capture itself.
One detail that surprises people: if a take was split into several slices, Export Raw gives you links to each of those raw recordings rather than one combined file. That's normal — stitch them together in whatever editor you're using. It's also worth knowing before you shoot, since pausing and resuming during a take is one way a recording ends up in pieces.
Export Raw also appears on the post-recording screen straight after you stop recording, next to Export MP4.
Recordings are saved automatically inside the app, in the Recordings panel — but not to your camera roll or gallery. You have to export them yourself, which is usually why a video you're certain you recorded isn't in Photos: see Will my video recordings be saved automatically?.
Recordings also stay on the device that made them. Cloud Sync covers scripts only, so your original file won't appear on your Mac just because you recorded it on your phone — you'll need to move it across yourself. Why Aren't My Videos Syncing Between Devices? lists the quickest ways to do that.
Still stuck? Email support@teleprompter.com or use Settings > Contact Support in the app.
Filters are available on the iOS, macOS and Android versions. There are no filters in the web browser version.
One thing to clear up first, because it changes how you should plan a shoot: filters are not applied live while the camera is rolling. They are not on the recording screen at all. You add them afterwards, on the video preview screen you land on once a take is recorded, using the Filters button.
Two kinds of filter are available there:
Because nothing is committed at capture time, you are not gambling on a look before you have seen the footage. You can try a few, dial the strength up and down against the take you actually got, and change your mind without setting up and performing the whole thing again. If the skin smoothing reads as too strong on a big screen, that is an adjustment rather than a reshoot.
It also means the recording itself is captured clean. If you want that untouched source file — to grade it elsewhere, or to hand it to an editor — see Where Do I Find the Original, Unedited Recording?.
Filters are a good fit for quick social clips, one-off updates, and anything where speed matters more than a perfect finish. They save you a round trip through an editor.
For work where colour has to be exact — a client deliverable, a launch video, a series that has to match shot to shot — grade in a dedicated tool instead. Either way, a filter cannot rescue bad light, so get your lighting right first, then set and lock your exposure so the brightness stays steady through the whole take: see How Can I Change the Exposure on Teleprompter.com?. A clean, correctly exposed file gives whoever grades it, even if that is you next week, far more room to work.
Grading elsewhere does not mean leaving the app behind. Once your colour is finished, you can bring the file back in and still add subtitles, clean the audio or drop on a watermark — see How Can I Import a Video into the Teleprompter.com App?.
Stream with URL is available on the iOS and macOS versions. It is not available on Android or in the web browser version.
Teleprompter.com connects directly to YouTube, Facebook, Instagram and TikTok. For everything else there is Stream with URL, which lets you broadcast to any platform that accepts an RTMP stream — LinkedIn, Twitch, Vimeo, a webinar tool or your own server.
RTMP is the standard protocol apps use to send live video to a streaming platform. In practice it comes down to two pieces of text: a server URL (where to send the stream) and a stream key (which broadcast on that platform it belongs to). Paste both into Teleprompter.com and you are live, with your script scrolling over the camera view as usual.
You only have to do the pasting once. The app remembers the custom server URL and stream key you entered, so for your next broadcast you can open Stream with URL and go straight to going live instead of digging the details out of the platform's dashboard again.
These come from the platform you are streaming to, never from us. Every service that supports RTMP has a live dashboard or a "create a broadcast" screen where you set up the event, and it hands you the two values — usually labelled something like server URL or ingest URL, and stream key. Create the broadcast there first, copy both values, then come back to Teleprompter.com and paste them in.
Two things worth knowing. Your stream key is effectively a password for your channel, so treat it like one: do not share it and do not leave it on screen. And most platforms have their own eligibility rules for going live — follower counts, verified accounts, approved live access — which you have to satisfy on their side before any stream will connect.
Some platforms also rotate or reset a stream key when you finish a broadcast or create a new event. If a stream that worked last week will not connect, it is worth checking whether the saved key is still the current one and pasting in a fresh one if it is not.
For the fully integrated platforms, along with each one's setup requirements, see How Can I Activate Live Streaming? — it covers YouTube, Facebook, Instagram and TikTok in detail.
If your stream will not connect, check the key and URL for stray spaces first, then confirm the broadcast is still open on the destination platform. Still stuck? Email support@teleprompter.com or use Settings > Contact Support in the app.
Audio only recording is available on the iOS, macOS, Android and web browser versions.
Not every recording needs a camera. Audio recording mode scrolls your script exactly as it normally would, but captures sound alone. It is worth knowing about if you are:
The files are much smaller than video, too, so it is kinder to a phone that is short on storage.
There is no audio toggle to hunt for in Settings. Teleprompter.com works in modes: teleprompter, video recording, audio recording and live streaming. A script opens in whichever mode you used last, and you move between them with the button in the top right corner.
The browser version works the same way: the same modes, and the same mode button in the top right corner. Because the mode is remembered, the next script you open will already be set up for audio, which makes recording a run of short takes quick.
With no picture to carry the recording, audio quality is the whole thing. Moving from the built-in microphone to a wired, USB or Bluetooth mic is the single biggest improvement you can make — see How Can I Select or Change the Microphone? for how to pick your input on each platform.
Reading hands-free helps as well, since you are not reaching for the screen mid-sentence. VoiceGlide auto scroll follows your voice and waits whenever you pause.
Audio only takes are editable in the same ways a video take is. Room hum, air conditioning and traffic can be stripped out with Clean Audio, and you can cut a fluffed opening or a long pause off either end with Trim. Both work on audio only recordings exactly as they do on video.
You can also pause and resume mid-take rather than starting over, which is handy when a delivery van goes past.
Need a hand? Email support@teleprompter.com or use Settings > Contact Support in the app.
Pausing a recording is available on the iOS, macOS and Android versions. It is not available in the web browser version, where a recording runs from start to stop.
This is the part people get wrong, so it is worth saying plainly: by default, tapping Stop recording does not finish your recording — it pauses it. Tapping the same button again resumes straight into the same recording, so one button both pauses and resumes.
The button that actually ends the take is Done, which appears while the recording is paused. Until you tap it, the app is holding the recording open and waiting for you.
Because a resumed take carries on writing to the same file, you end up with one continuous video, not two clips you have to join together somewhere else. So if you fluff a line, need a sip of water, want to move a lamp or have to wait for a car to pass the window, you do not have to start again. Pause, sort it out, resume, and carry on from where you were in the script.
That depends on one setting: Sync Scrolling Text and Recording (Settings > Precision Settings).
There is a full walkthrough of the setting in How Can I Sync Scrolling and Recording in the Teleprompter.com App? If you tend to pause mid-take, leaving it on is the less fiddly option.
A pause is invisible in the finished video, but the moments either side of it are rarely trimmed exactly how you want them. To cut a stray breath or a false start, open the recording and use Trim Video — it takes a few seconds and saves a round trip through a separate editor.
Still have questions? Email us at support@teleprompter.com or go to Settings > Contact Support in the app.
Background tools are available on the iOS, macOS and Android versions. They aren't available in the web browser version.
Teleprompter.com gives you three ways to deal with whatever is behind you. Blurring is its own tool; the other two live together inside Remove Background, where you flip between a true green screen key and Magic Remove. Here's how to pick.
Blur softens your background instead of replacing it, so a busy room stops competing with your face. It's the fastest of the three and the most forgiving: a blurred bookshelf still reads as a bookshelf, so a slightly imperfect edge around your hair goes unnoticed. Apply it after recording from the Recordings panel — see How Can I Blur the Video Background? — or blur live while filming with Portrait Mode and the depth bar, described in How Can I Edit the Recording Resolution in Teleprompter.com?.
Magic Remove uses AI to detect your background and separate you from the room automatically, with no green screen and no setup, so you can drop in an image instead. It's the right call when you want a genuinely different background and you're filming wherever you happen to be. The trade-off is fine detail: automatic separation is weakest around flyaway hair, glasses frames and fast-moving hands. See How to Replace Your Video Background.
This is a true chroma key against a physical green screen, and the other half of Remove Background. It asks the most of you up front — a screen, space to stand away from it, even lighting — and gives the cleanest possible edges in return. If your composite has to hold up on a large screen, or you're cutting between shots that all need to match, this is the one to use.
The key is not adjustable. Key colour, tolerance and spill suppression cannot be changed at the moment — there are no sliders to rescue an unevenly lit screen or to pull green off your shoulders afterwards. What you do in the room is therefore the whole game: if the key comes out ragged, the fix is to relight and shoot again, not to tweak a setting.
Since the key itself can't be tuned, a few minutes of setup does more for the result than any control would:
Frame rate can be set on the iOS, macOS, Android and web browser versions. Stabilisation is available on iOS, macOS and Android.
Both sit in the same menu as your resolution setting, so it is worth deciding on all three together before a shoot.
Resolution lives in the same place — see How Can I Edit the Recording Resolution? and How Can I Record or Enable 4K Recording? if you want to change that as well.
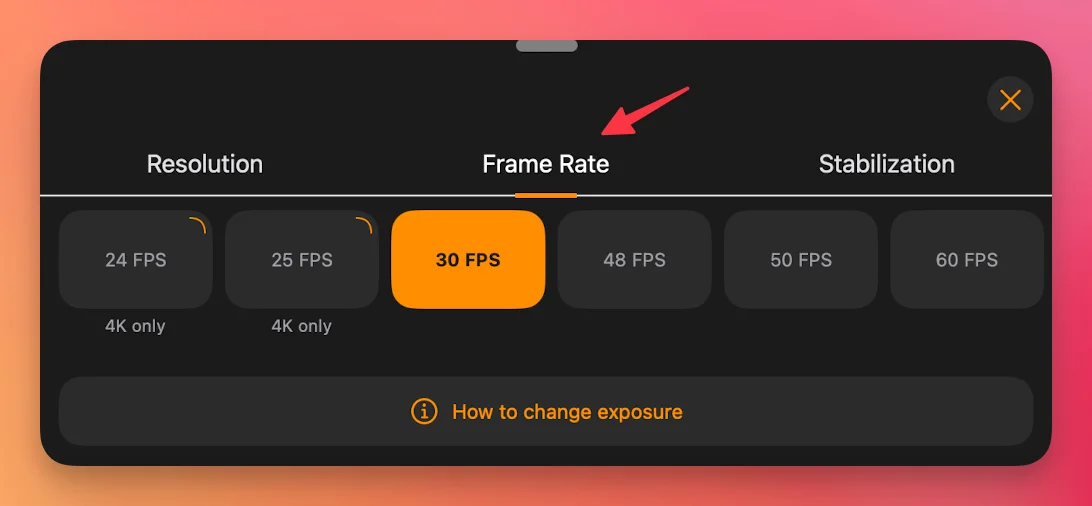
The app offers 24, 25, 30, 50, 60 and 120 fps. In short:
Higher frame rates mean bigger files and more work for your device, especially alongside 4K, so do not reach for 60 or 120 unless the shot genuinely needs it.
Stabilisation smooths out shake by cropping into the frame very slightly and shifting the image around inside that crop. That trade-off is what should decide your setting:
Depending on your device, this menu may also list Auto and extended Cinematic options alongside the three above.
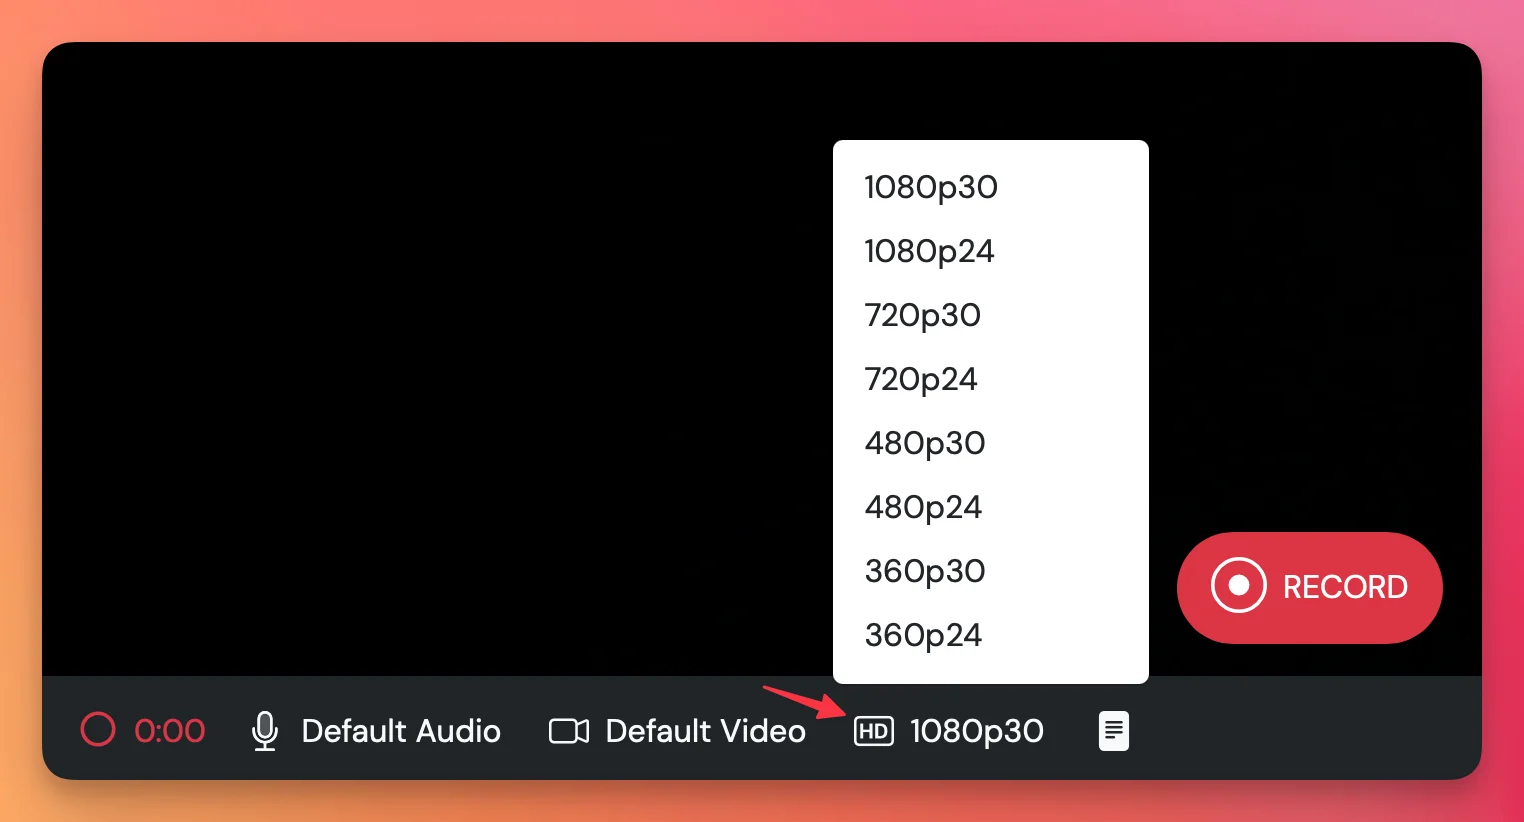
In the browser, frame rate and resolution are chosen together from the HD icon on the recording screen, as combinations such as 1080p30 and 1080p24. Stabilisation is not offered in the browser.
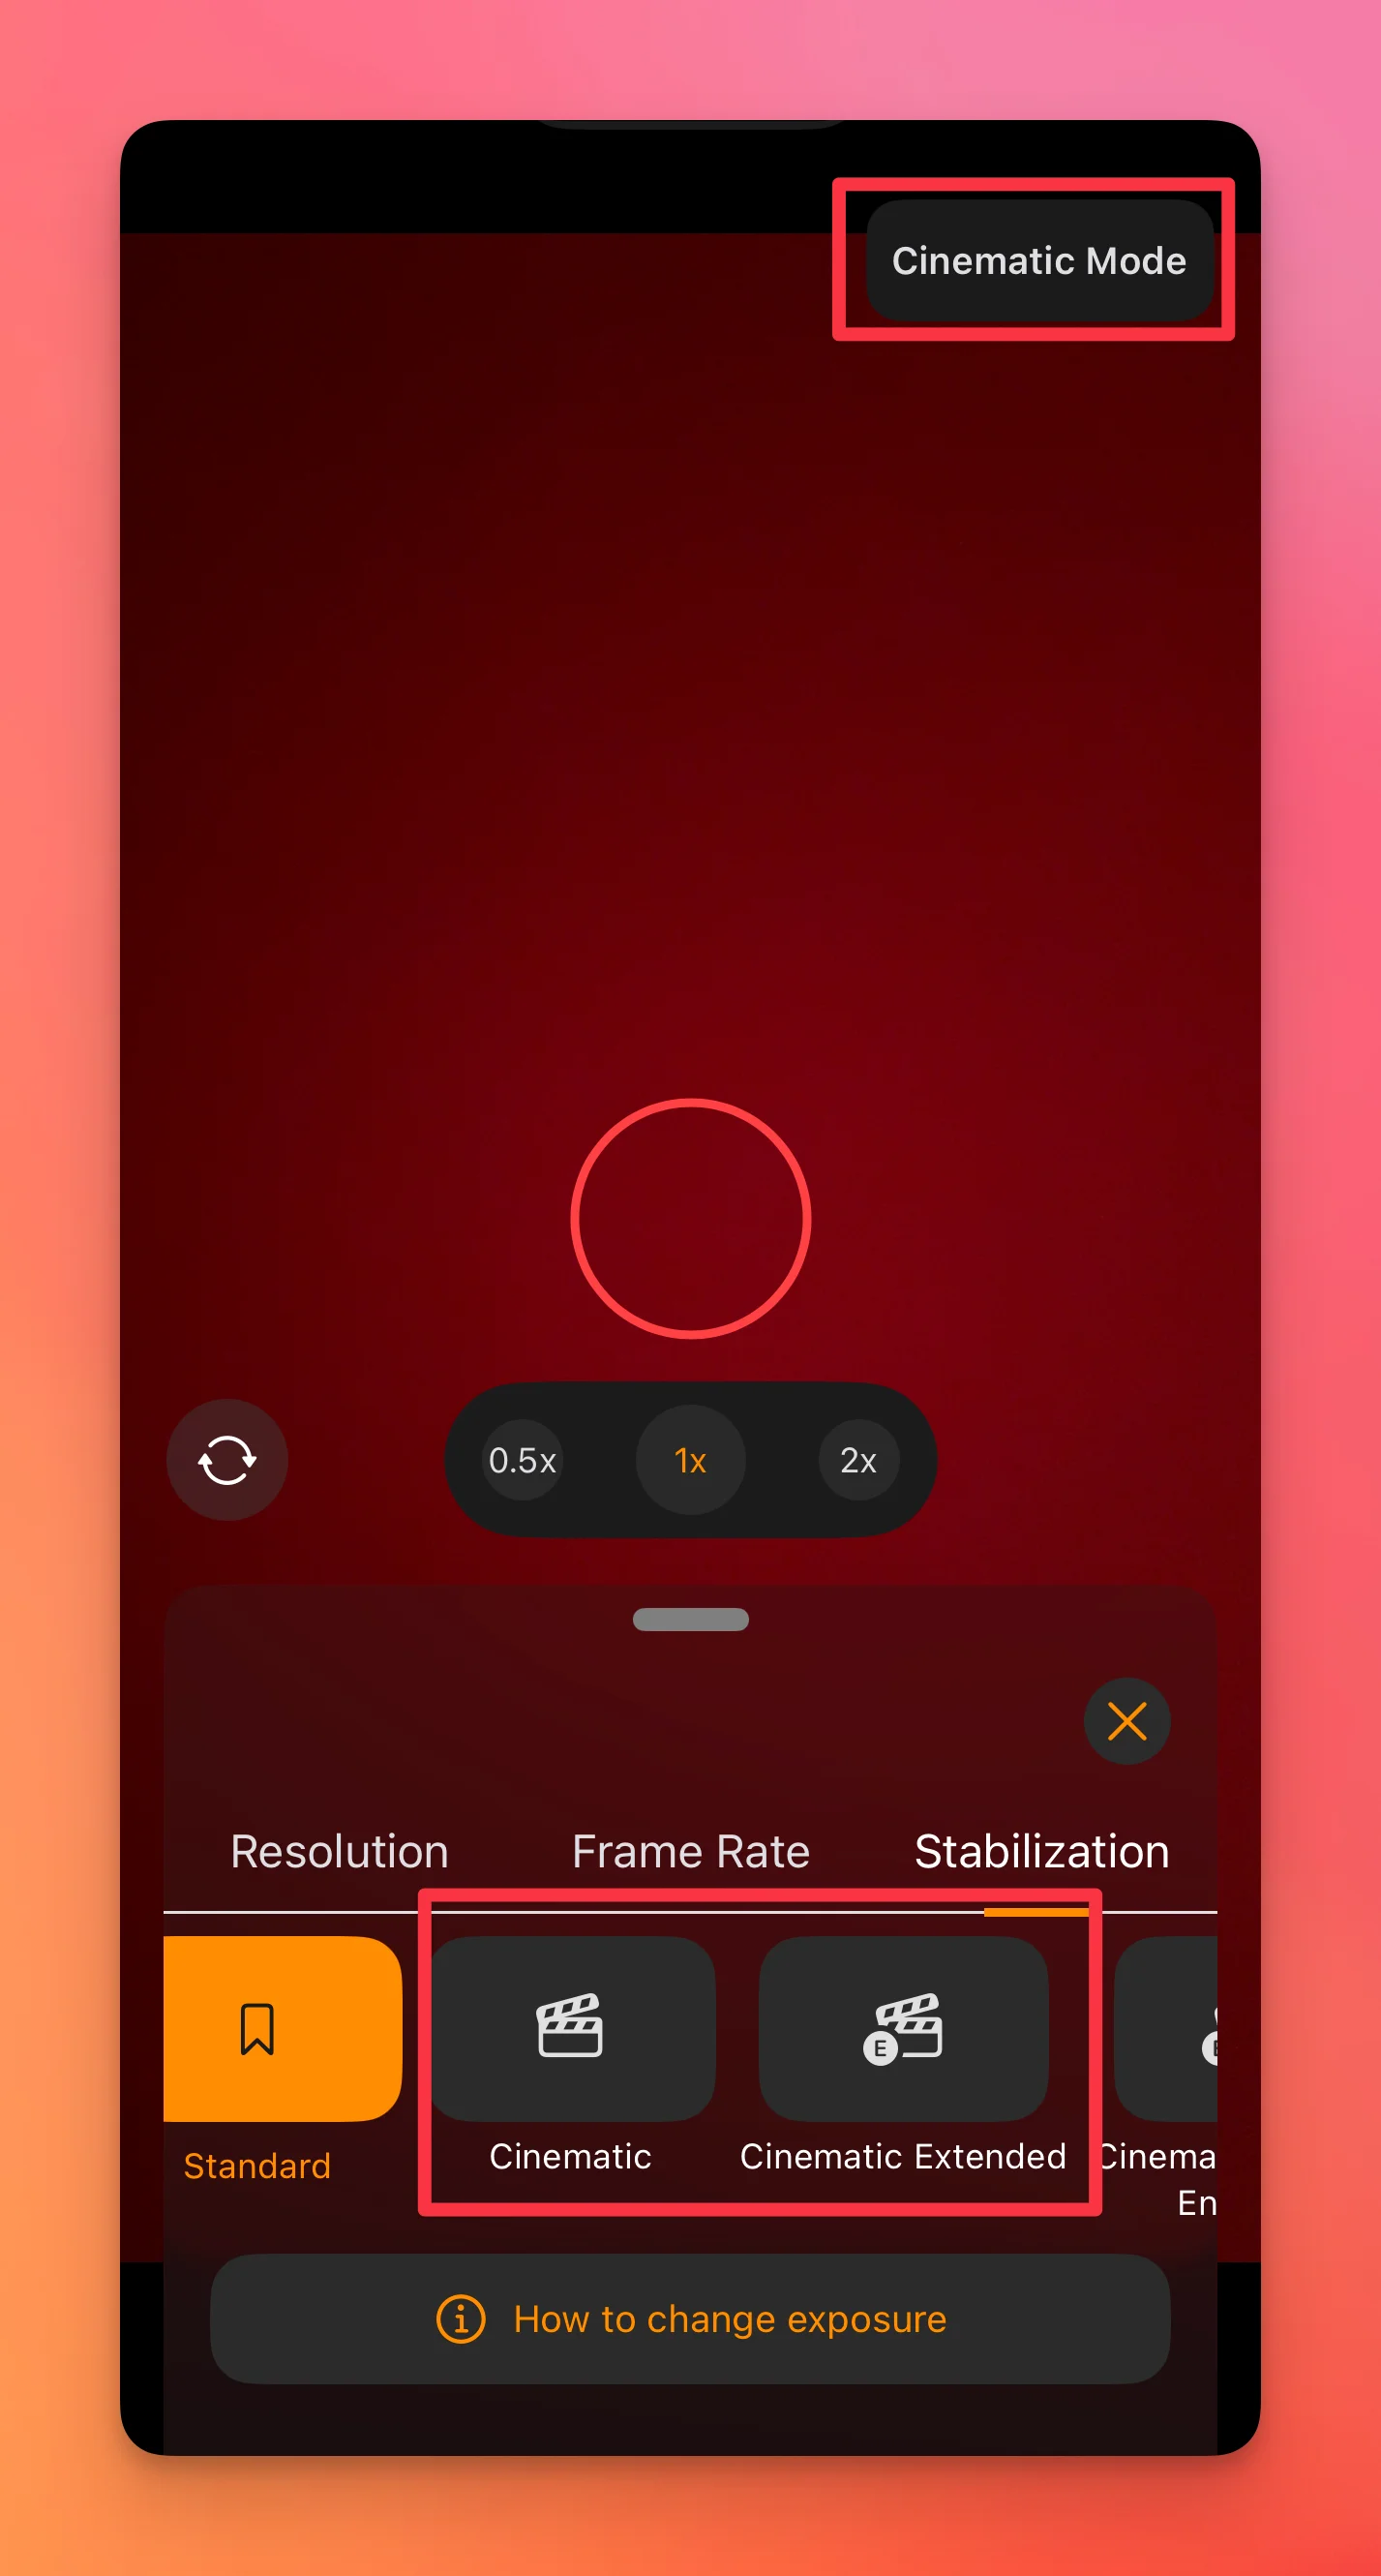
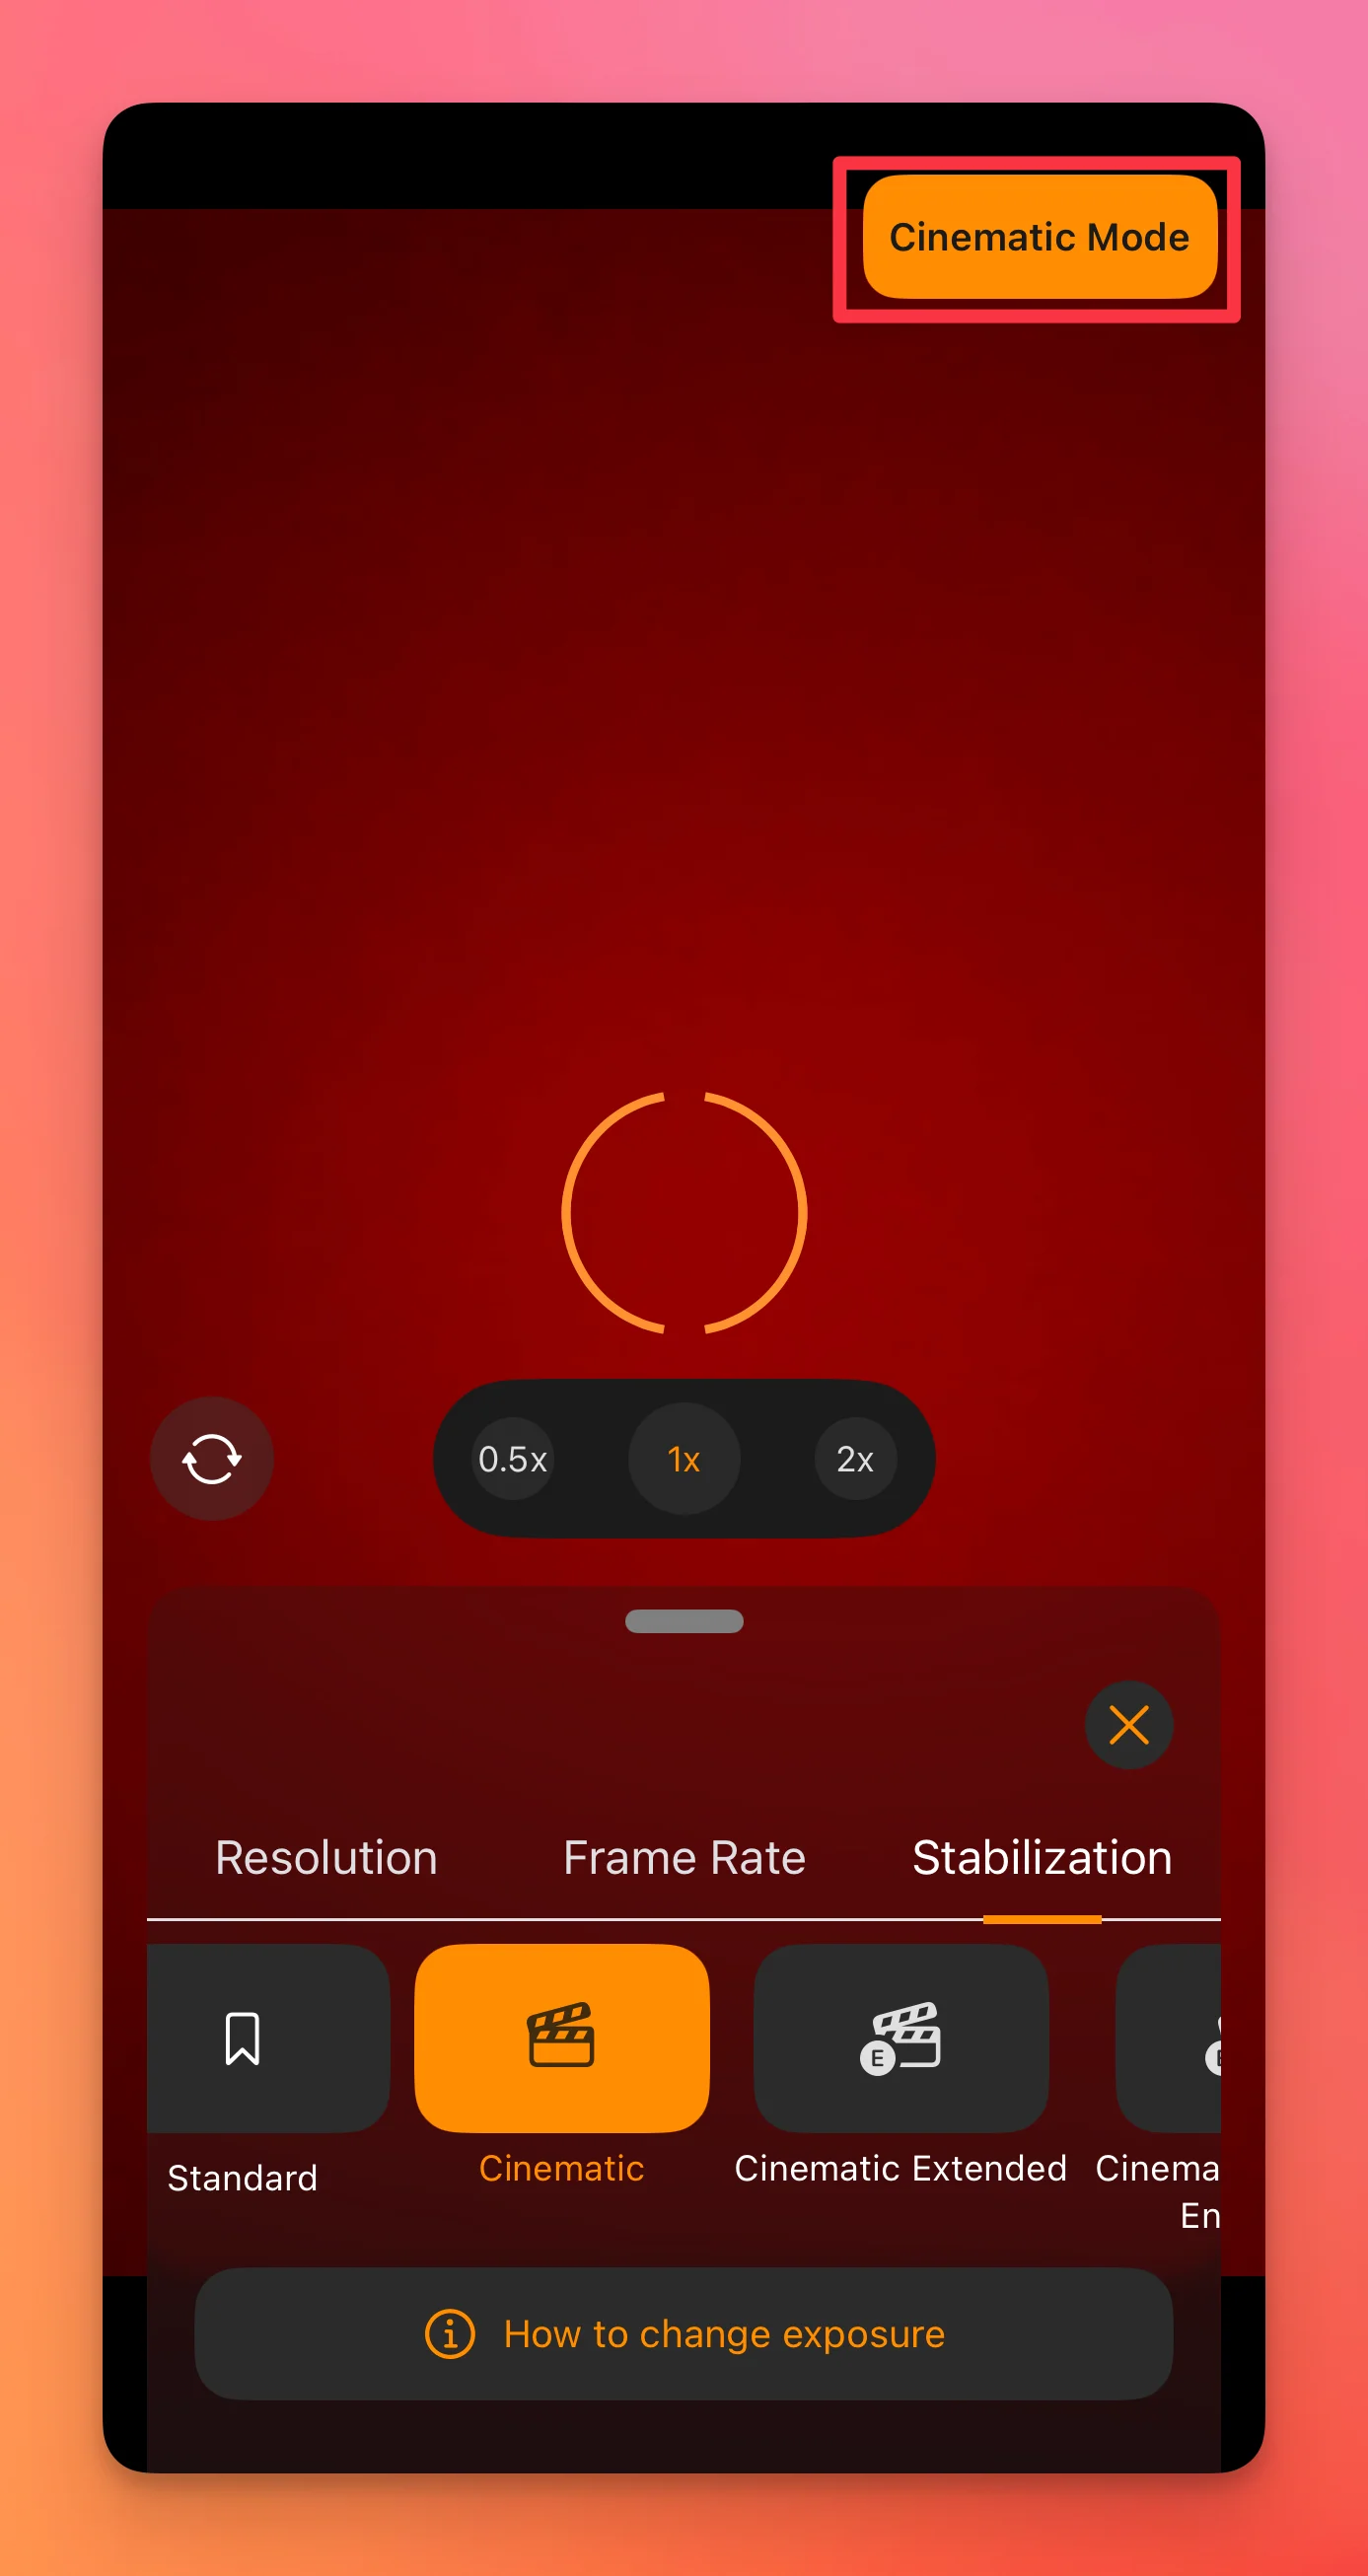
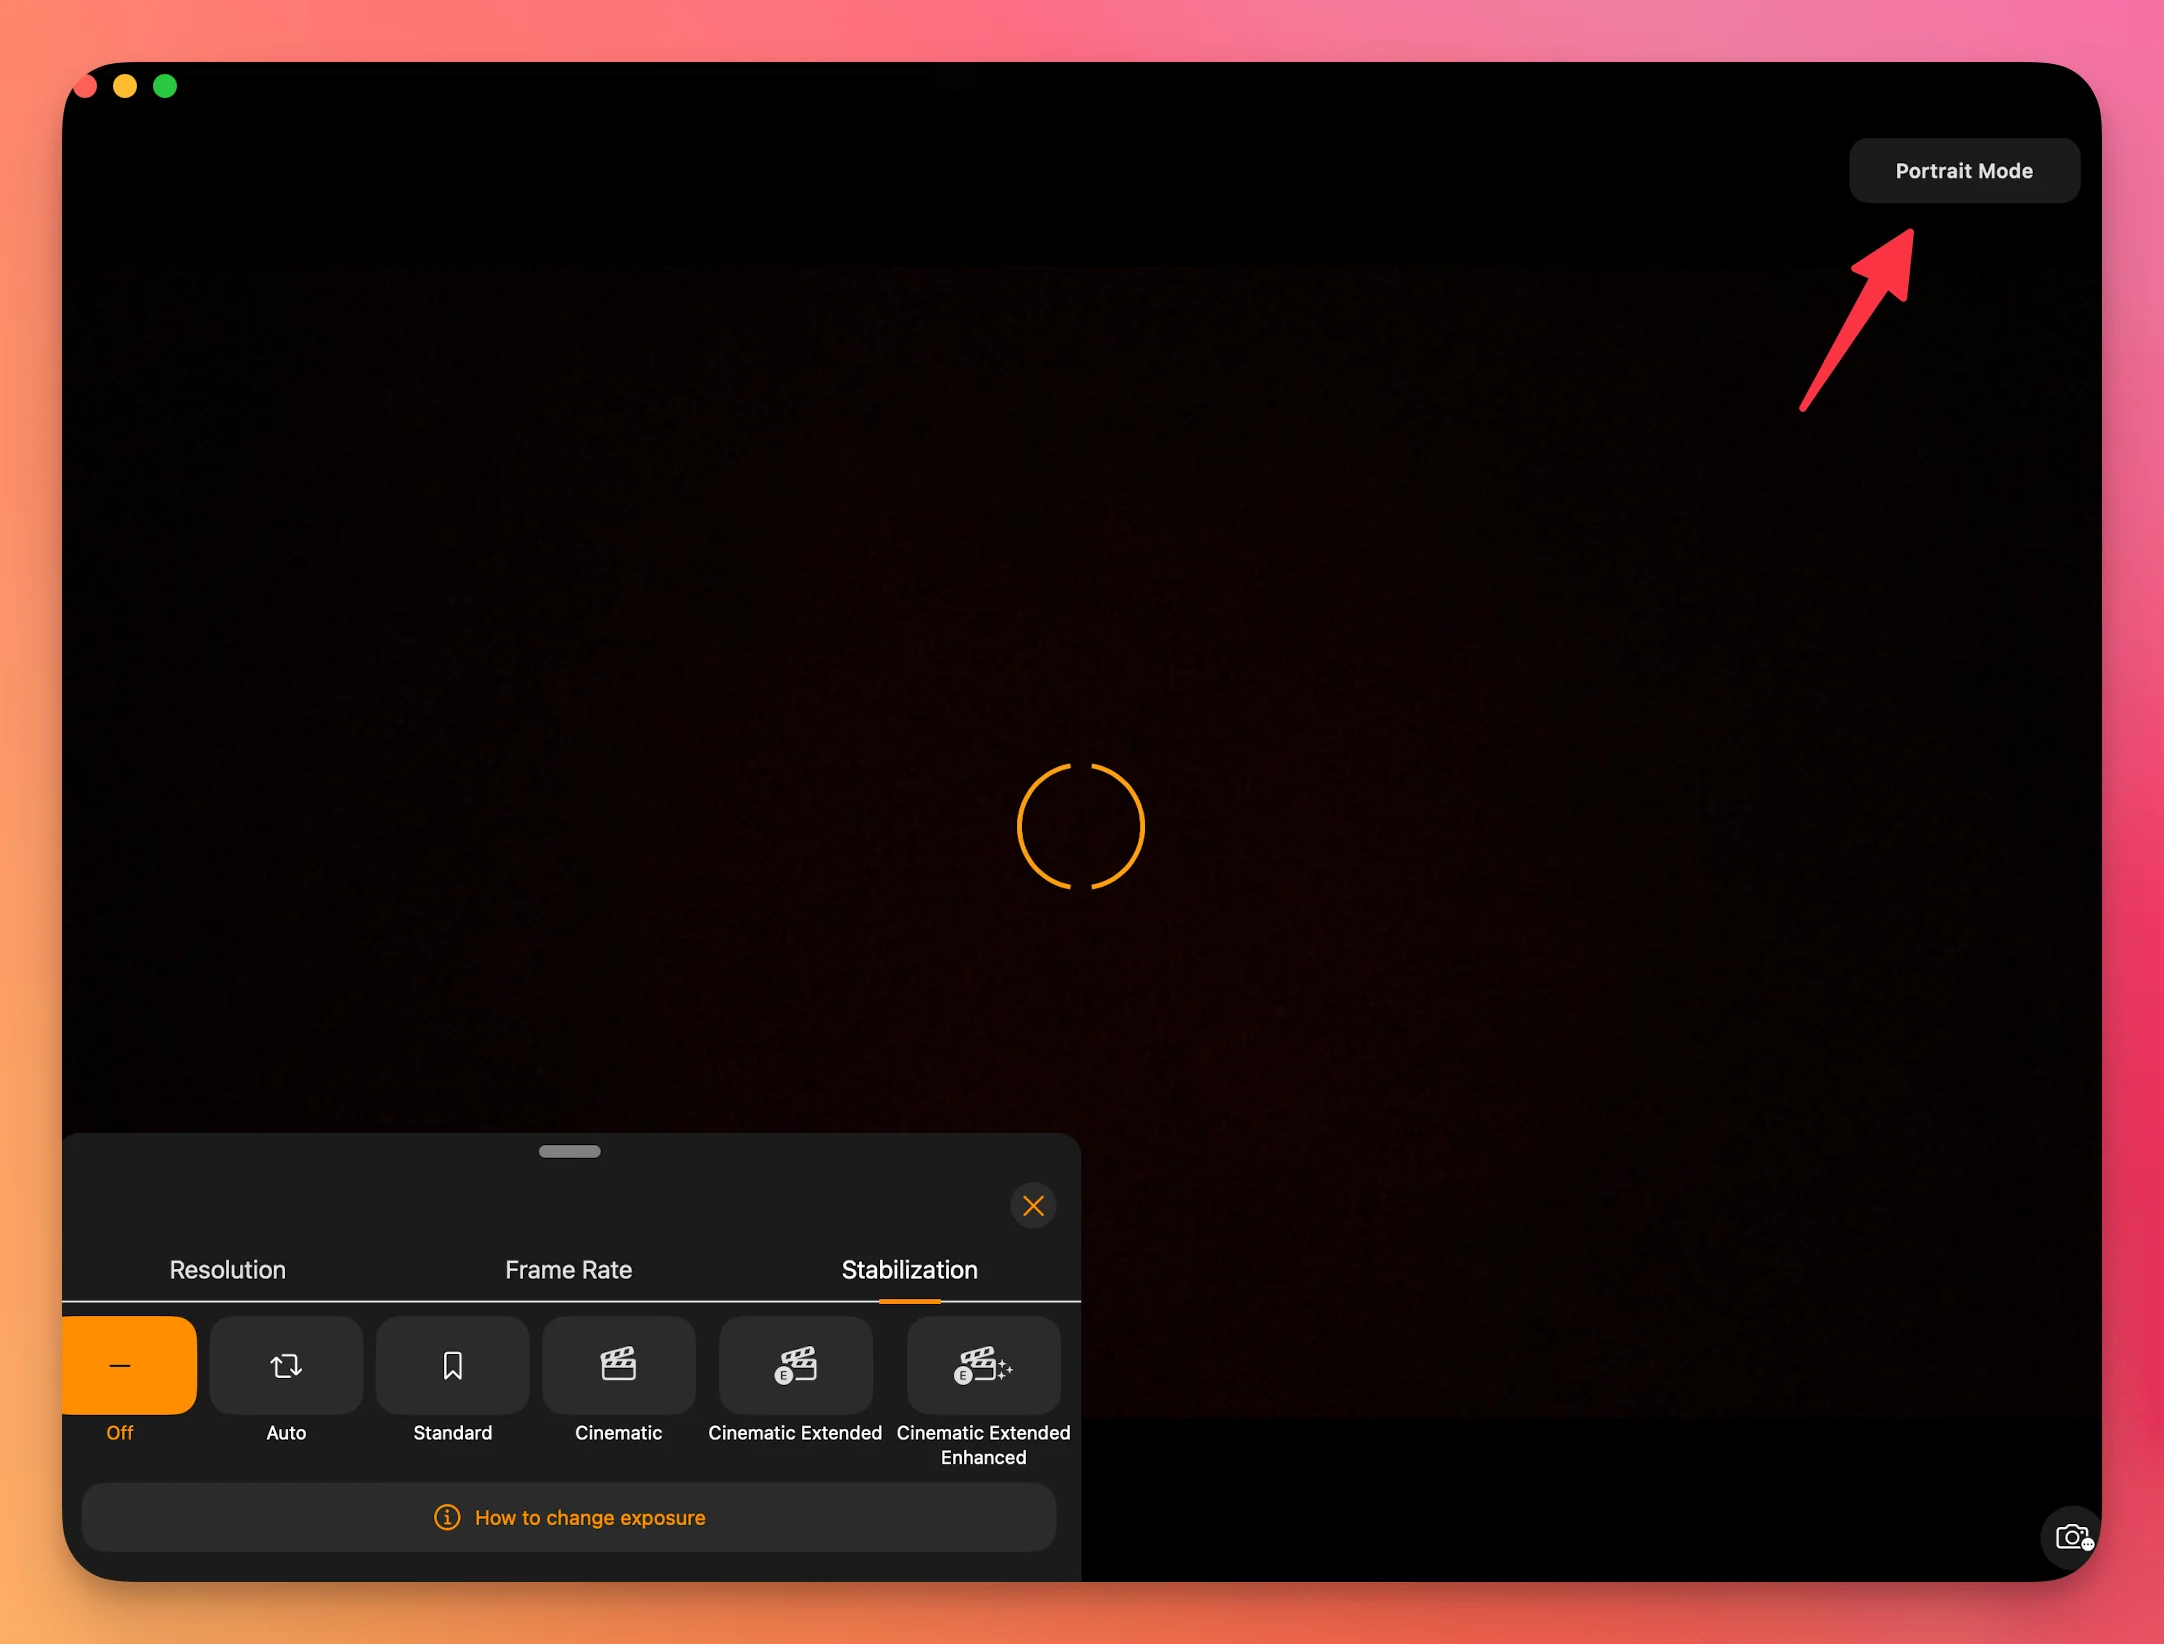
Starting with iOS 26.0, portrait mode has been replaced by Cinematic Mode on supported iPhones. If you previously had portrait mode enabled in Teleprompter.com iOS app, it will automatically turn on when you start a capture session in the Teleprompter.com app. Here’s how you can disable it — and how to turn it back on when you need it.
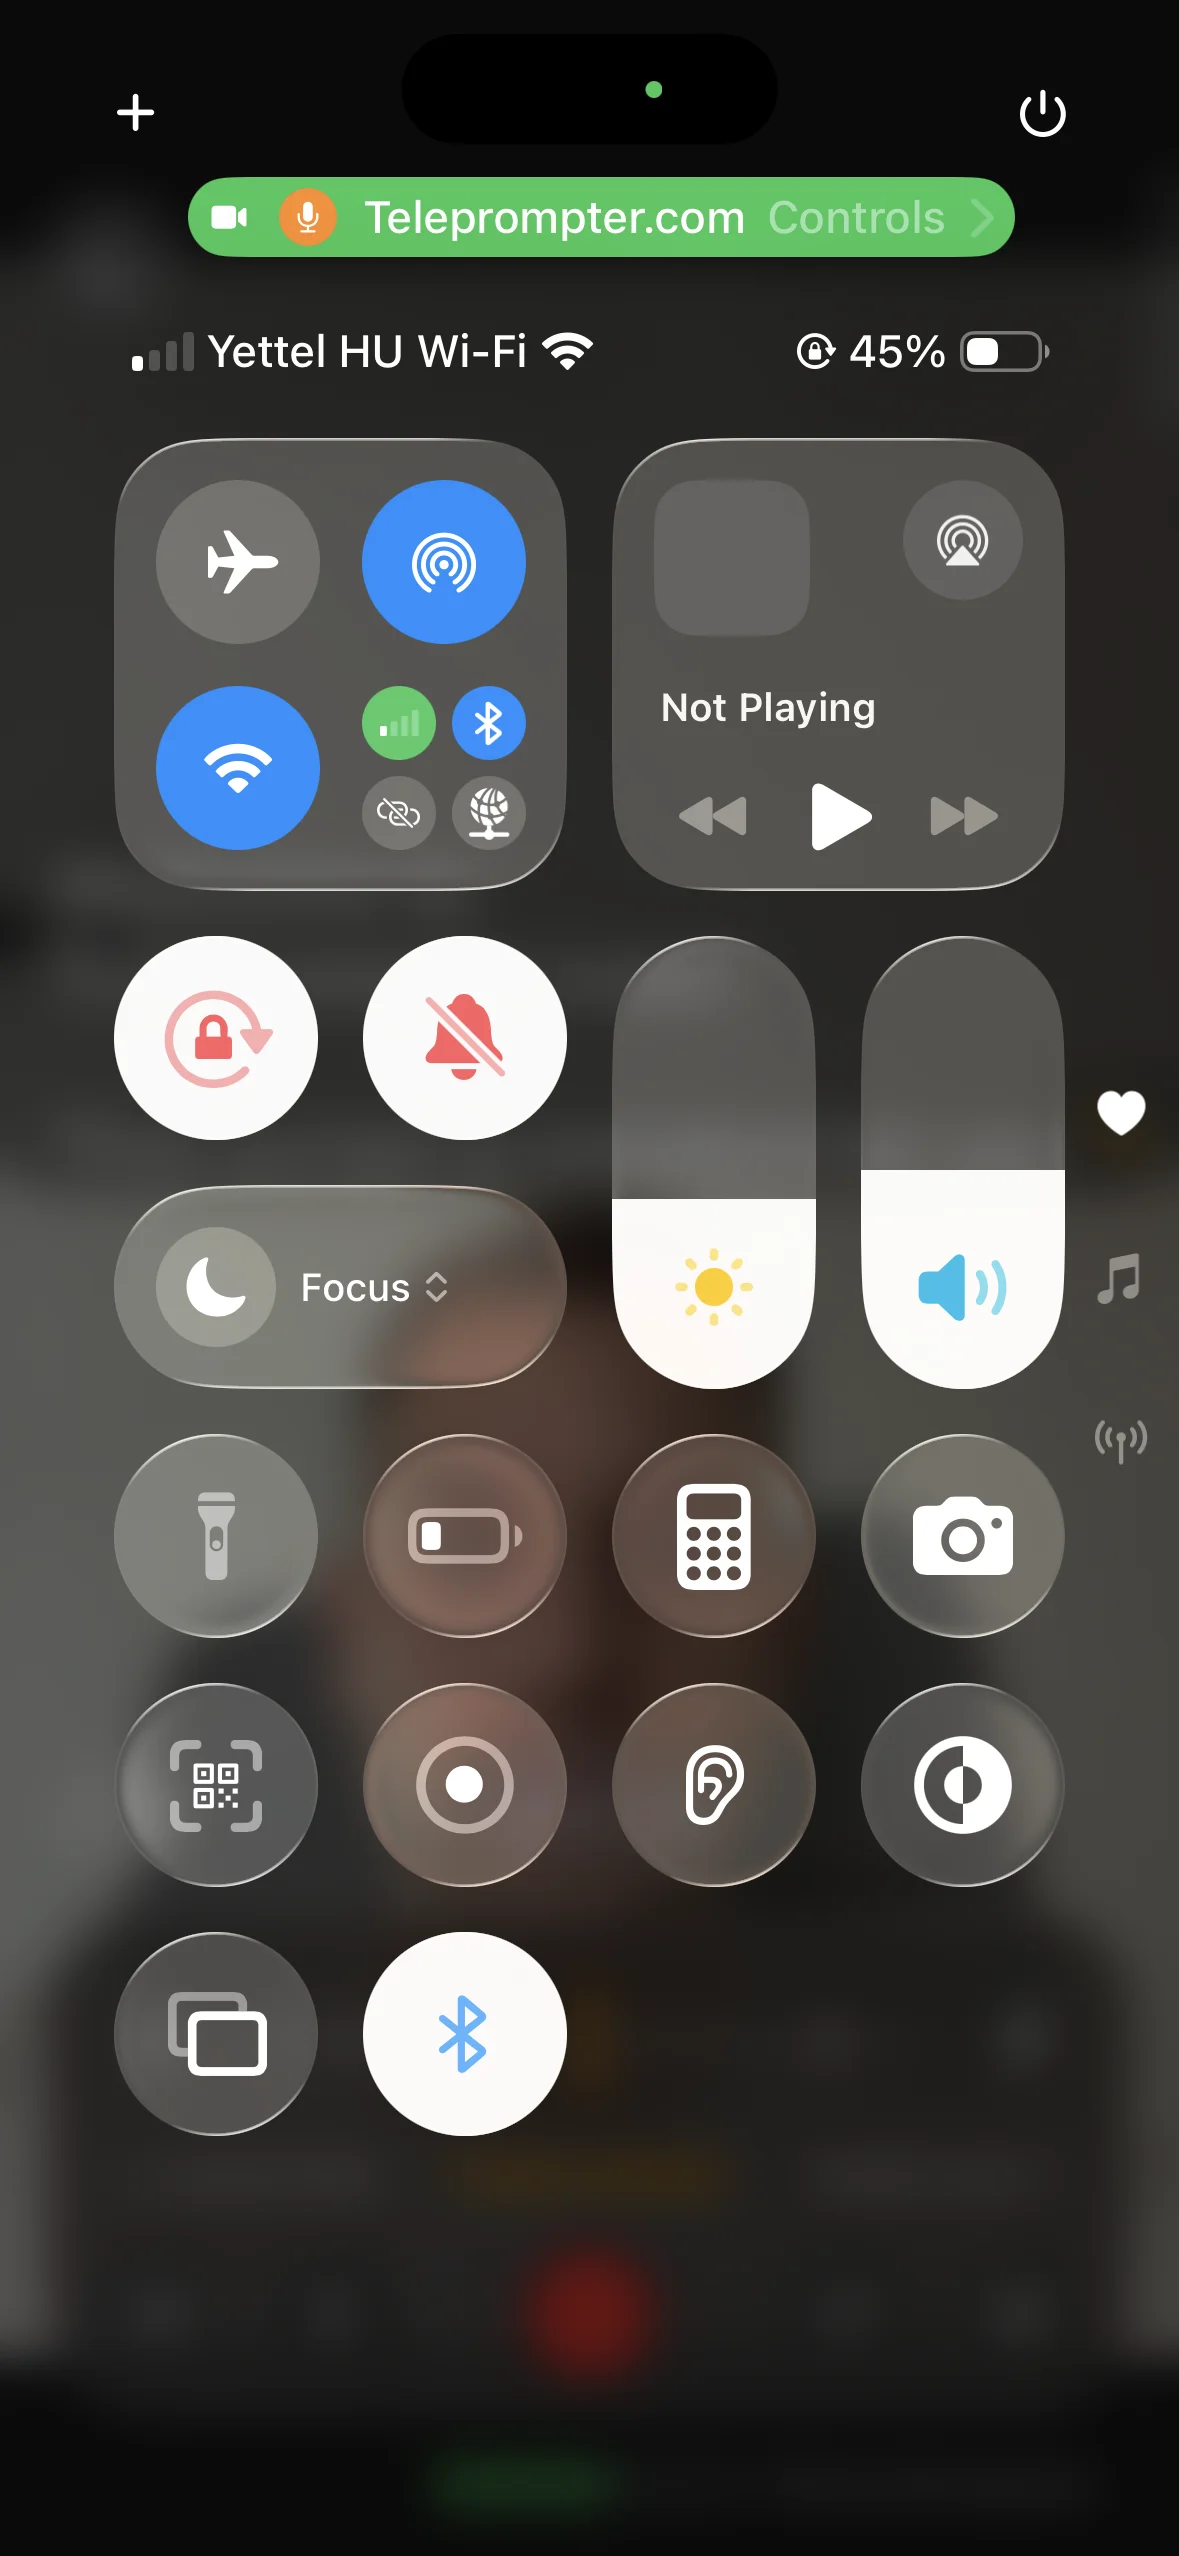
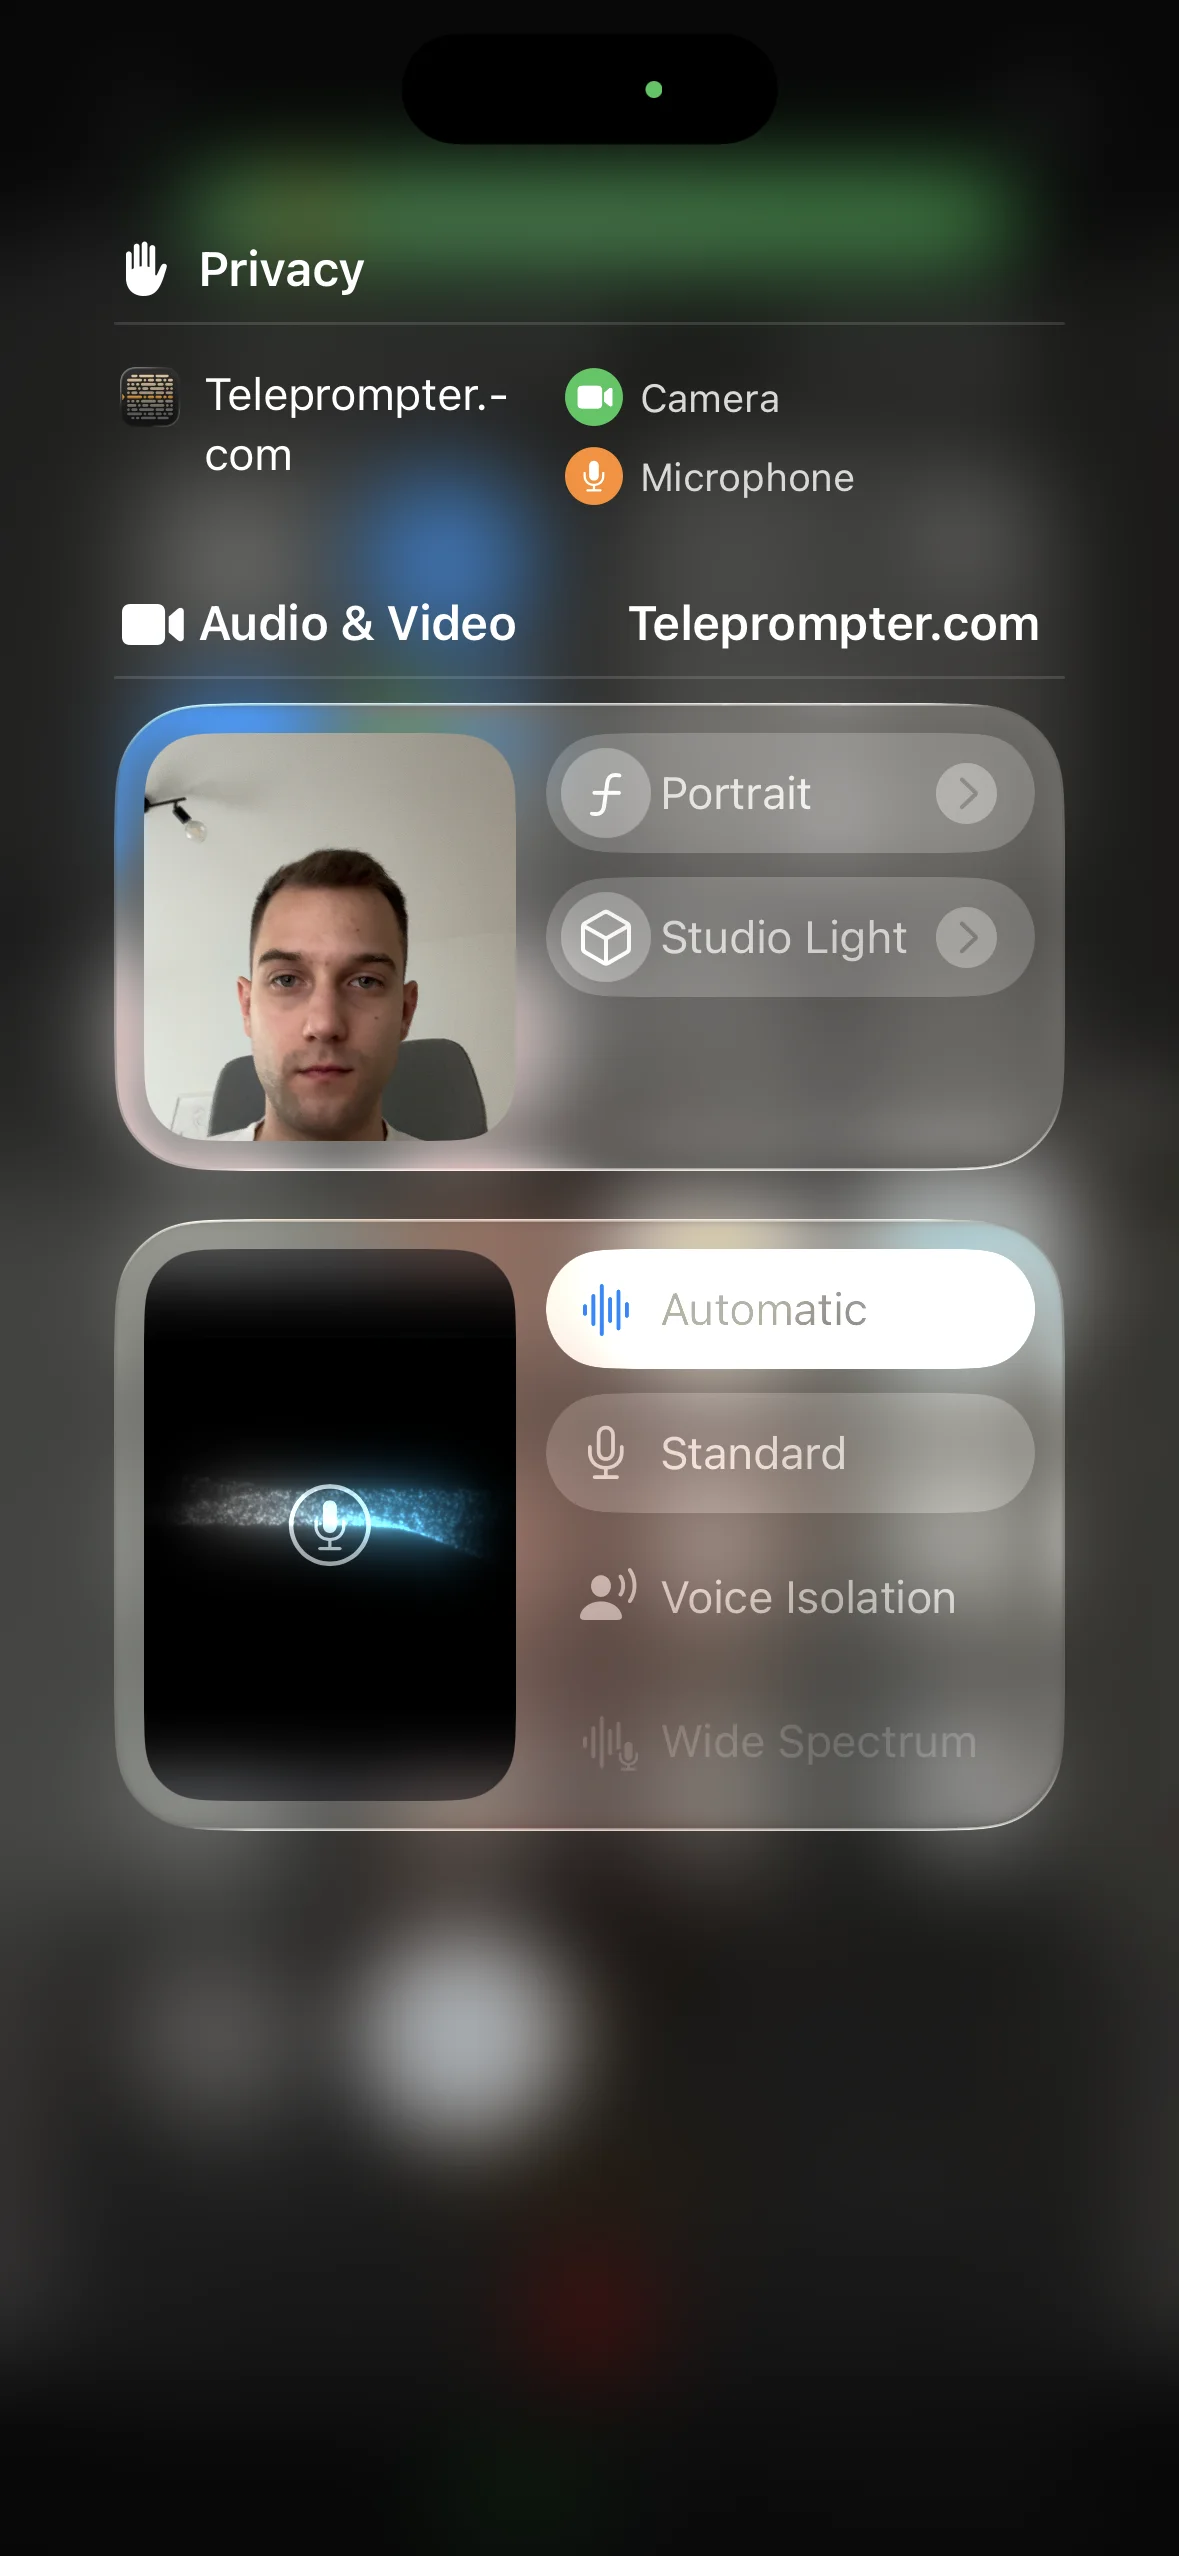
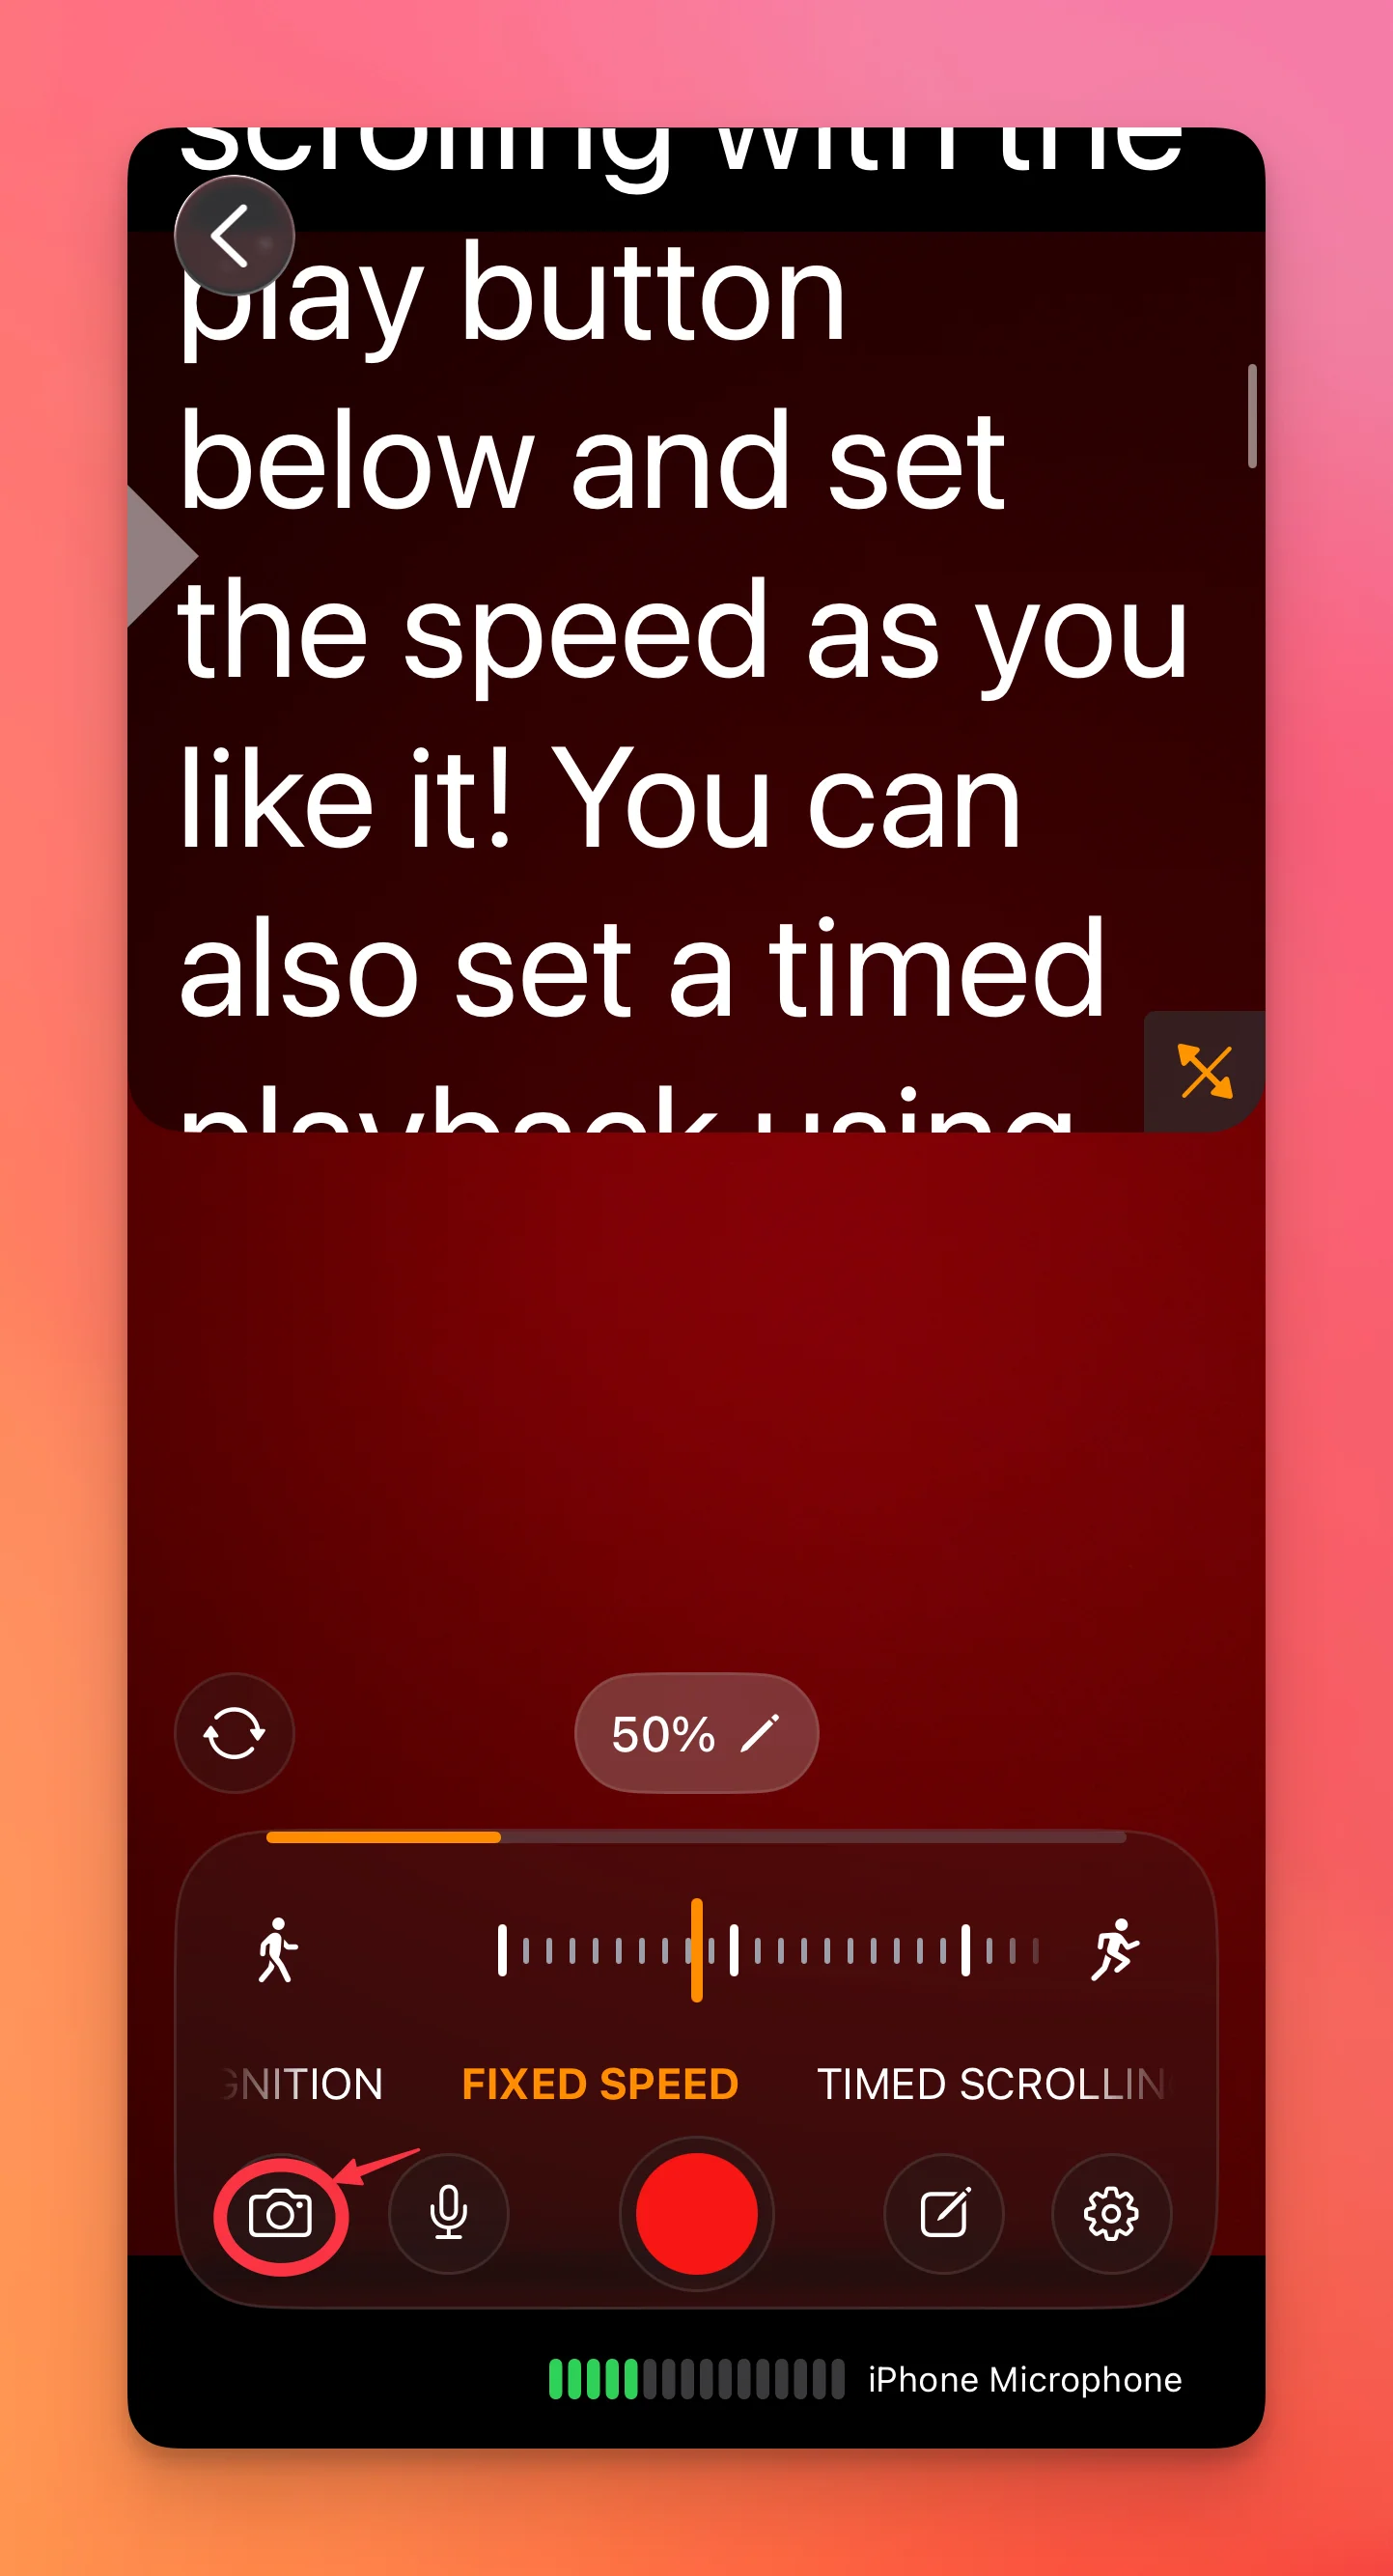
You can also enable cinematic mode directly from the capture screen of the Teleprompter.com app:
Creating recordings using the web version of Teleprompter.com is quick, intuitive, and doesn’t require any downloads. Here’s how you can get started:


Once the recording screen loads, you’ll see the teleprompter/script window. The interface is divided into two main areas:
Here, you can adjust and control how the script appears:
On this side of the screen, you’ll find technical recording controls:
Remember that Stop only pauses your recording—click record again to resume into the same file, and click Done when the take is finished. Once the take is complete, you’ll be directed to the post-recording screen, where you’ll find several options:

With Teleprompter.com, you can stream live on YouTube, Facebook, Instagram, TikTok, or any platform that supports RTMPS streaming—all while reading your script seamlessly within the app.
Live streaming is one of the app’s four modes, alongside teleprompter, video recording and audio recording. To get started:
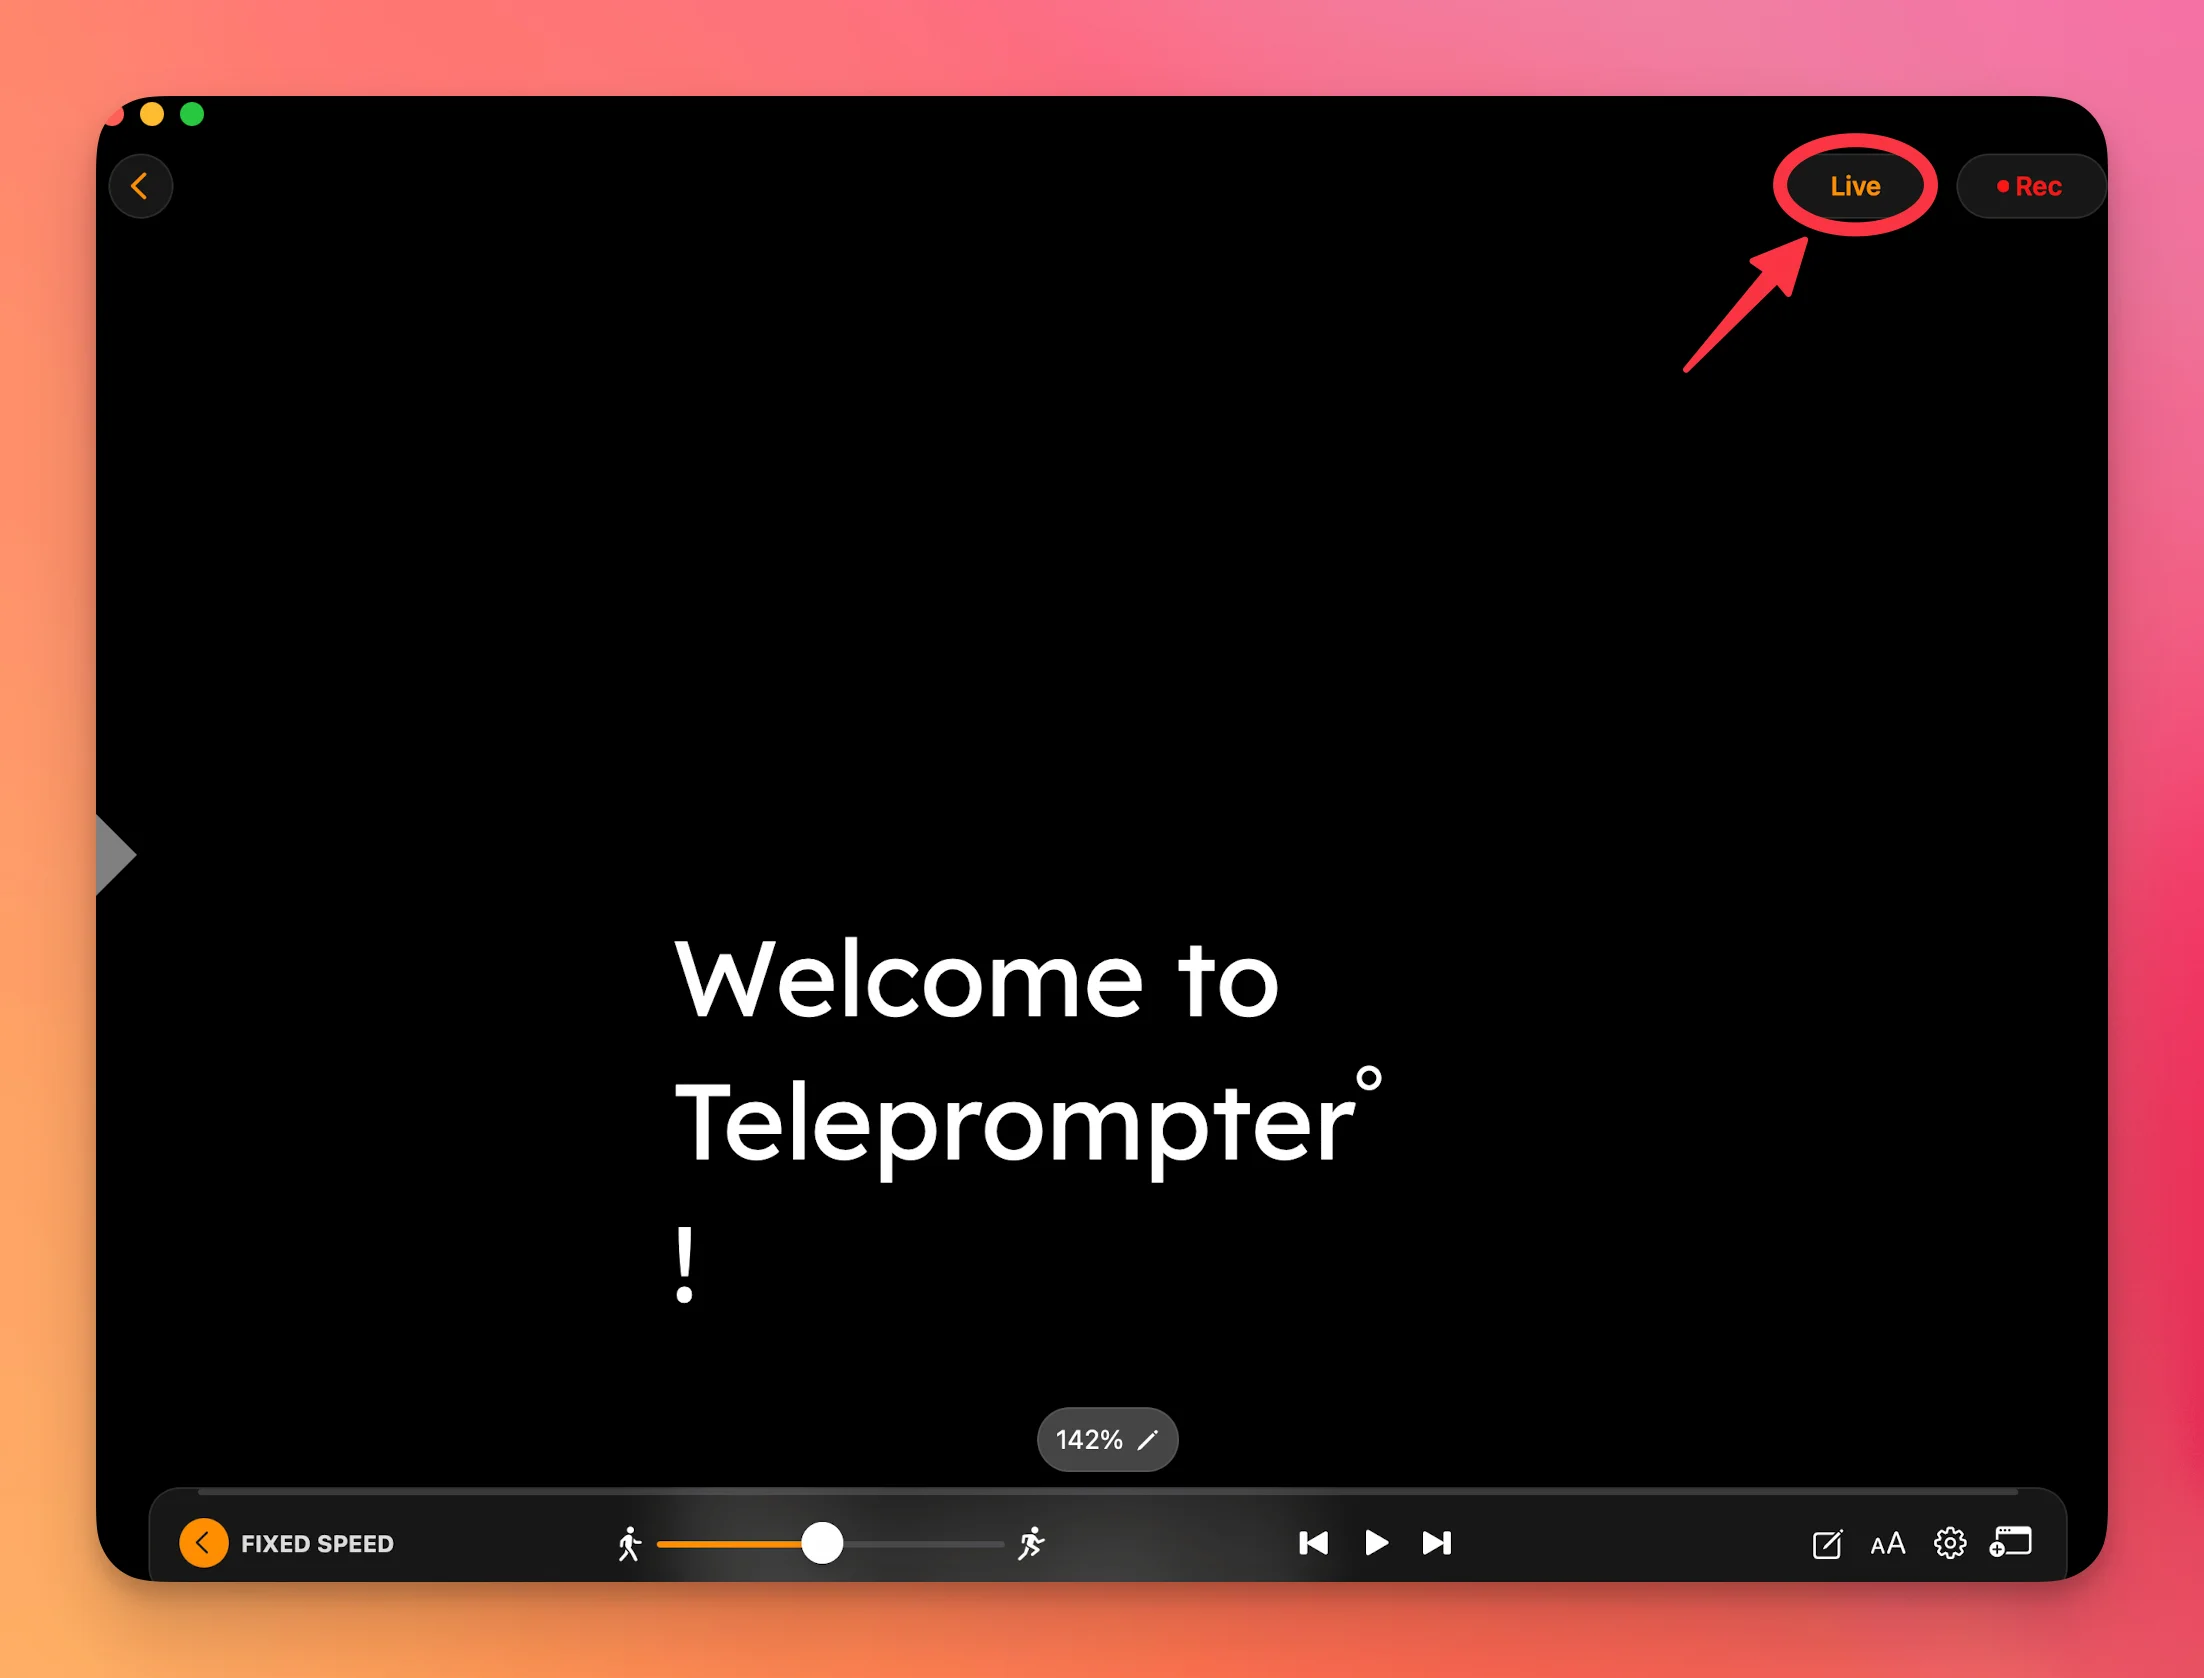
From there, you’ll be able to choose your streaming platform and set up your live session.
Once you are in live streaming mode, there is also an option to Stream with URL.
This allows you to stream to any platform that supports RTMPS, such as:
Just paste your Stream Key and RTMPS URL, and you’re ready to broadcast. For the full walkthrough, see Streaming to a custom RTMP URL.
Going live on YouTube is easy, but it does require a few steps:
Once that’s done, you’re ready to stream through Teleprompter.com.
Before you go live on Facebook, make sure your account meets the following criteria:
More info available here:
👉 Facebook Live Eligibility & Requirements
If your business page is linked to a different Facebook profile, you might experience login issues when trying to go live from Teleprompter.com.
Here’s a quick fix:
This works because the Facebook Login SDK uses Safari’s webview for authentication. Unfortunately, Facebook’s SDK doesn’t provide an option to switch accounts directly inside the app, so logging out manually in Safari ensures you can connect the correct profile for live streaming.
To stream live on Instagram from your desktop (or via Teleprompter.com), you need a Professional Account. Here’s how to switch:
After switching, you’ll see the “Live Video” option under Create [+] on the left. This change is usually effective immediately.
To go live on TikTok using a stream key, you must have Live Access.
Once access is granted, you'll be able to retrieve your Stream Key & URL and use Teleprompter.com to stream live.
Whether you're teaching, presenting, or connecting with your audience, Teleprompter.com gives you a smooth, guided live streaming experience.
Already recorded a video and want to edit it or add features like subtitles, background blur, or watermarks? Teleprompter.com lets you import external videos directly into the app for quick and easy editing.
Here’s how to do it:
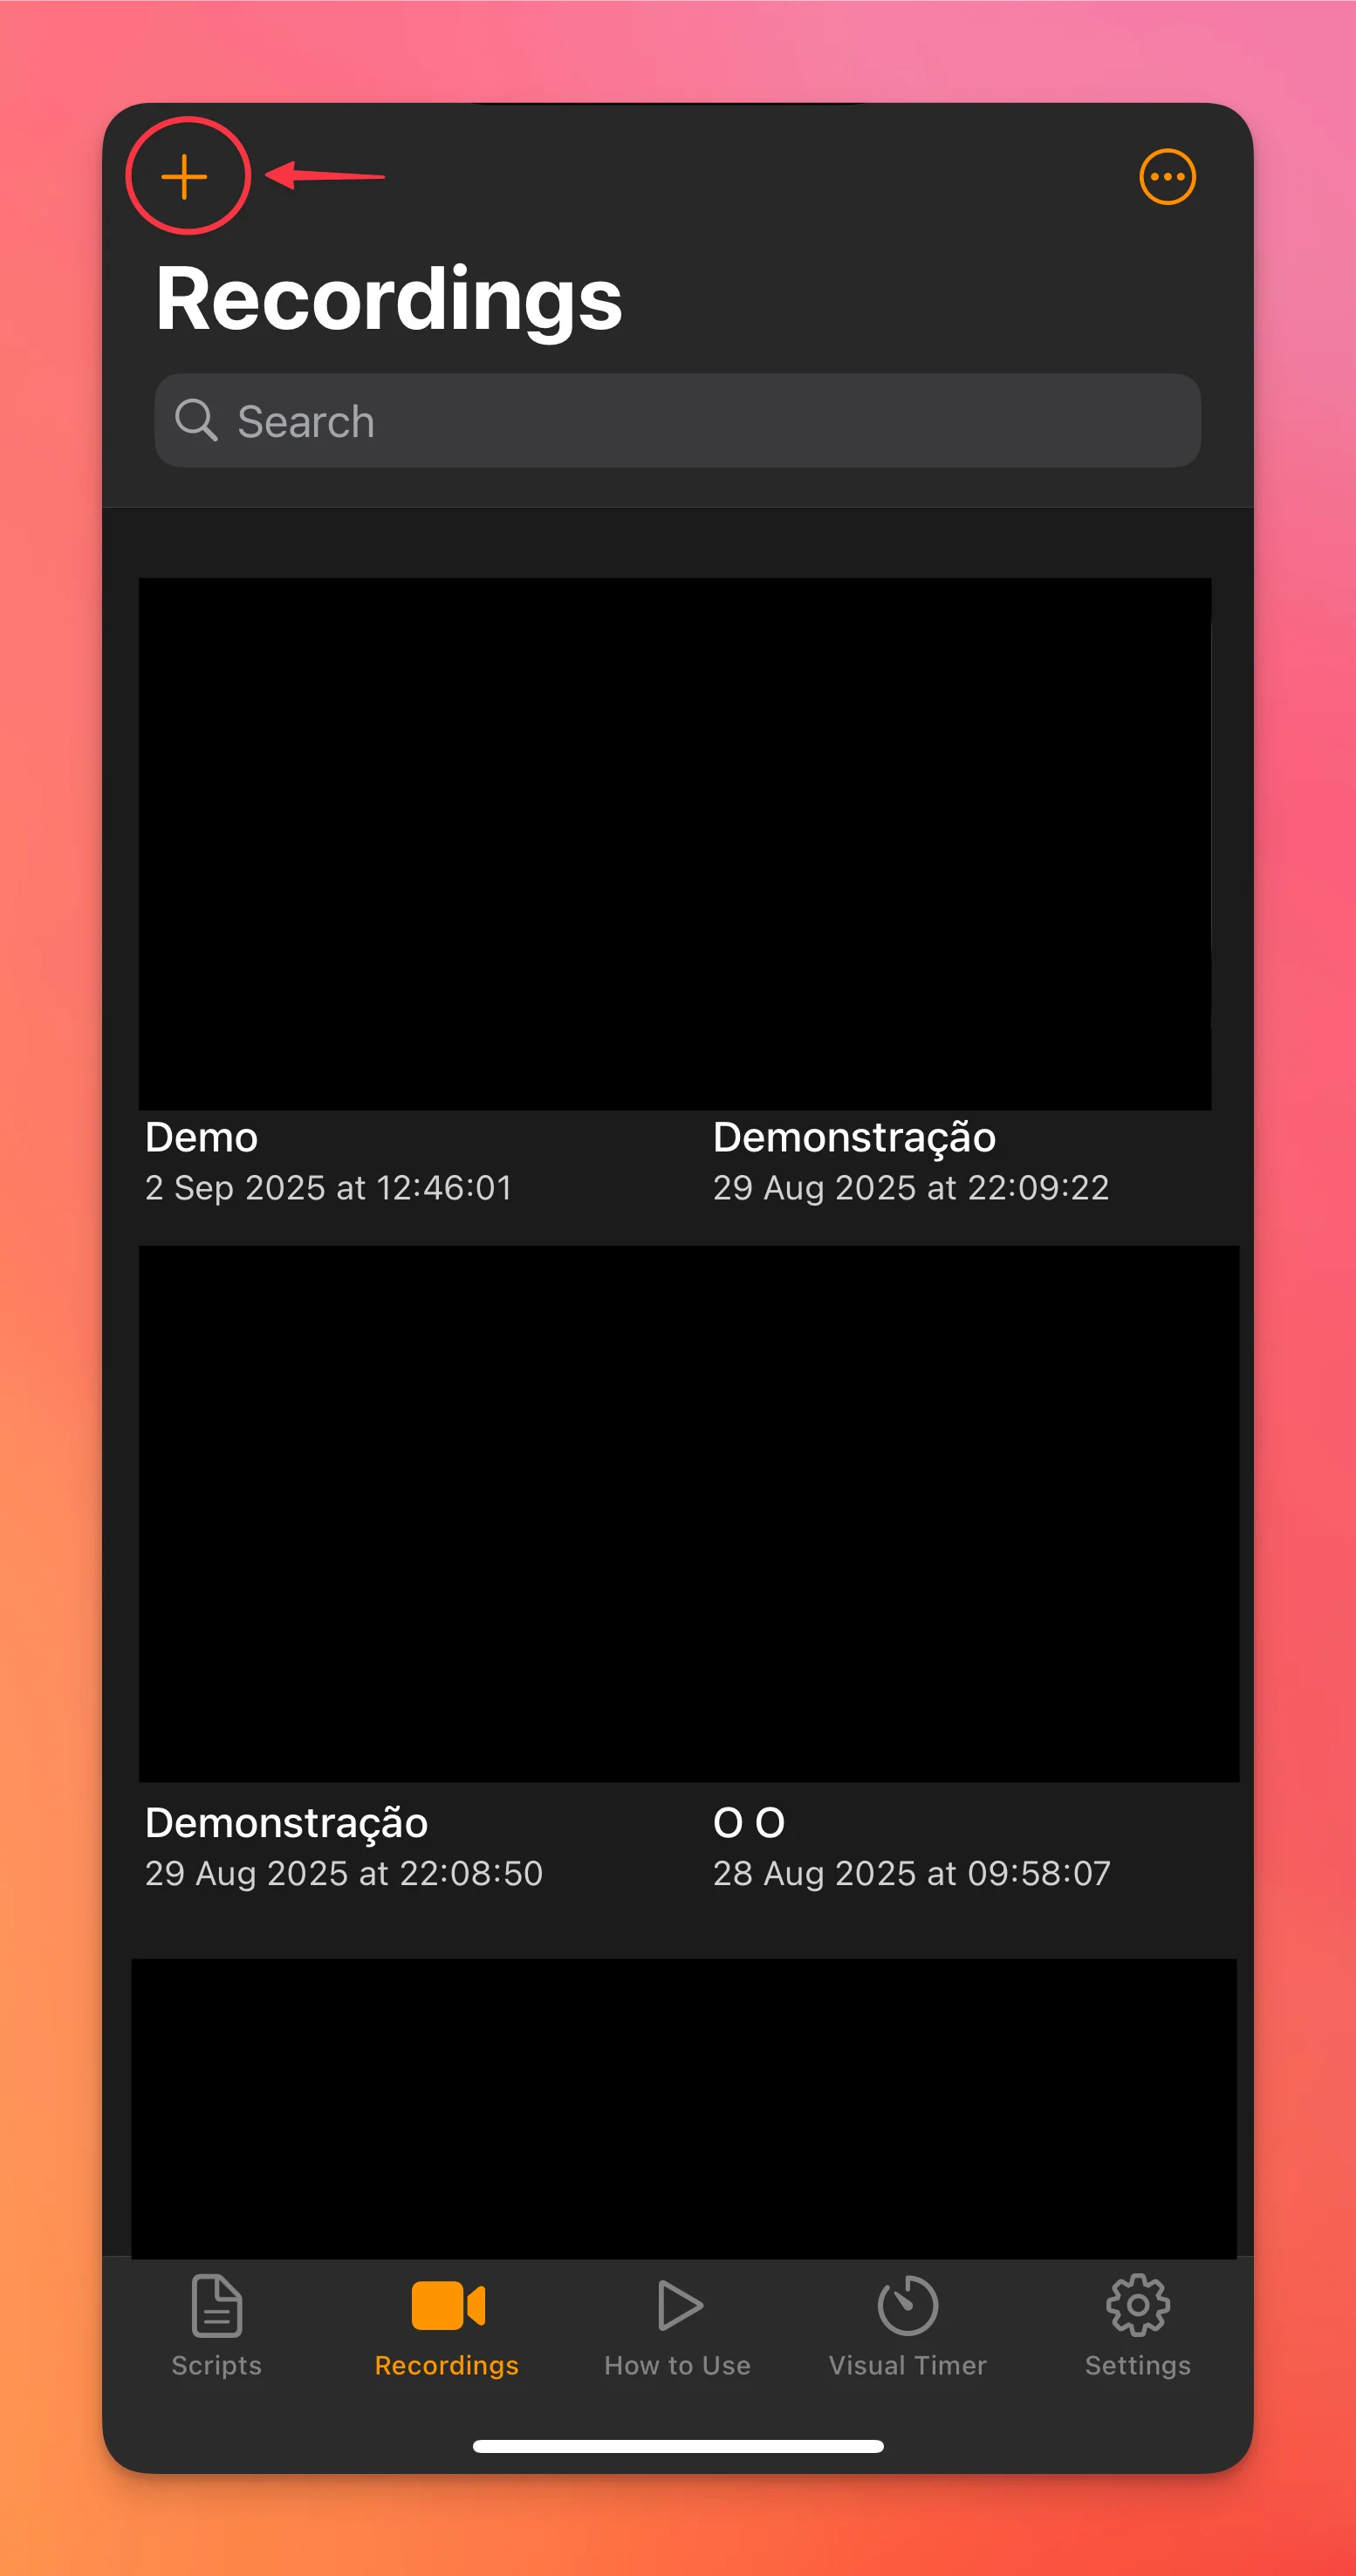
Tip for macOS Users:
If you’re using Teleprompter.com app on a Mac, you can also drag and drop your video file directly into the Recordings panel for an even faster import experience.
Once imported, your video will appear alongside your other recordings and can be edited using all of Teleprompter.com’s built-in tools.
Want to personalize your videos with an intro or outro clip? With Teleprompter.com, you can easily add branded openings or closing segments directly from your camera roll.
Here’s how to do it:


Adding intros and outros is a great way to make your content more polished and professional.
Want to create a clean, professional look by blurring the background in your videos? Teleprompter.com lets you easily apply a blur effect after recording, even if you didn’t use Portrait Mode during the shoot.
Here’s how:
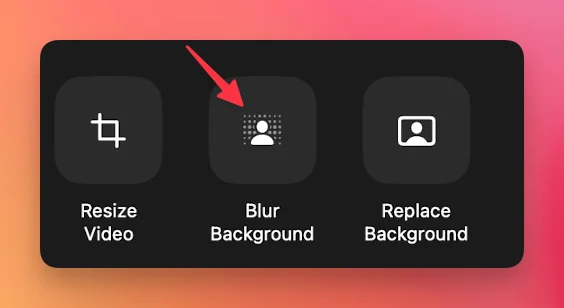
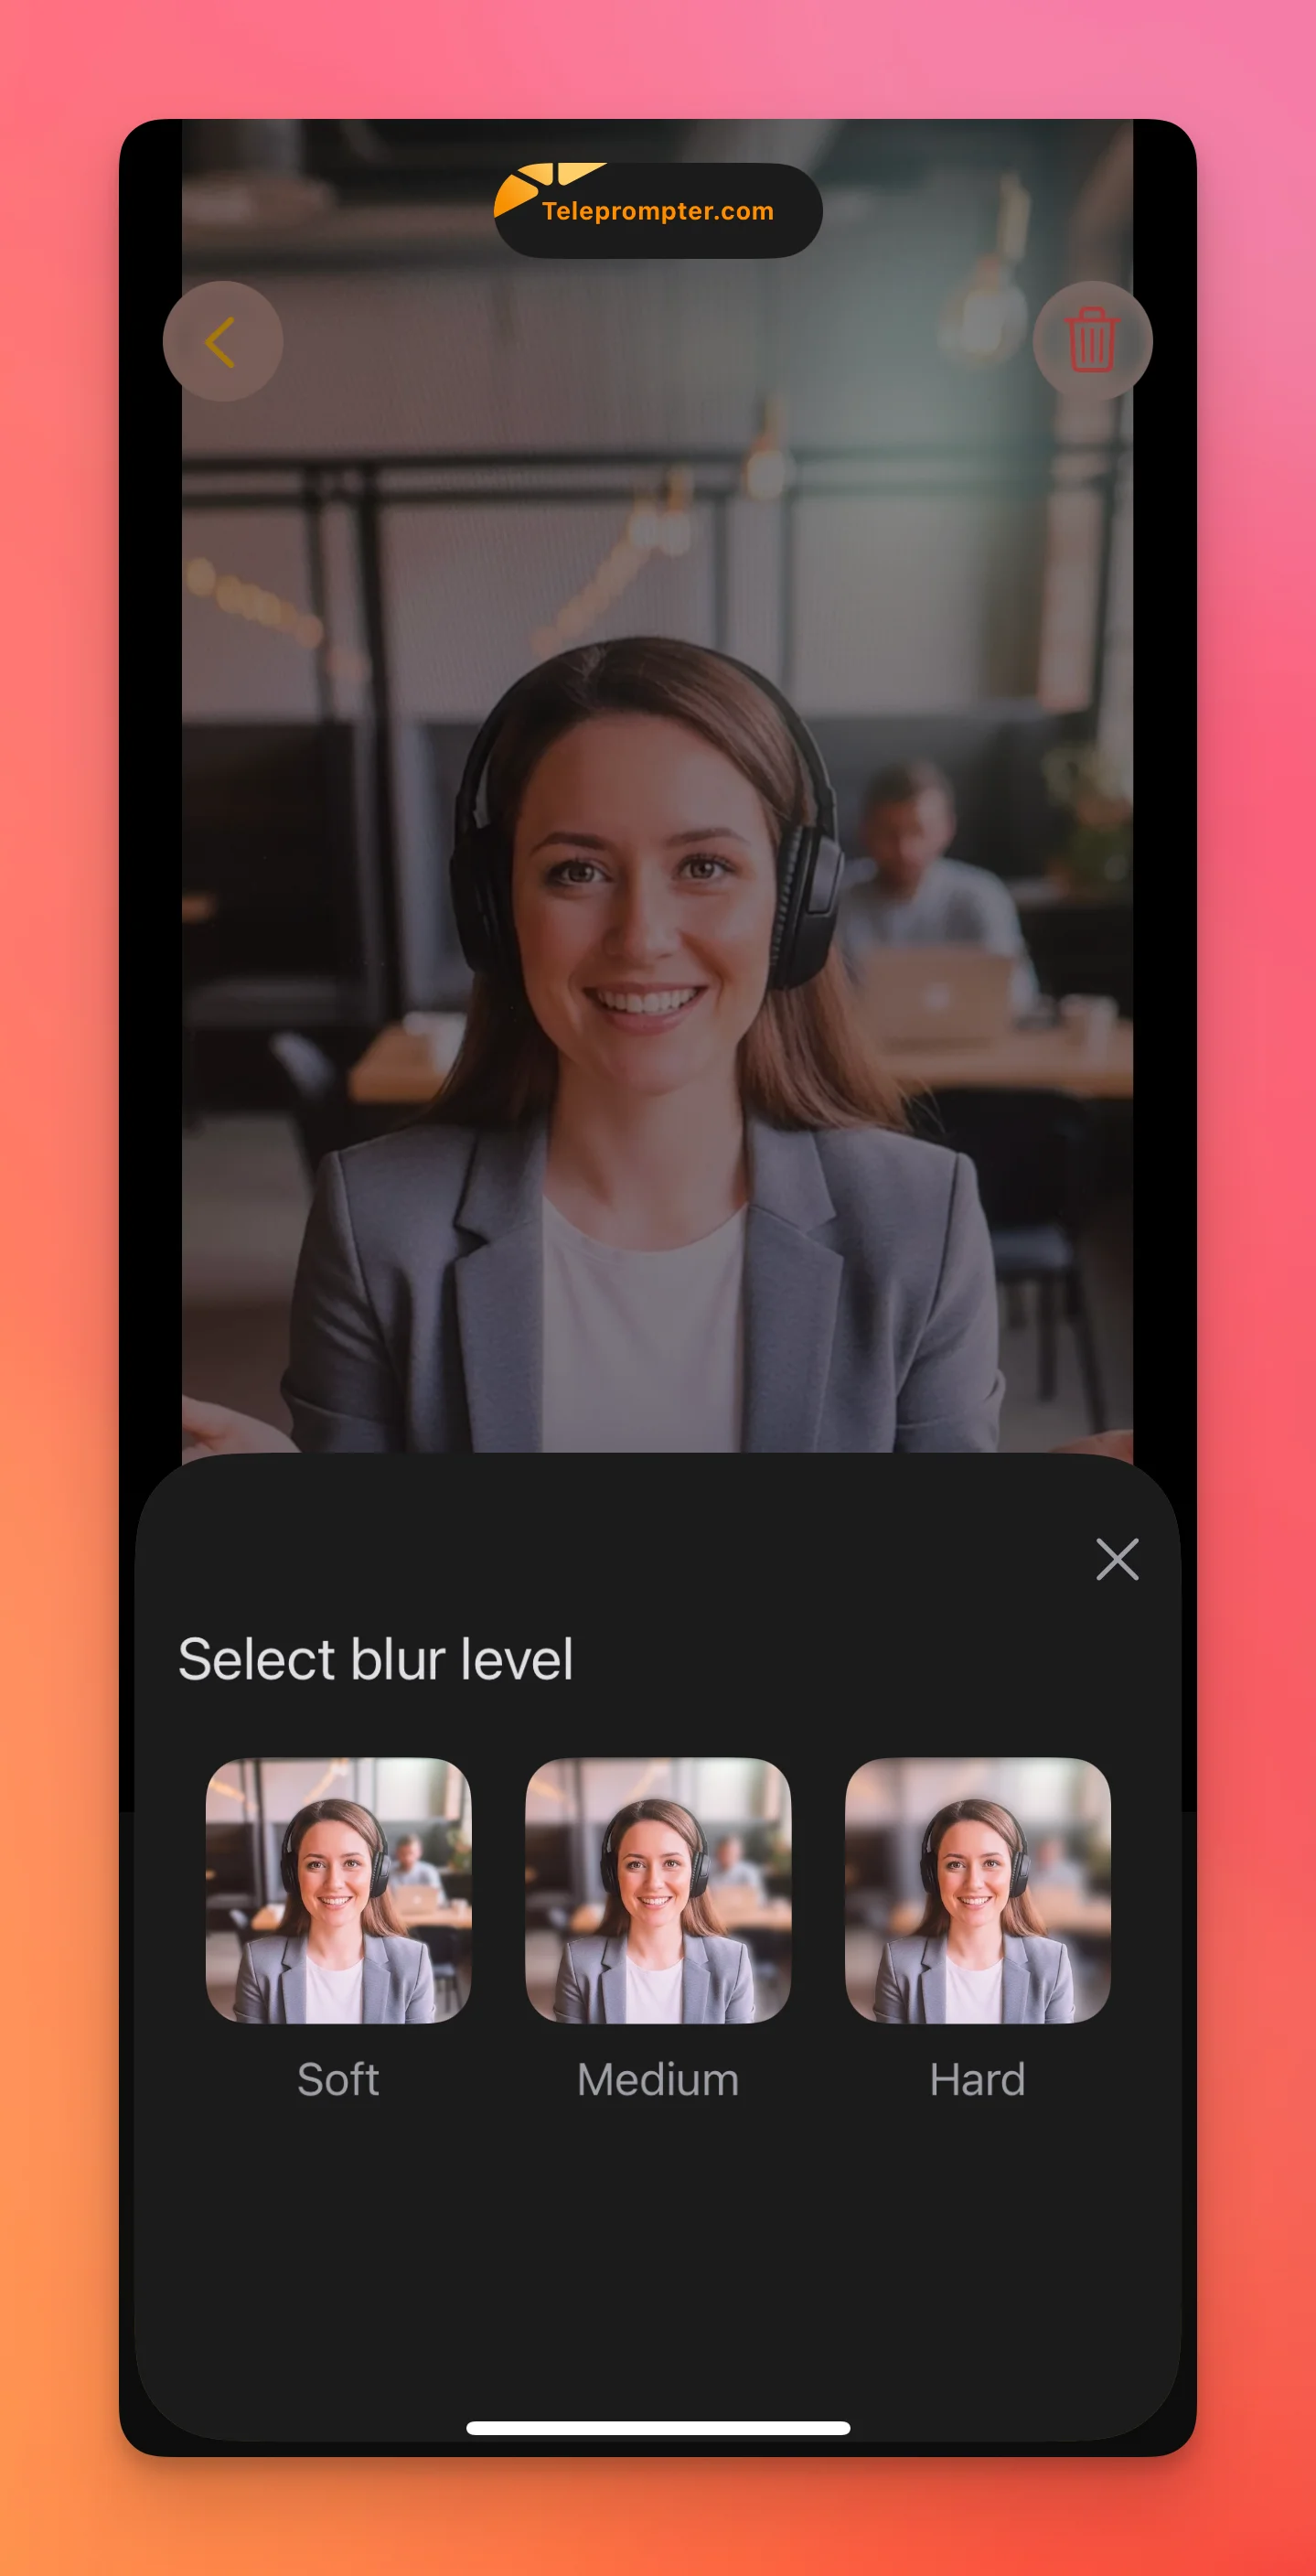
📌 Tip: For best results, we recommend enabling Portrait Mode before recording. To learn how, refer to the FAQ on How Can I Edit the Recording Resolution in Teleprompter.com?
Note: starting with iOS 26, Portrait Mode is called Cinematic Mode on supported iPhones. See How to Disable or Enable Portrait (Cinematic) Mode for the full steps.
Video resizing is available on the iOS, macOS, Android, and web versions.

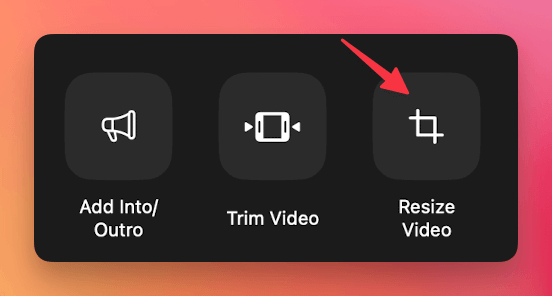
You can also resize manually by pinching with two fingers directly on the screen to adjust size and placement.

If you need to cut out unwanted parts of your video, Teleprompter.com makes it simple with a built-in trim feature.

Note: Trimming is not available in the web browser version at the moment.
If your recording has background noise or uneven sound, Teleprompter.com offers a quick and effective way to improve your audio with the Clean Audio feature.
Follow these steps:

Once completed, your video will have enhanced audio with reduced background noise, making it sound clearer and more professional.
Want to personalize or brand your videos? With Teleprompter.com, you can easily add a watermark to any video you've recorded in the app.
Here’s how:

Watermarks are a great way to protect your content or promote your brand.
Still have questions? We’re here to help at support@teleprompter.com or via Settings > Contact Support in the app.
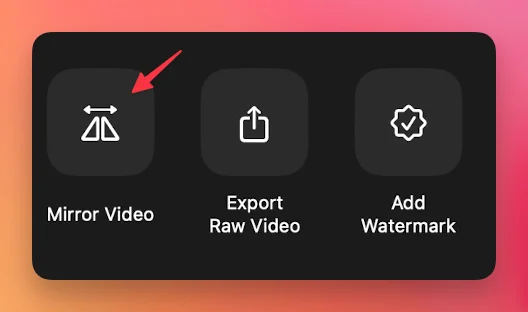
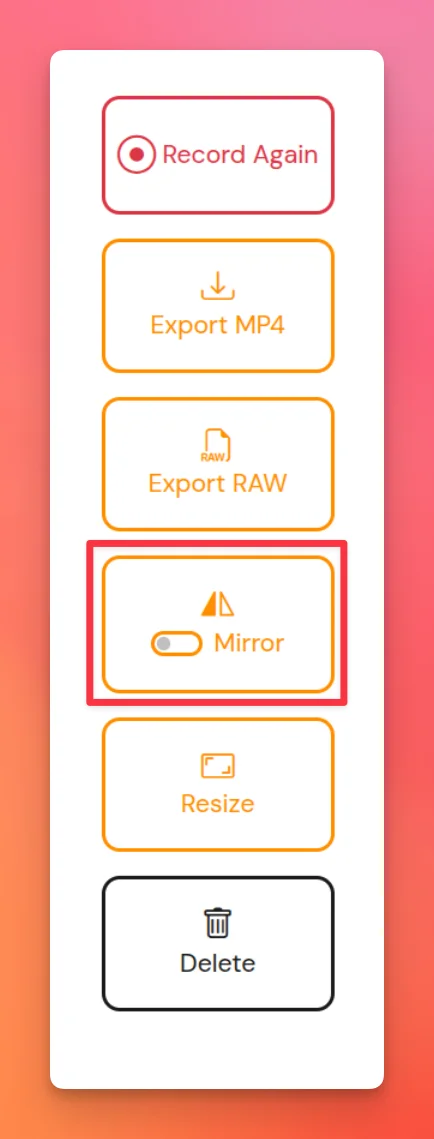
If your video appears flipped or you'd simply prefer a mirrored version, Teleprompter.com makes it easy to mirror your footage with just a tap.
Here’s how to do it:
Need to make last-minute changes to your script before a recording? With Teleprompter.com, you can quickly edit your text whether you're prepping or already on the recording screen.
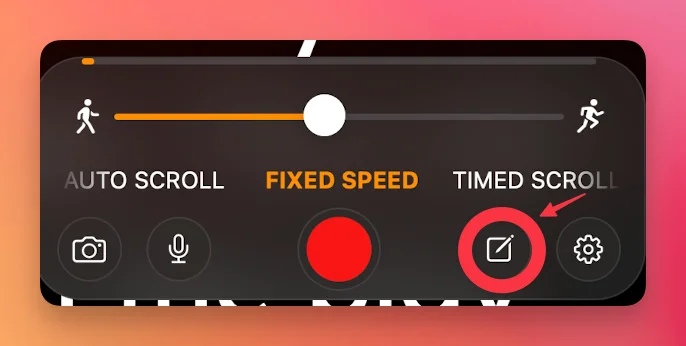
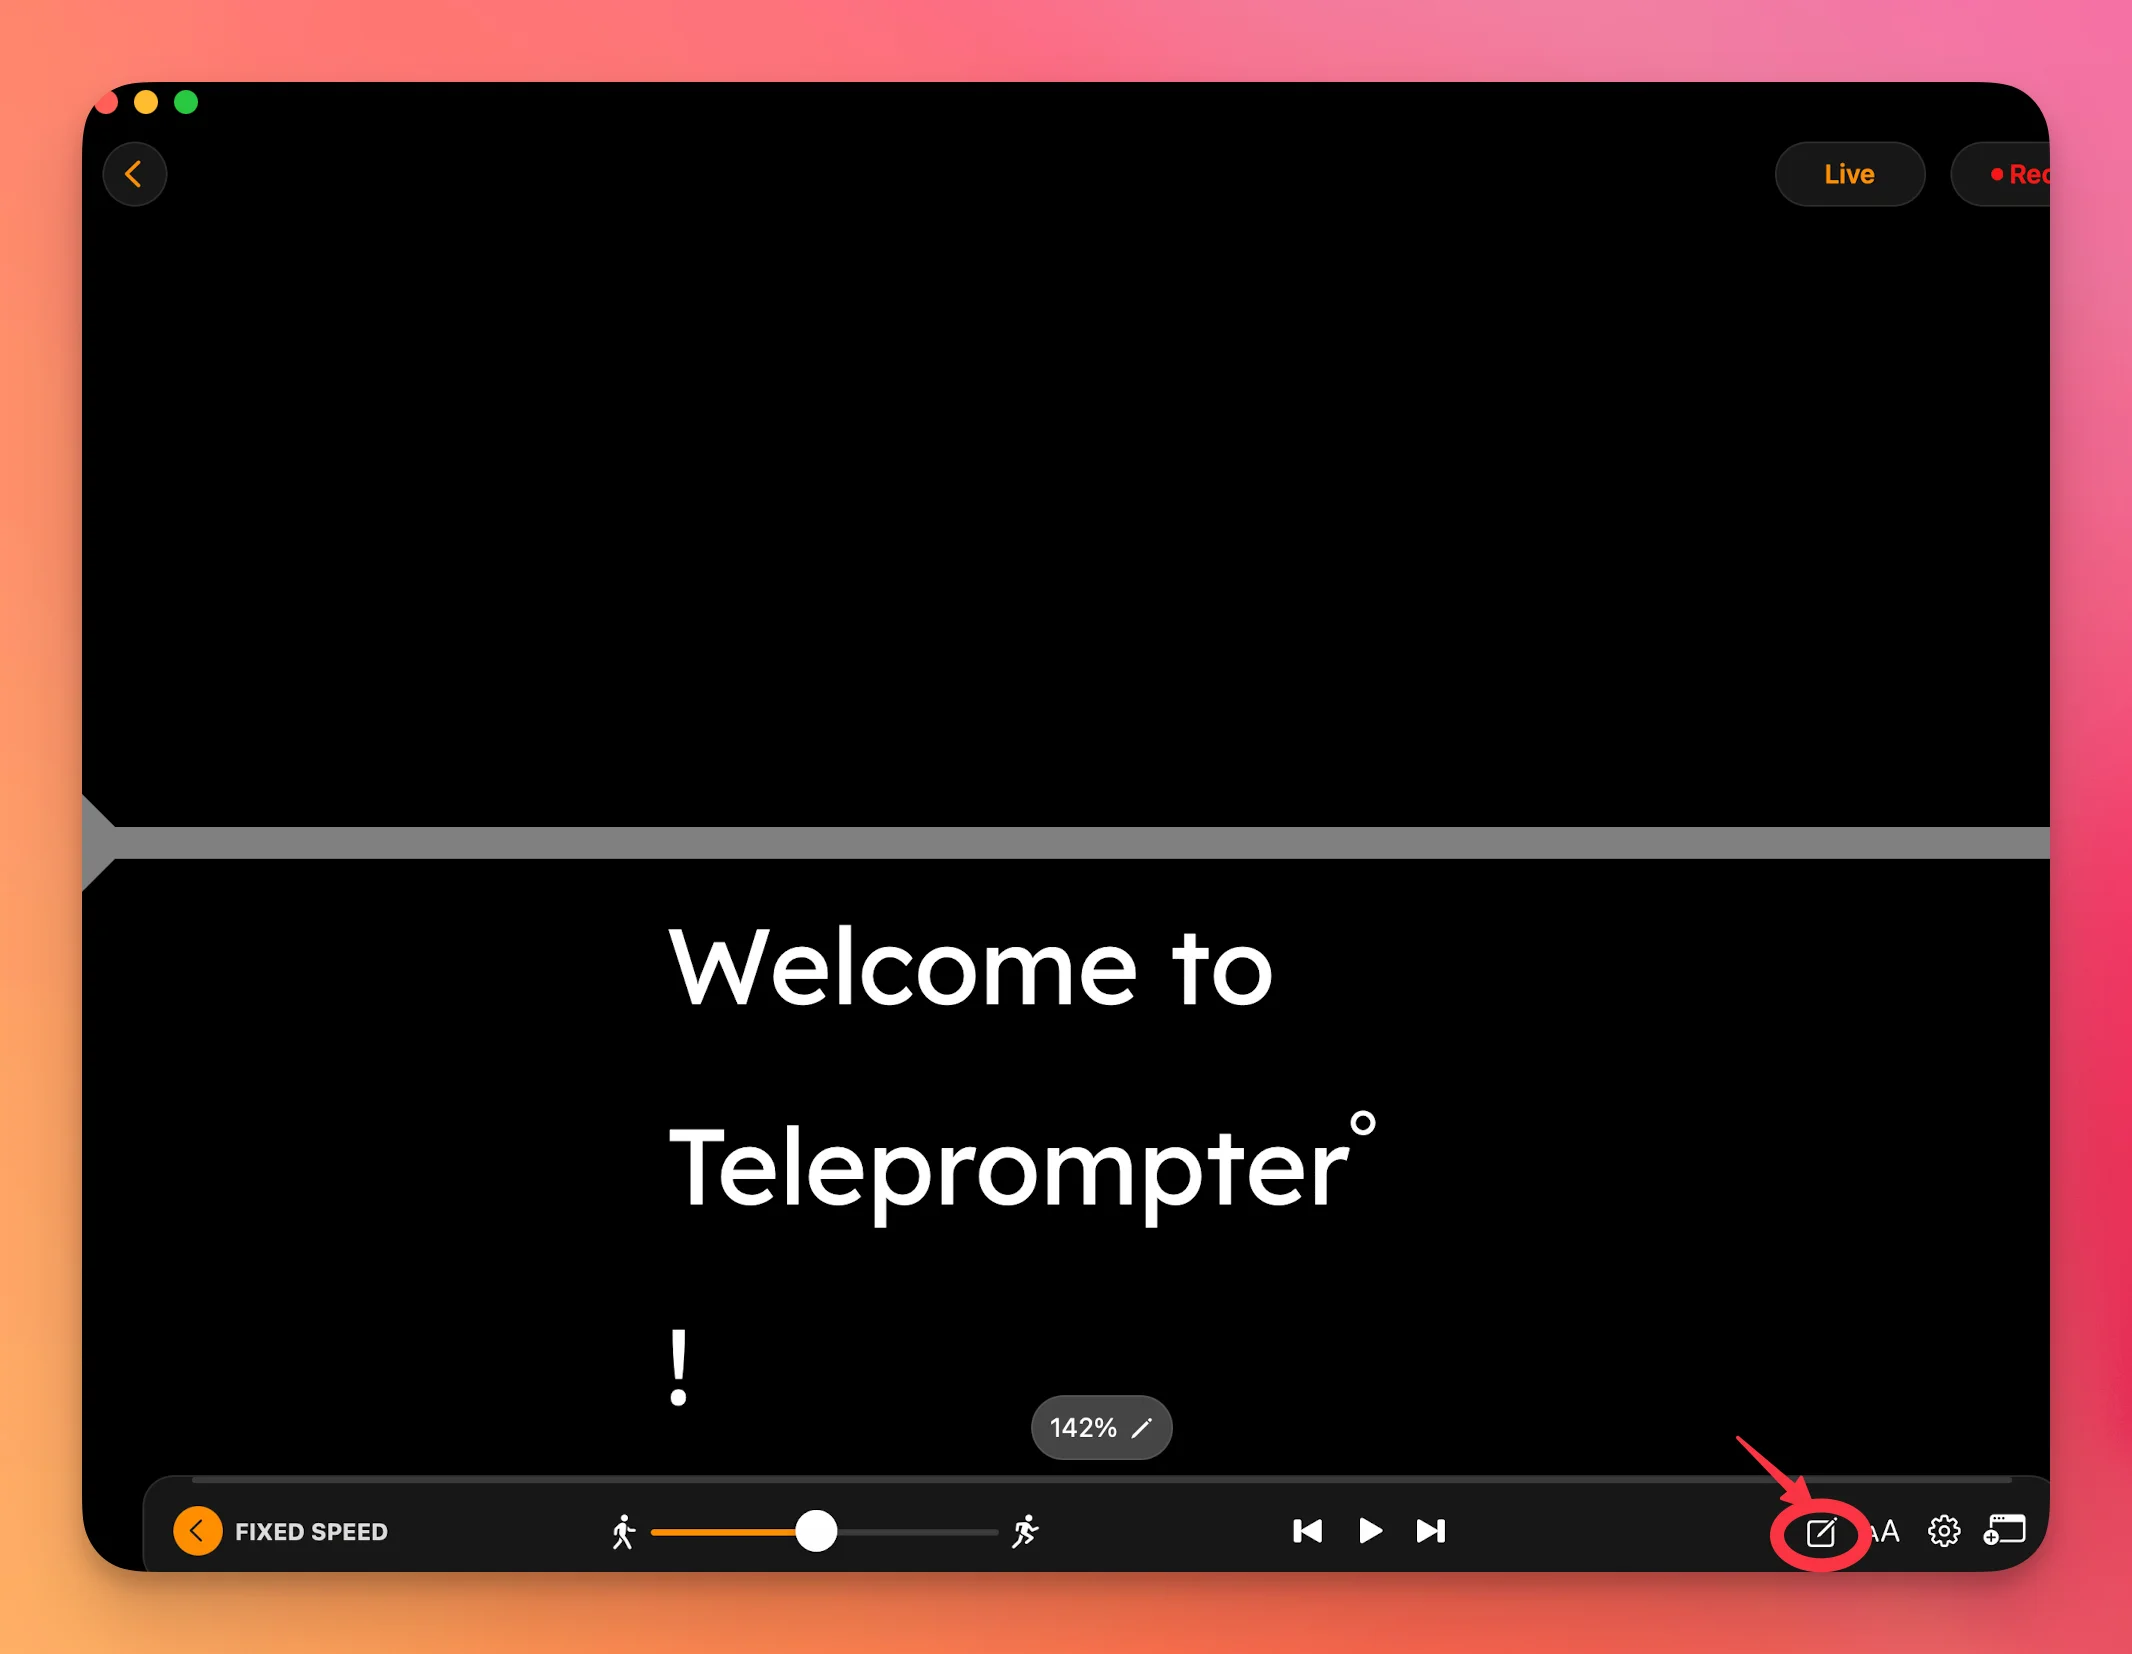
Whether you’re refining a word or rewriting a section, Teleprompter.com makes it easy to keep your script polished and ready.
With Teleprompter.com, you can easily adjust your video quality before recording to match your project needs—from quick demos to professional content in full 4K.
Here’s how to do it:
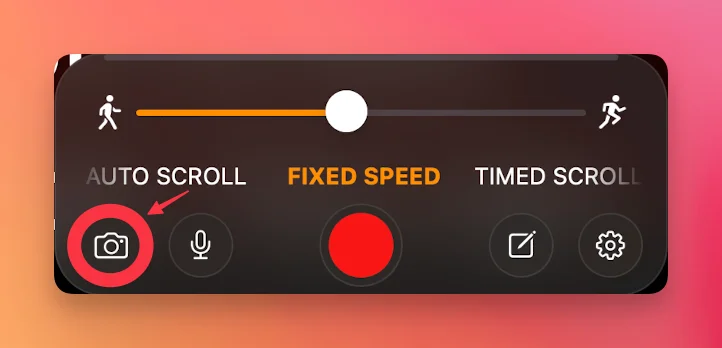

You can also fine-tune other video settings in this menu:
Note: starting with iOS 26, Portrait Mode is called Cinematic Mode on supported iPhones. See How to Disable or Enable Portrait (Cinematic) Mode for the full steps.
Choose the format that best matches your platform, lighting, and performance goals.
Want your script to start scrolling automatically when you hit record? The Sync Scrolling and Recording feature makes that possible, helping you stay focused without needing to press multiple buttons.
Here’s how to activate it:
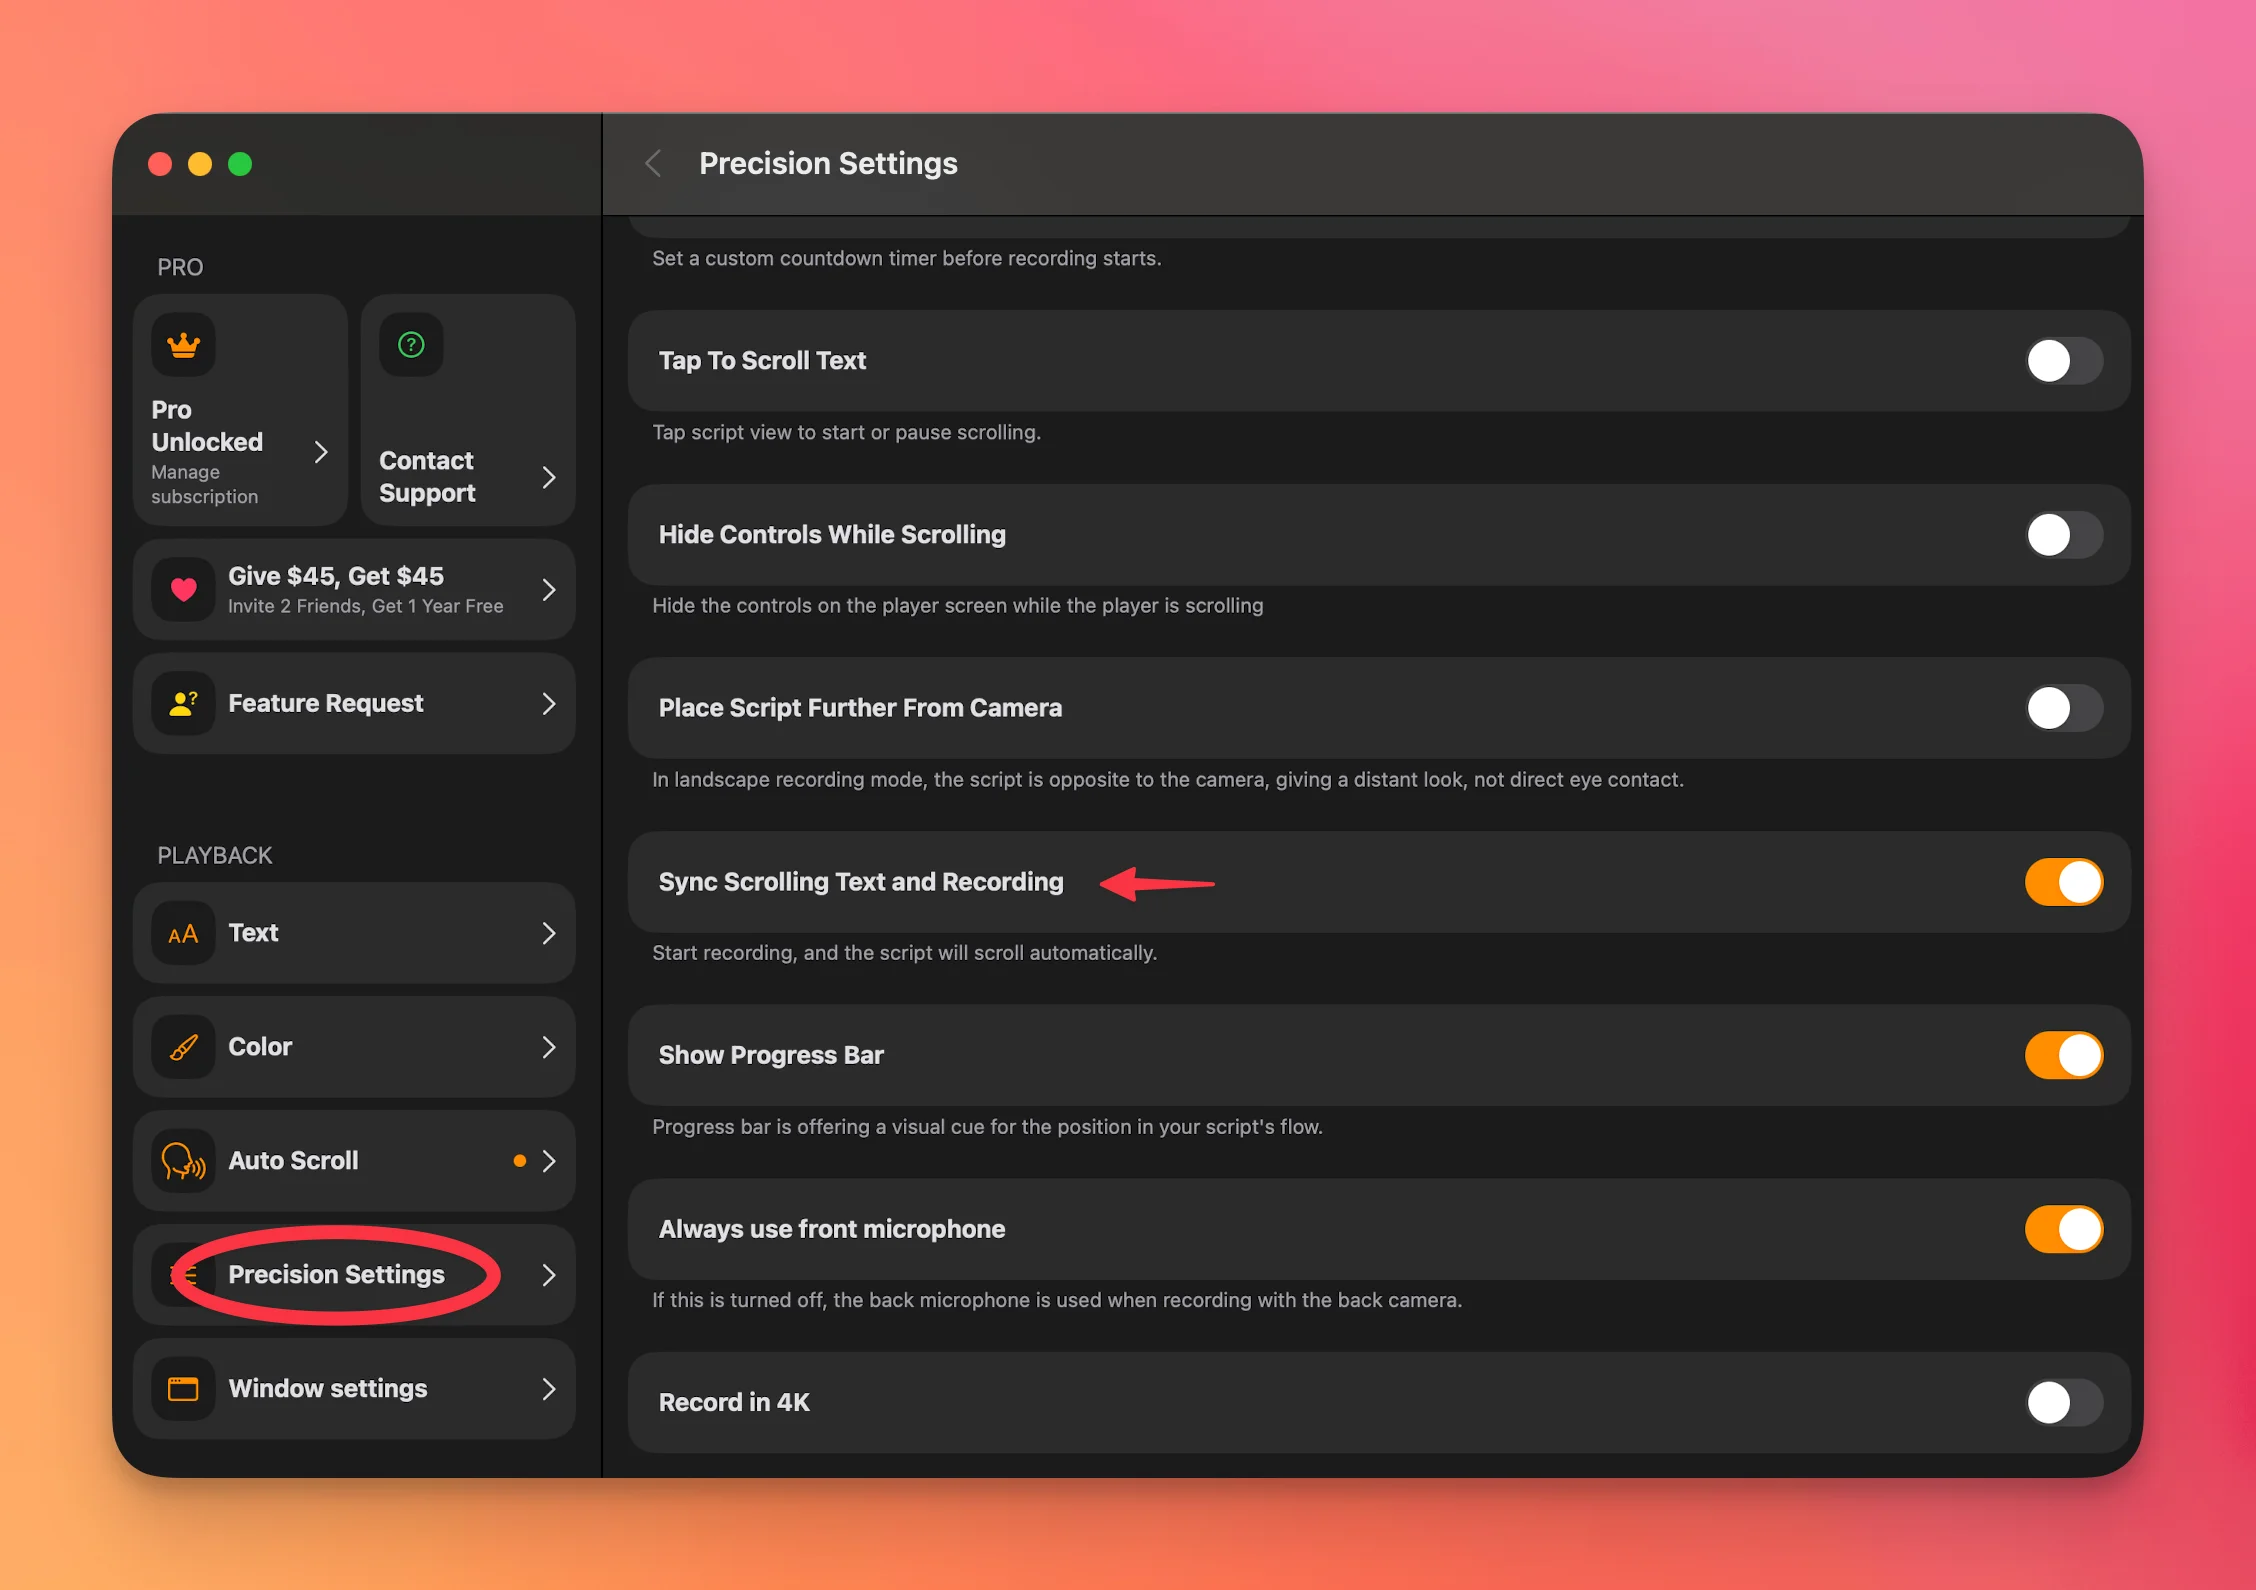
With this setting enabled, your script will automatically begin scrolling the moment you start recording.
Changing scrolling speed is available for iOS, macOS and Android versions
If syncing is enabled but the script isn't scrolling, the scrolling speed might be too low. Here's how to adjust it:
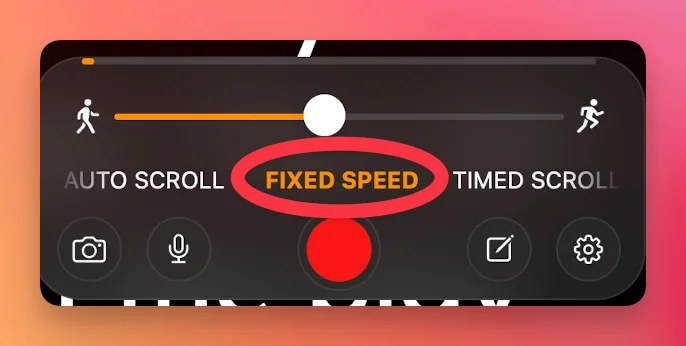
This ensures a smooth and synced start to your video recordings.
Still having trouble? Contact us at support@teleprompter.com or via Settings > Contact Support inside the app.
Looking to capture your videos in ultra-high definition? The 4K Recording feature allows you to record in crisp, professional-quality resolution—perfect for creators, educators, and professionals who want their videos to look their best.
To enable 4K recording:
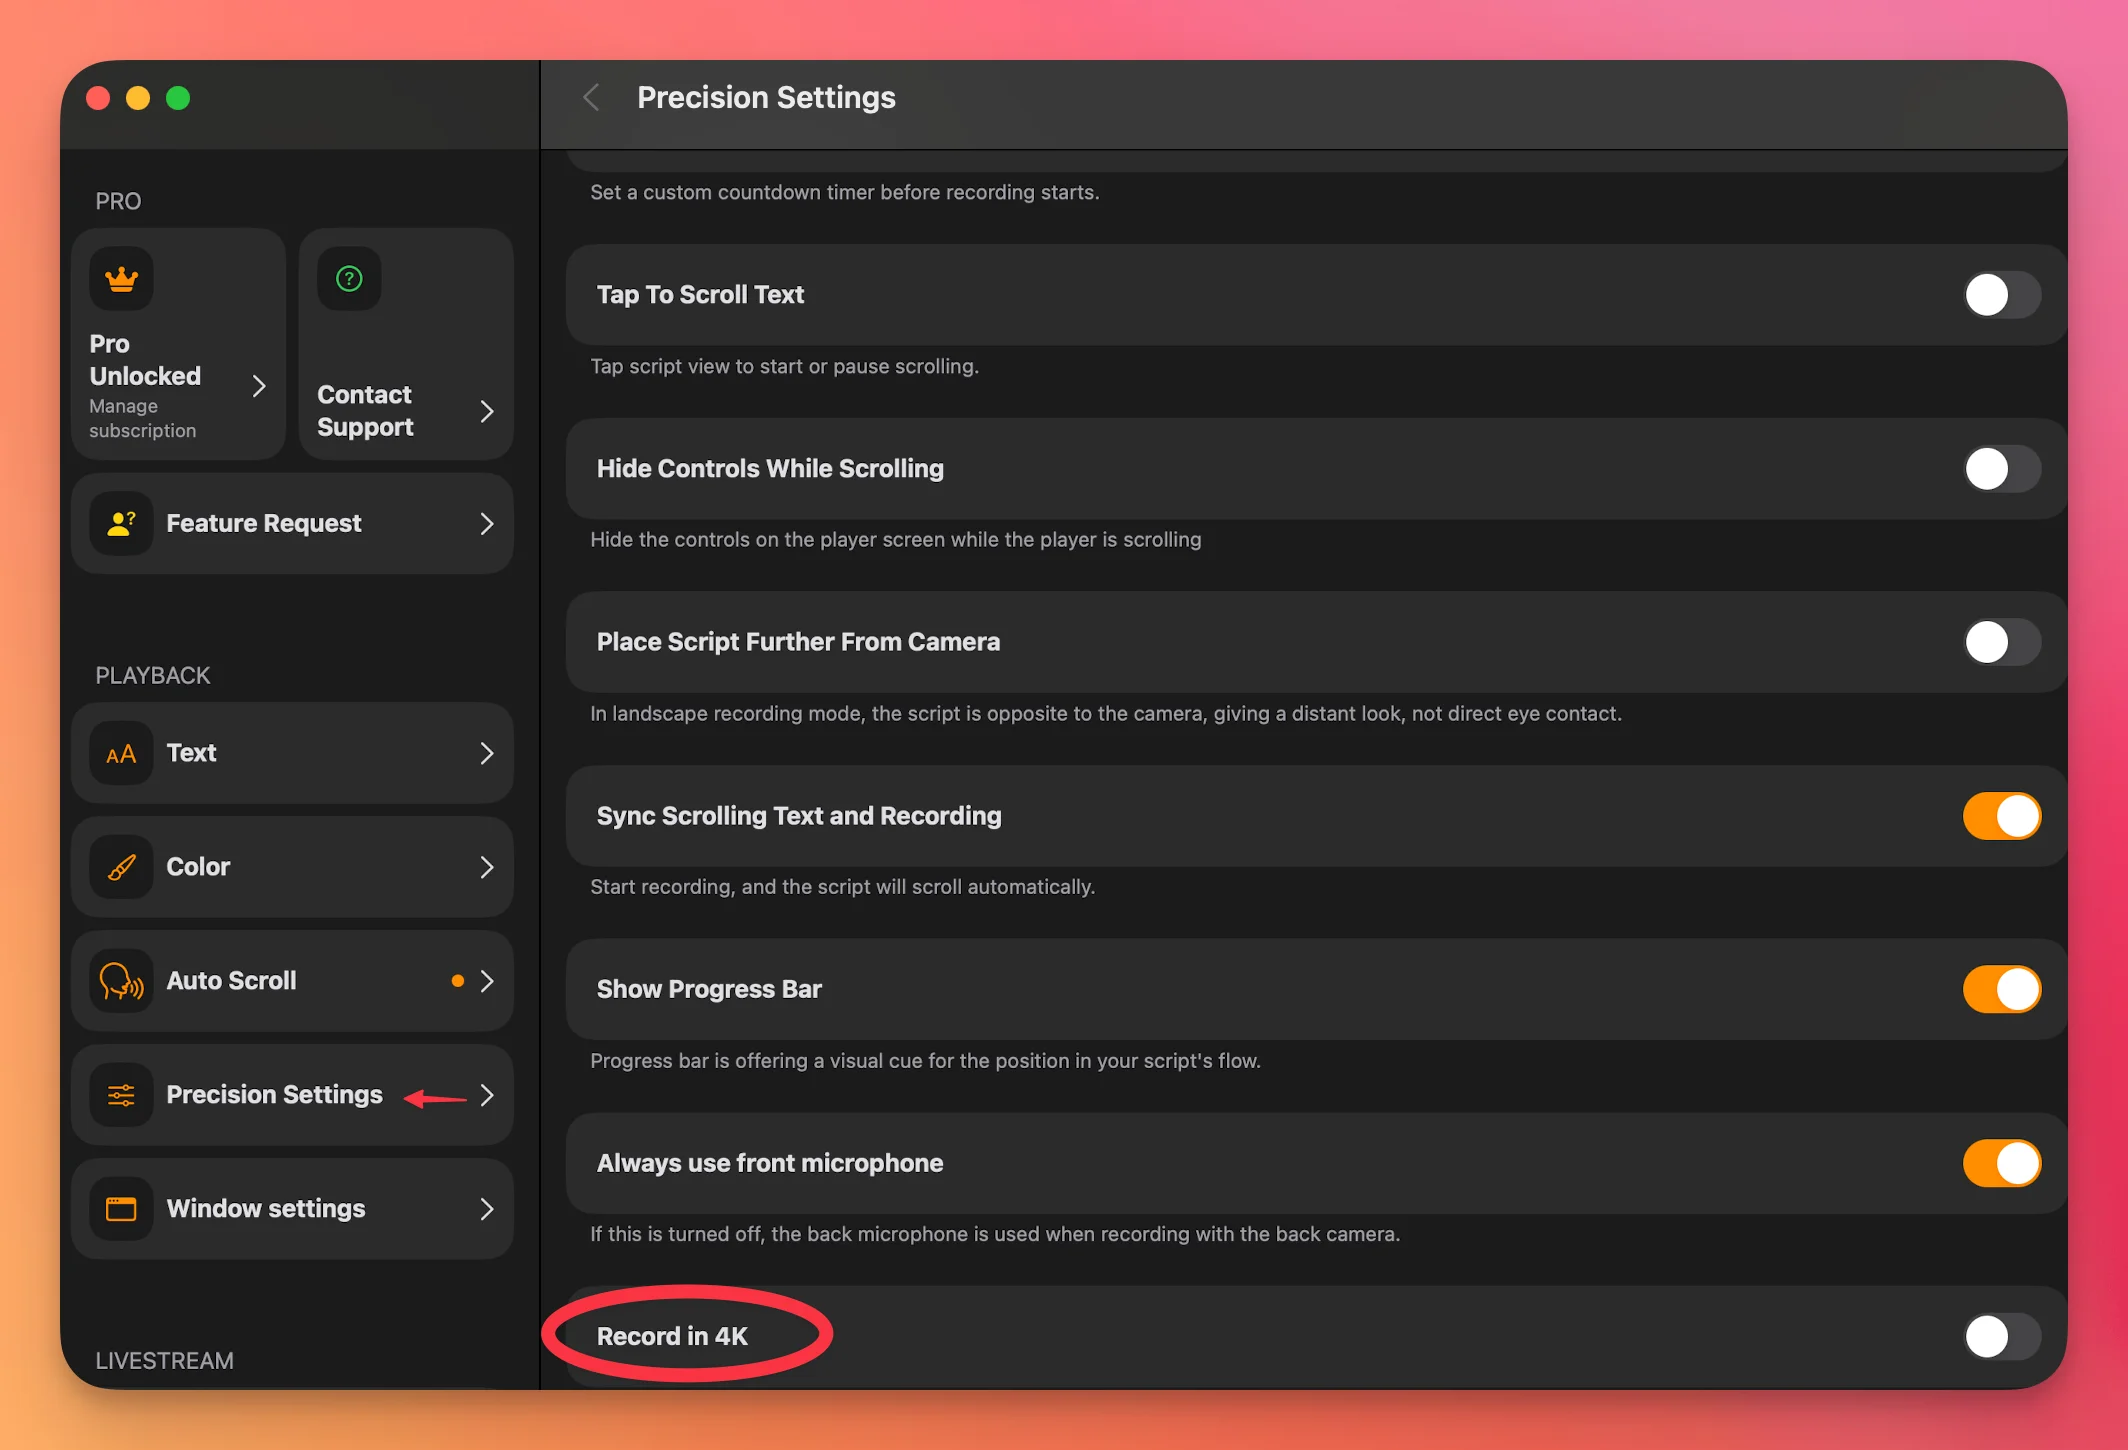
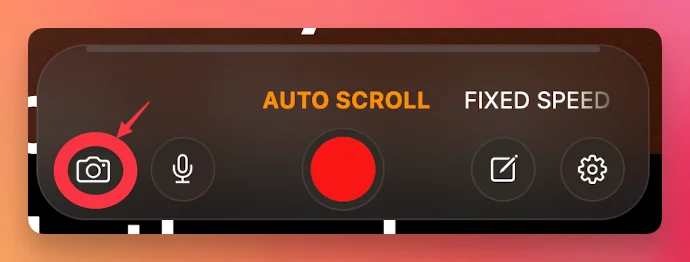
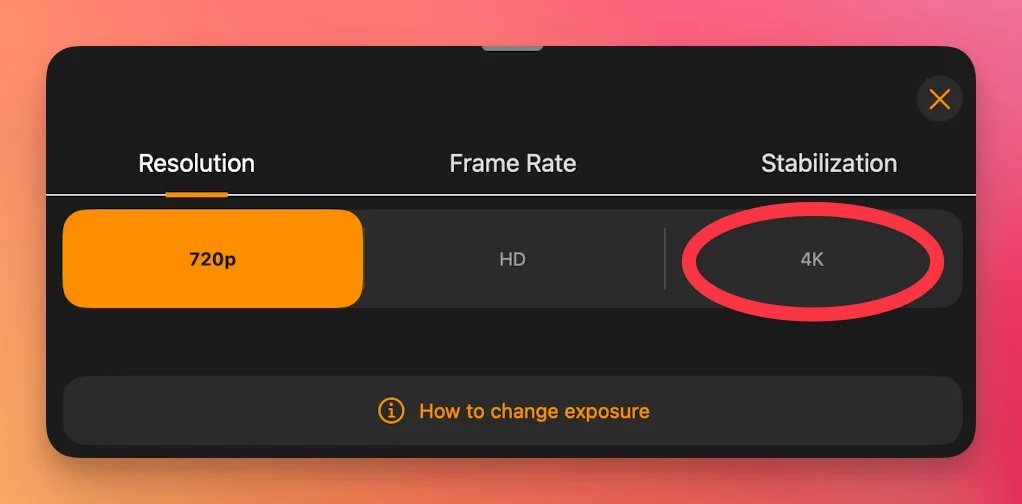
That’s it! From now on, your recordings will be saved in 4K quality.
Please note:
To check if your device supports 4K recording, visit Apple’s official specs page:
👉 https://support.apple.com/en-us/docs
Search for your specific device model and review the Video Recording section under Tech Specs for full details.
Want to keep track of how much time you have left while recording your script? The Remaining Time feature gives you a clear display of how long your session will take based on your current script and scrolling speed.
Here’s how to enable it:

Once activated, the remaining time will appear on your screen during your session, helping you pace yourself and stay within your time limits.
The countdown feature is a handy tool that gives you a few extra seconds to prepare before the recording begins — whether it's adjusting your posture, focusing your gaze, or getting into character.

This way, you can customize how much time you want before the recording kicks off — giving you a smooth and confident start every time.
A 3-second countdown will automatically begin as soon as you click to start recording.
At the moment, it is not possible to disable or customize this countdown on the web version.
Want to give your videos a more professional look or change the setting without reshooting? The Remove Background feature on iOS/macOS lets you do just that—whether you're using a green screen or not!
Here’s how to access it:
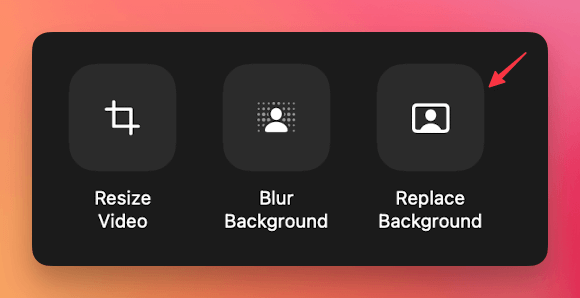
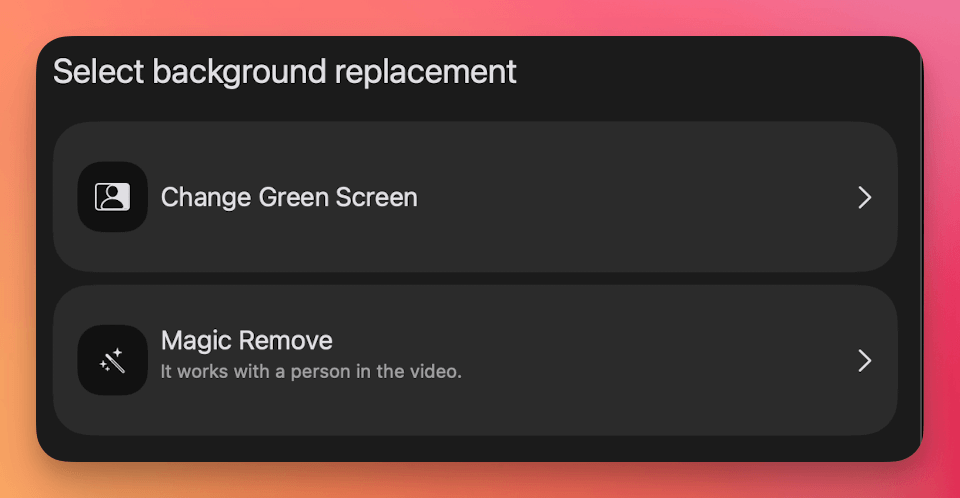
Please note that the key colour, tolerance and spill suppression cannot be adjusted at the moment.
Not sure which option fits your setup? See Green screen vs Magic Remove.
This feature is perfect for customizing your background and creating polished, dynamic videos directly from your iOS device.
Still need help? Reach out anytime at support@teleprompter.com or go to Settings > Contact Support inside the Teleprompter.com app. We're here for you!
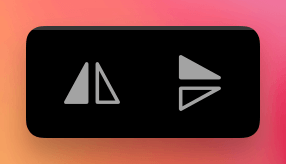
Text mirroring is a helpful feature in the Teleprompter.com app that allows you to flip your script horizontally or vertically. This is especially useful when using reflective glass setups or when you need to adapt your text orientation for different types of screens and camera positions.
Here's how you can activate this feature on both iOS and Android:


VoiceGlide is one of the most innovative features of Teleprompter.com, allowing your script to scroll automatically as you speak—hands-free and perfectly synchronized with your delivery. Whether you're a speaker, content creator, or educator, this feature helps you stay focused on your message without the need for manual control.
Follow these steps for a smooth setup:
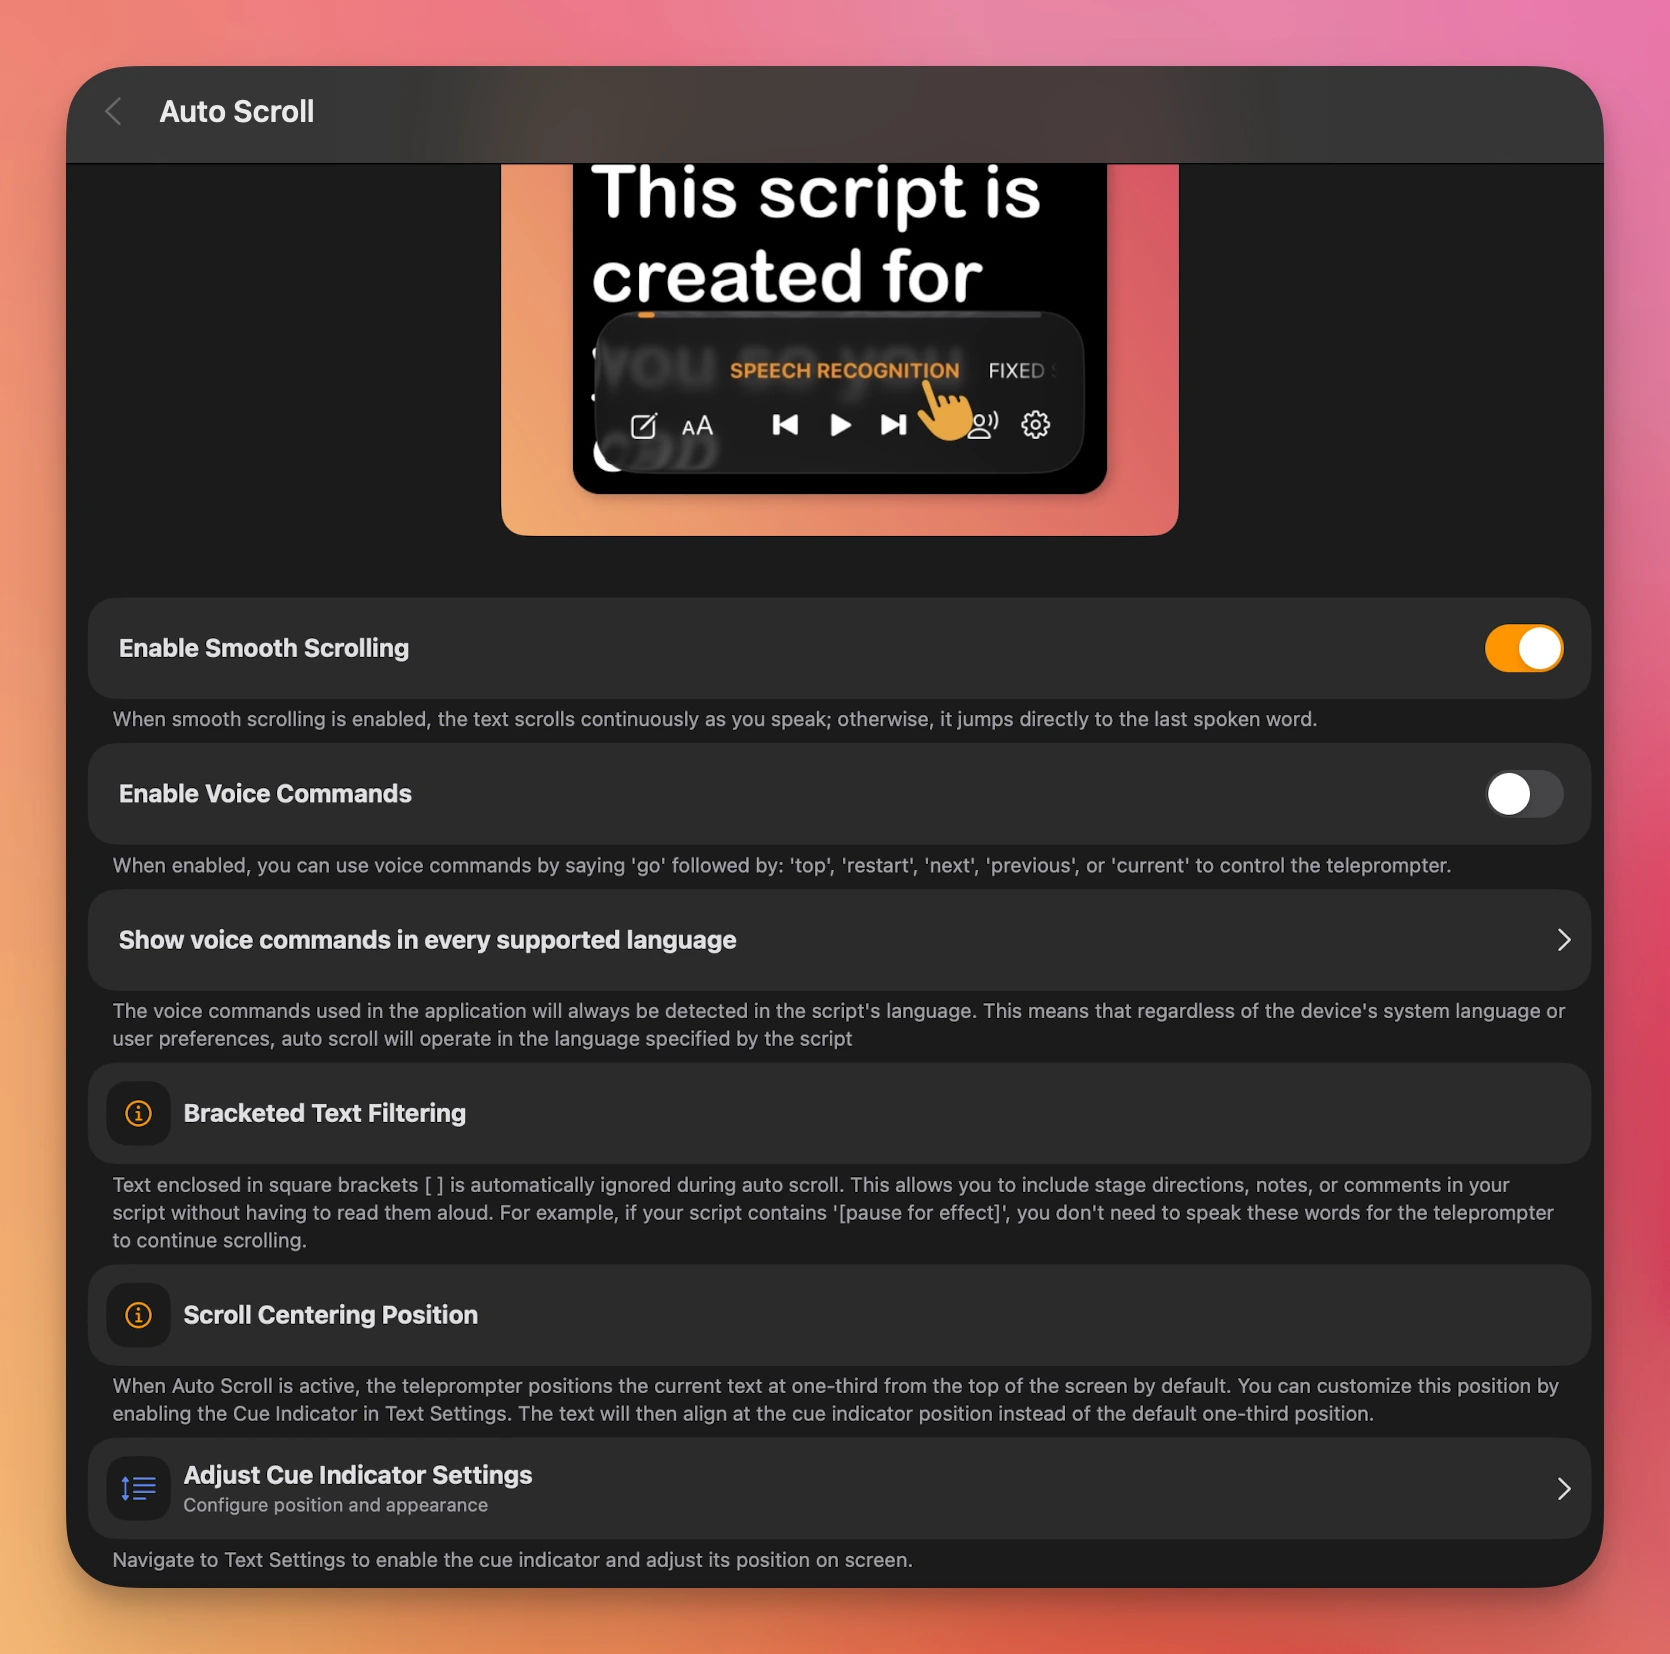
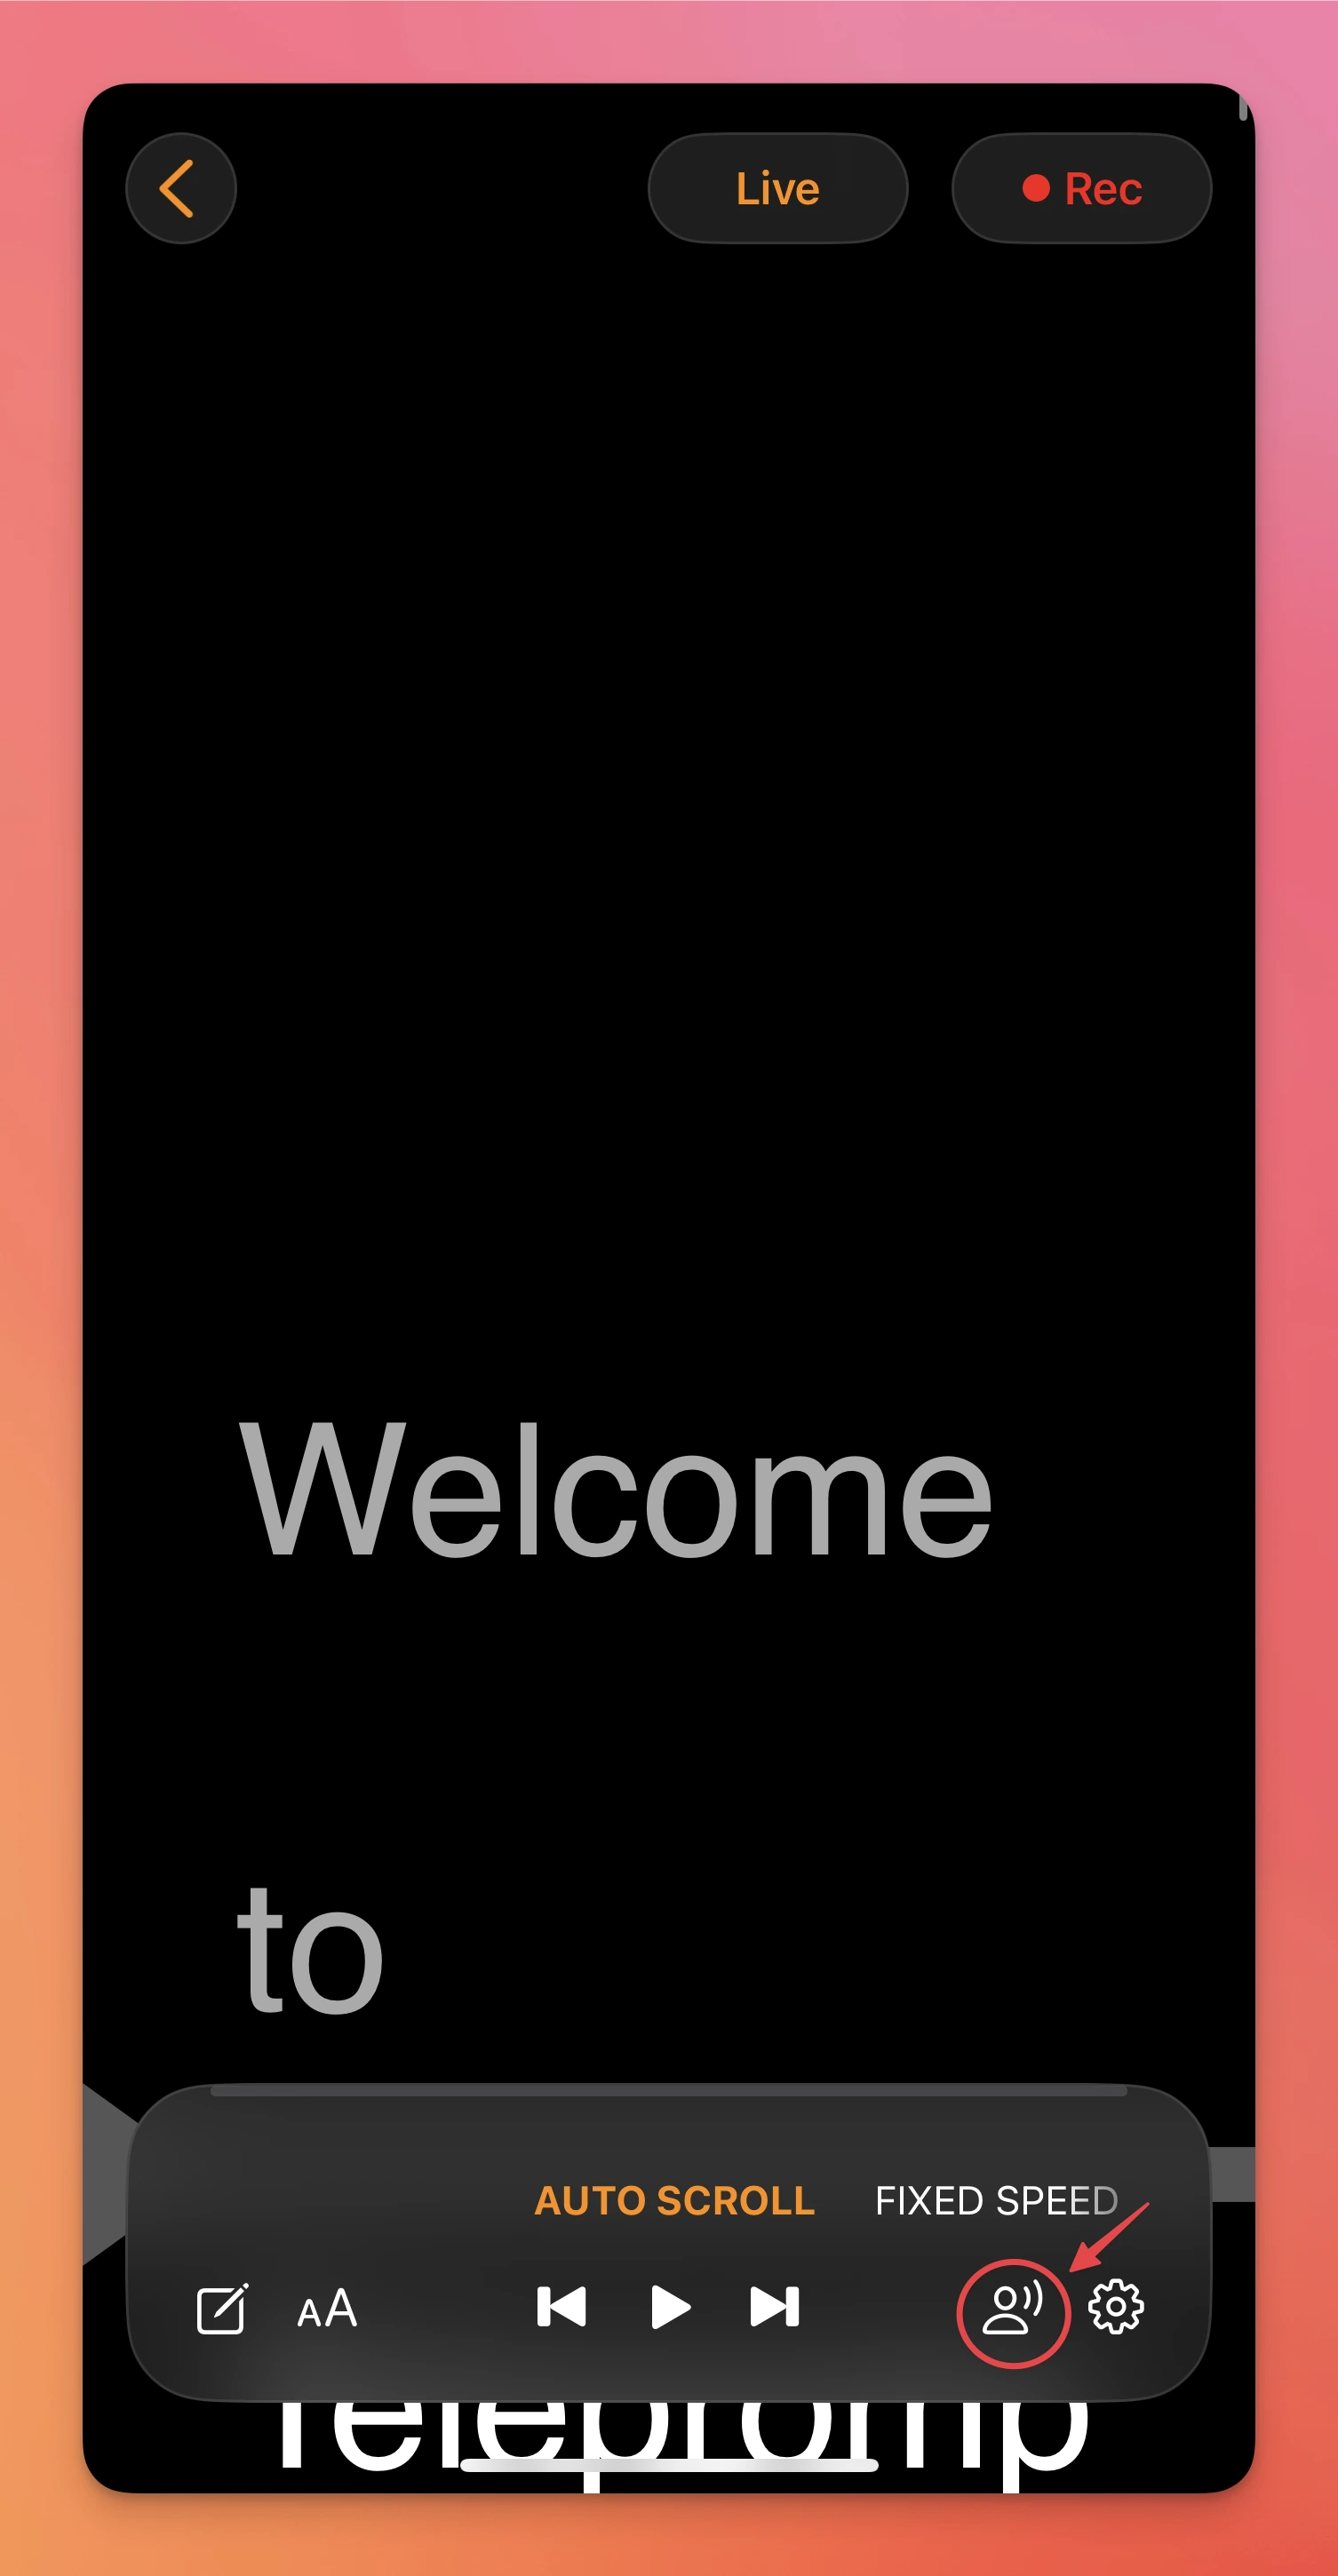
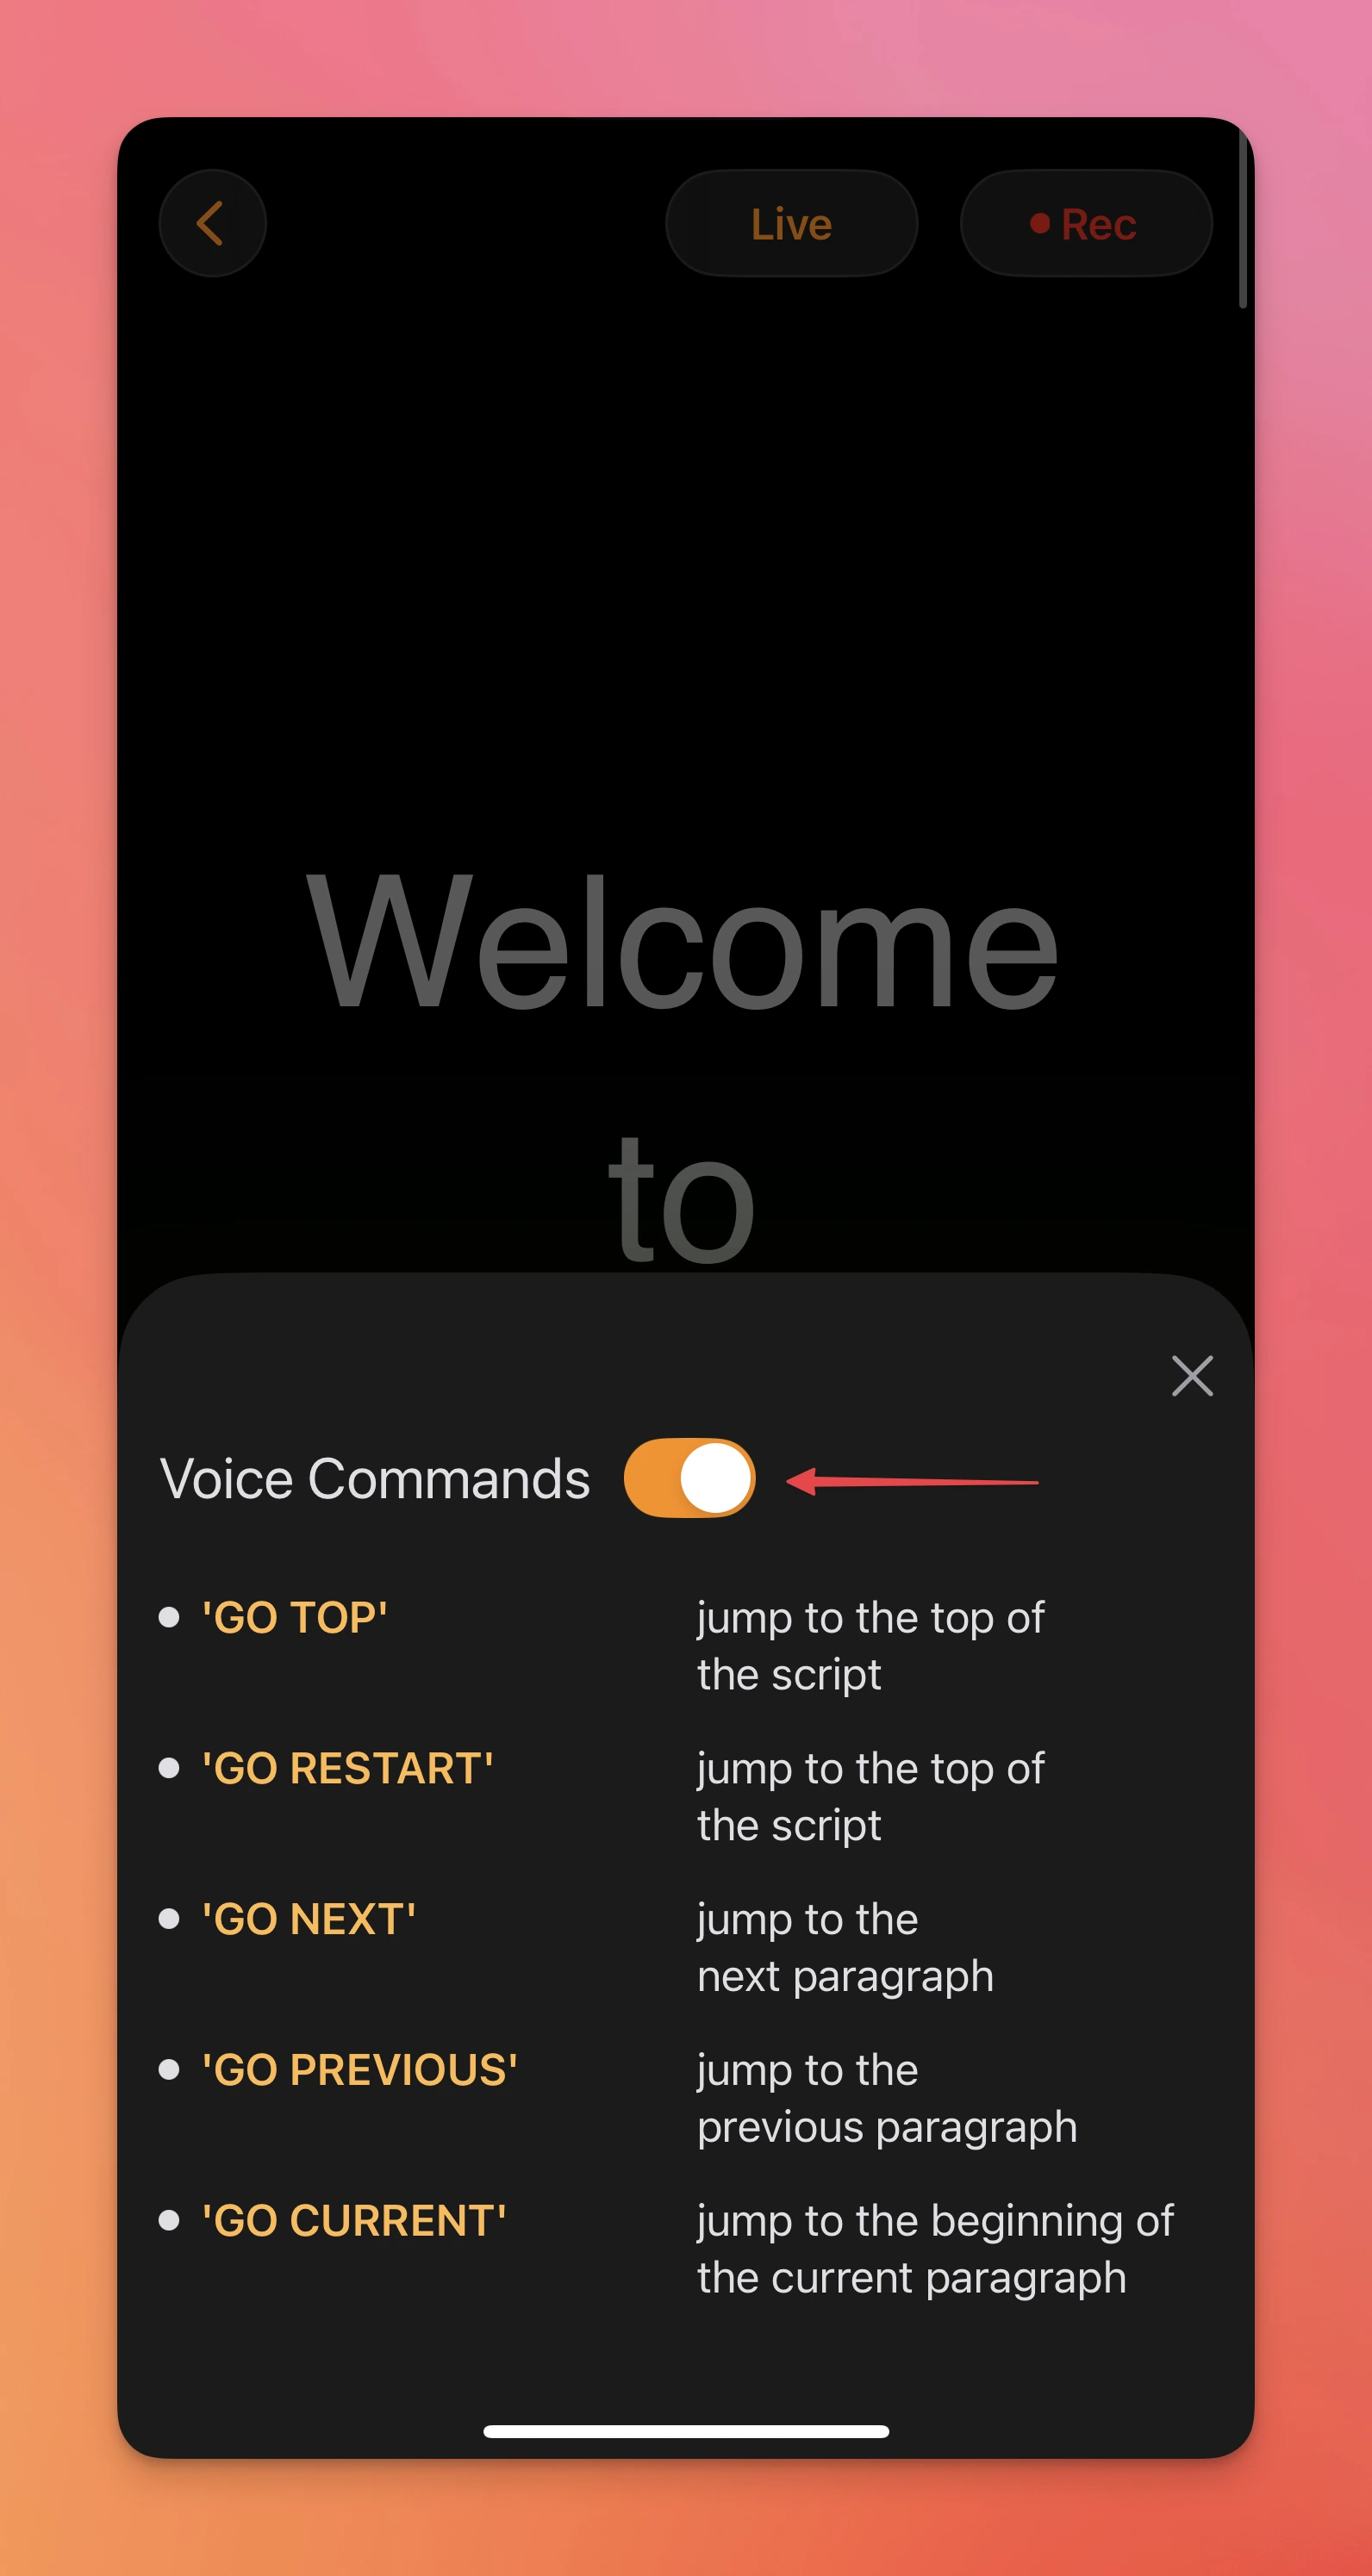
In the same Speech Recognition settings menu, you can toggle on Voice Commands to control playback using your voice.
If you're using an external mic, select it in this same menu to improve clarity and recognition.
Open the Scripts panel and tap the script you want to use.
Tap on Auto Scroll and the app will start listening and scrolling in sync with your voice.
Open the script, then use the button in the top right corner to switch to video recording mode. Activate Auto Scroll and begin speaking. The app will record your video and scroll your script in real time—perfect for presentations, practice, or polished video content.
If your script scrolls too high on the screen while using Auto Scroll, you can adjust it by enabling and repositioning the Cue Indicator:
If needed, move the cue indicator lower on the screen (Settings > Text > Cue Indicator) so that the text aligns below the top of the screen. This prevents your script from disappearing too early during Auto Scroll sessions.
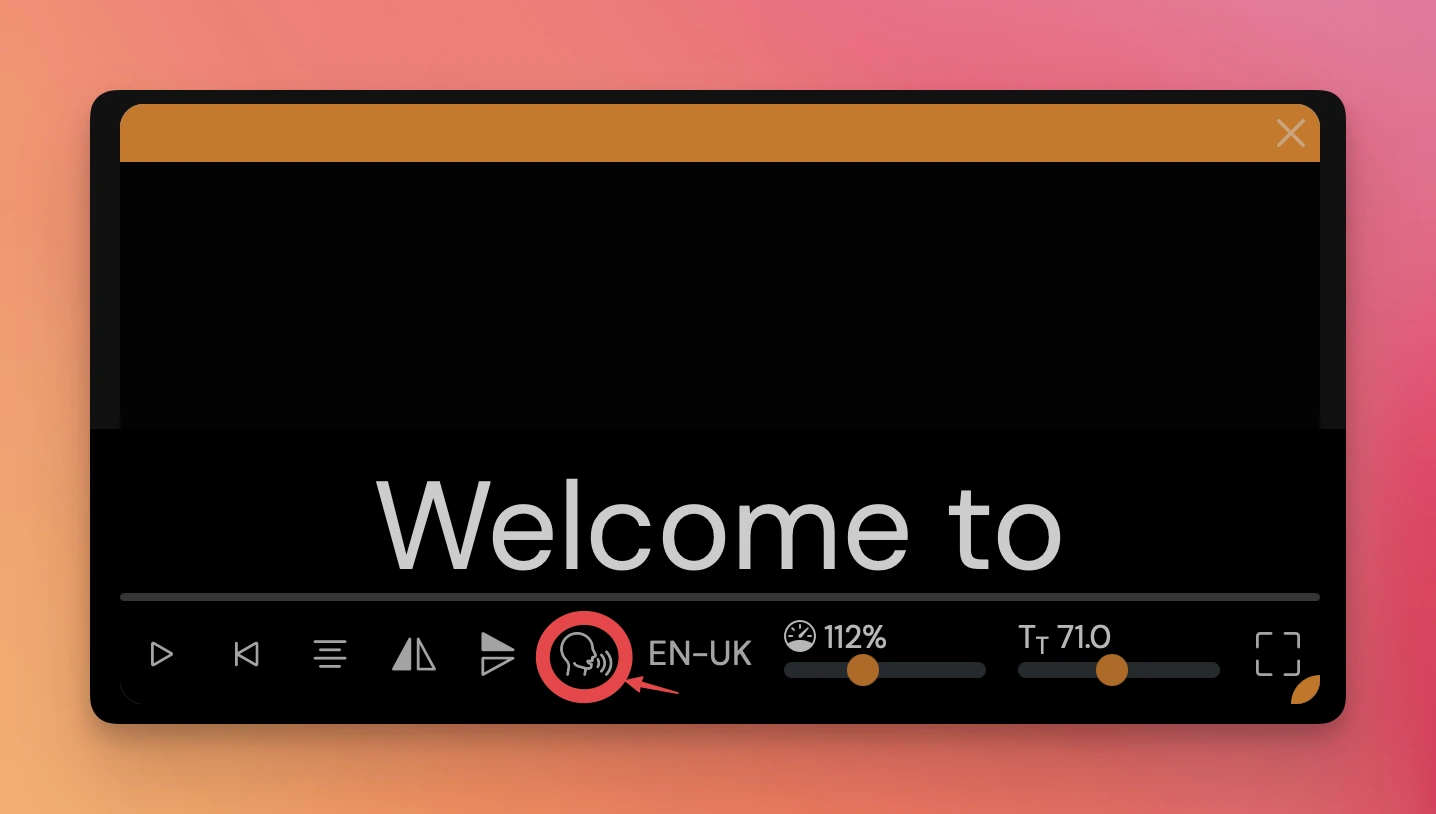
The script will scroll automatically, keeping pace with your voice for a natural and seamless experience.
Auto Scroll offers a smooth and intuitive teleprompting experience across all versions of Teleprompter.com. Whether you’re rehearsing or going live, this feature helps you stay confident, natural, and focused in front of the camera.
Have questions or need help setting it up? Our support team is always here for you at support@teleprompter.com or via Settings > Contact Support within Teleprompter.com.
Want to make your videos more accessible, polished, or social media–ready? Teleprompter.com lets you generate and customize subtitles automatically, giving your content a professional touch and enhancing its reach.
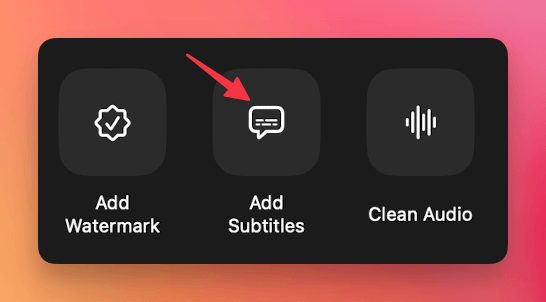

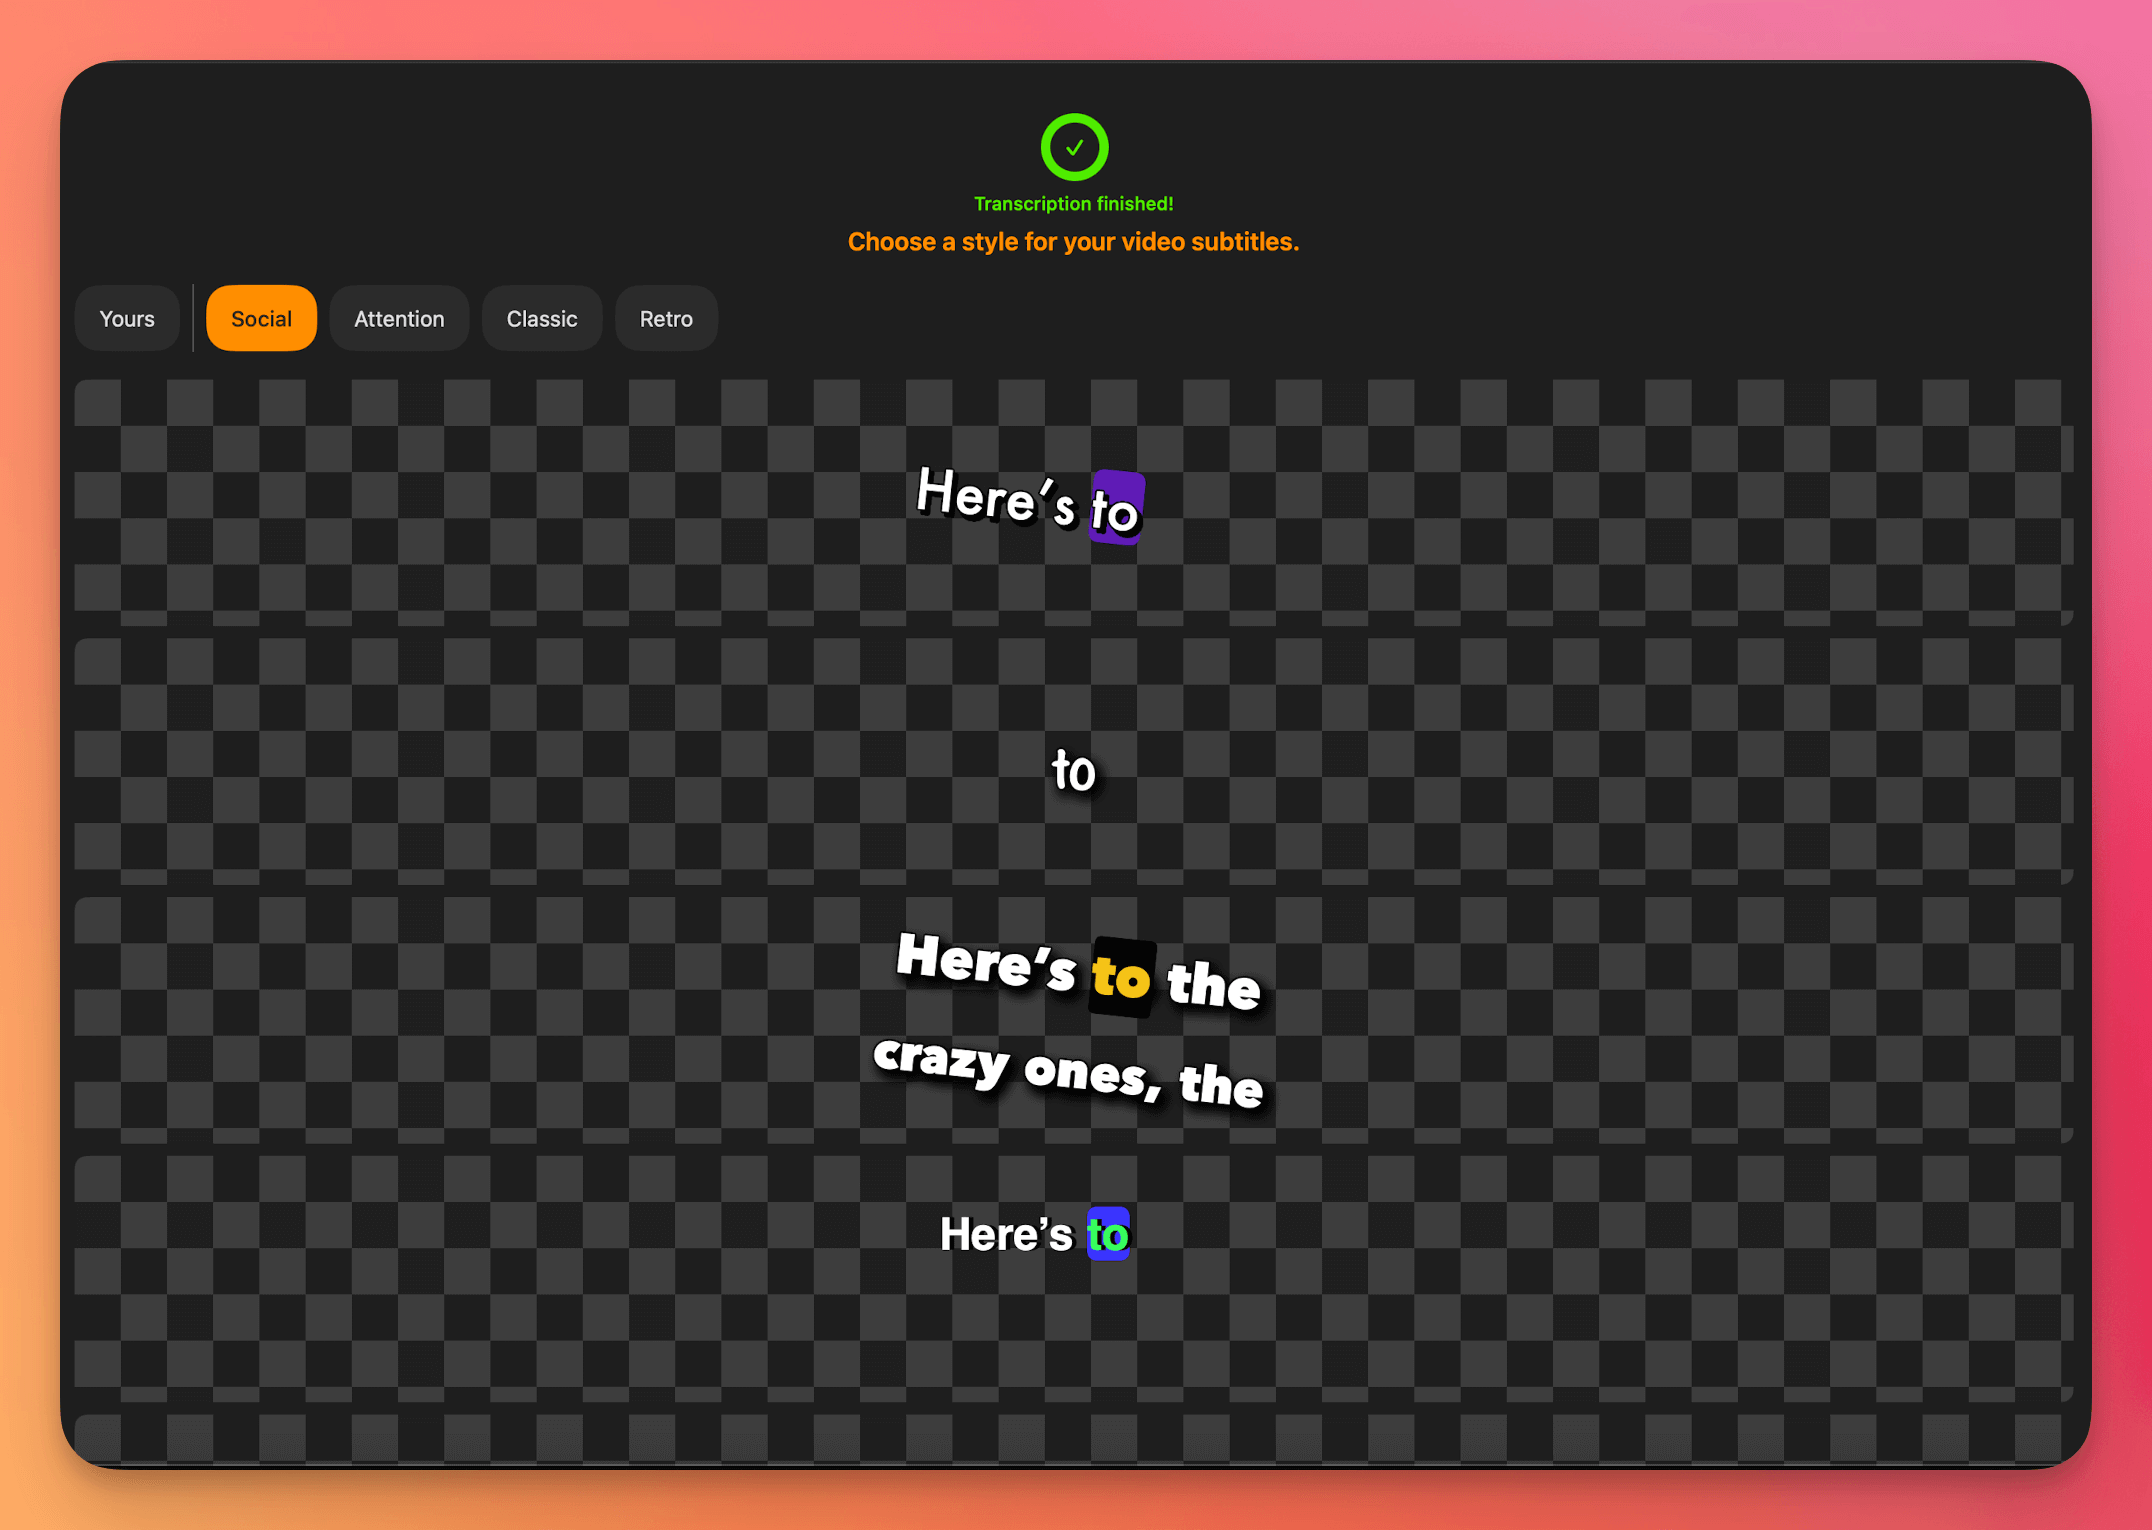
To edit your subtitles after they’ve been added:
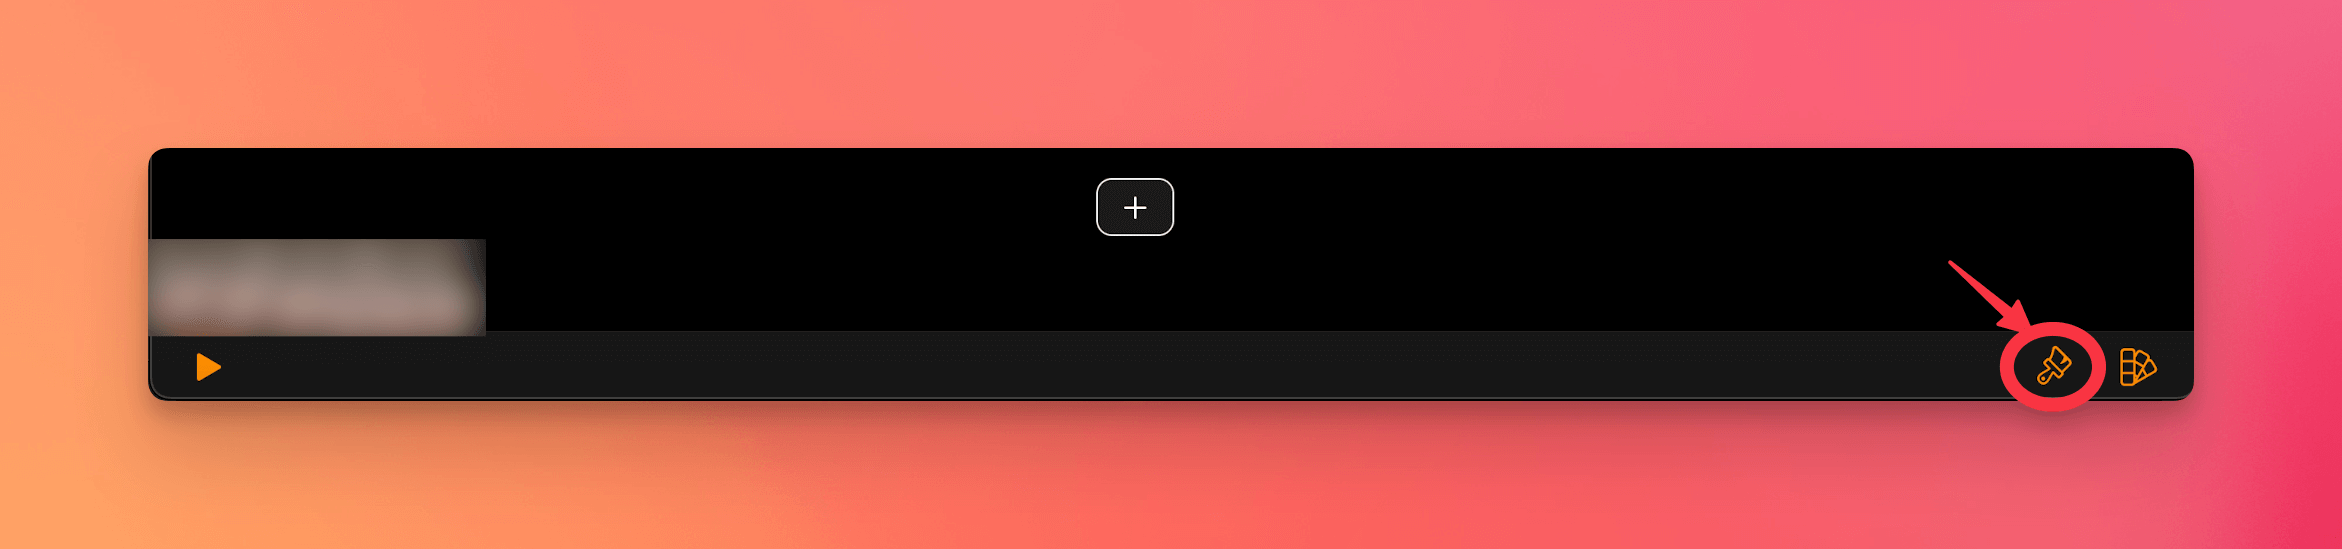
From there, you can customize:
These options give you full creative control over how your subtitles appear and behave.
Want to reuse your styling across multiple videos?
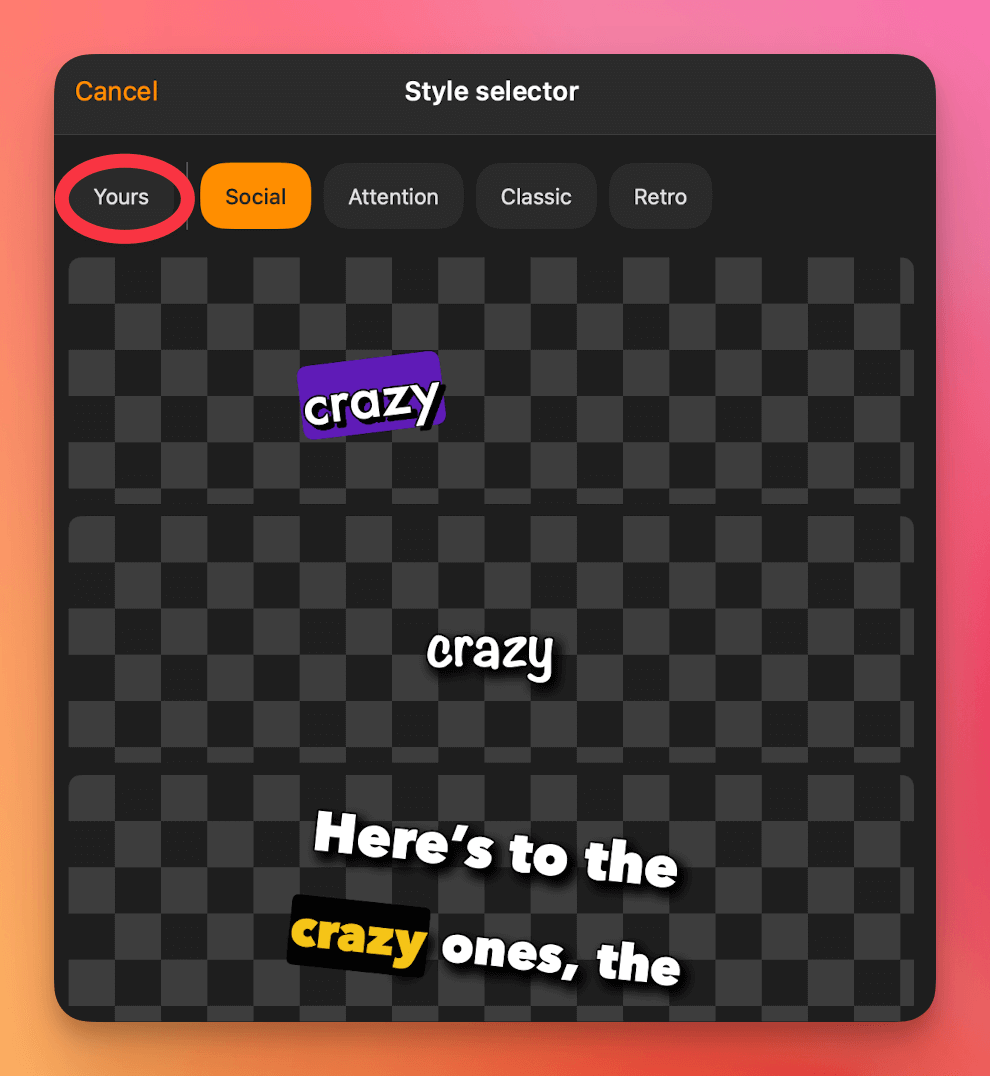
This is a great way to keep your branding or visual style consistent across all your content.
When you're finished customizing, be sure to save your changes. Your video will now include fully styled, accurate subtitles—making it more professional, accessible, and ready for any platform.
Enhancing eye contact with the camera during recordings is crucial for creating engaging and professional-looking videos. Here’s a quick guide to help you maintain better eye contact:
Quick Tip: Practice makes perfect. Spend some time getting used to this setup before your final recording to ensure comfort and natural delivery. By following these simple adjustments, you can significantly improve your eye contact with the camera, making your recordings more engaging, natural and personal.
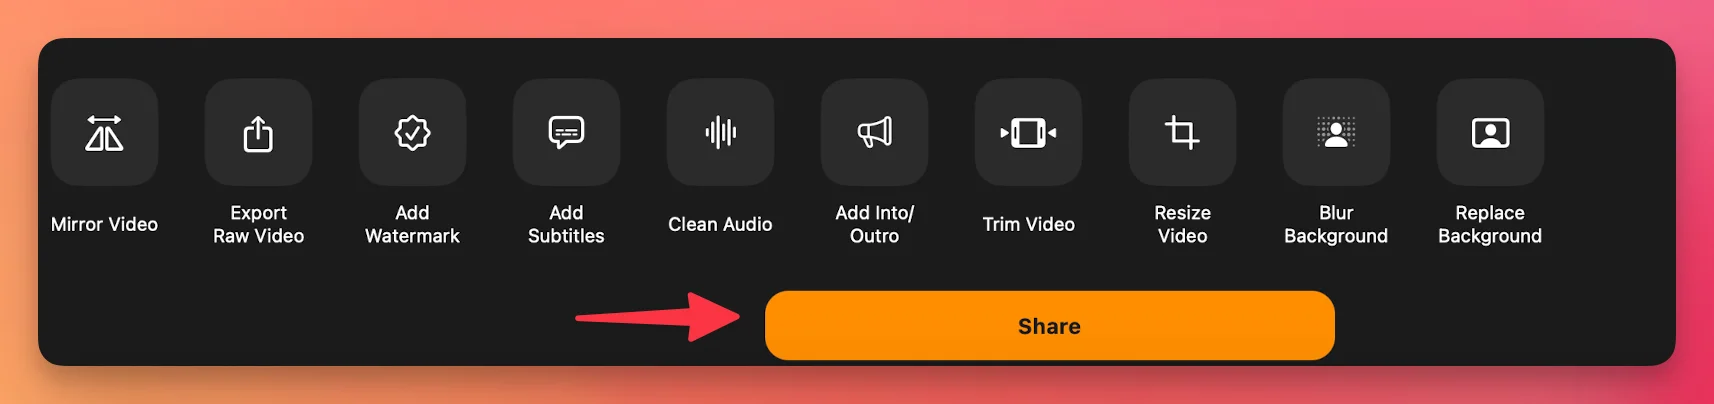
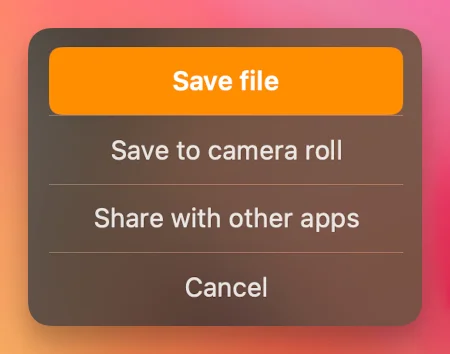
After recording your video in Teleprompter.com, you can easily save or share it across platforms. However, please note that videos are not automatically saved to your device’s gallery or camera roll—you need to export them manually.
To save to your camera roll, tap “Save to Camera Roll” from the same menu.
Note: All recordings are saved automatically within the Recordings section of the app—but they will only appear in your device’s gallery if you manually export them.
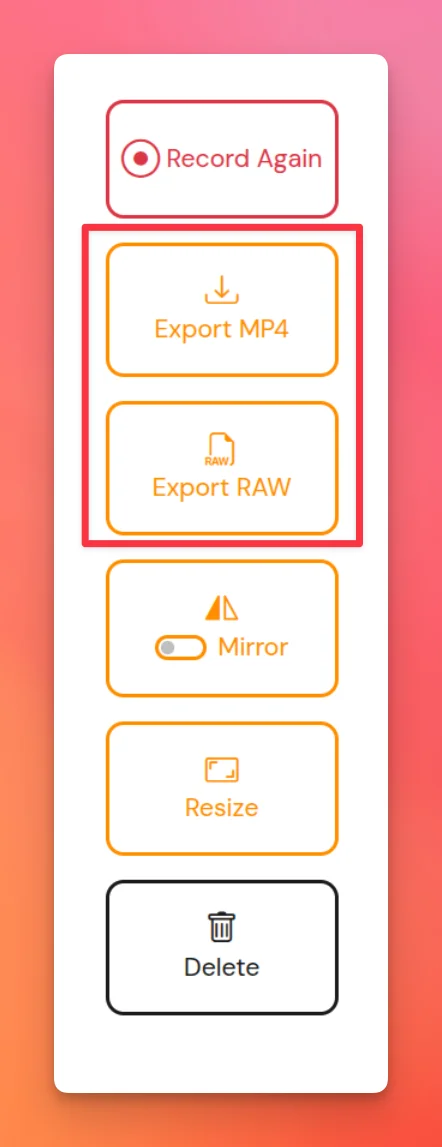
Export Raw is available to PRO users only, and the button sits on the video recording screen rather than in the Recordings list. It links straight to the raw recording—or to several raw files, if your take was split into multiple slices. It is available on iOS, macOS and the web version. For the full details, see Where is my original, unedited recording?
This gives you full flexibility depending on how you plan to use your video.
Our app automatically saves your video recordings to the Recordings section. To save into your camera roll/galery, after you’re done with the recording, tap on “Share” and you’ll see the option to “Save to camera roll”.
Creating a video while reading from your script is one of the core features of Teleprompter.com. Whether you're rehearsing, presenting, or producing content, the app allows you to record smoothly while your script scrolls onscreen.
Follow the steps below based on your device:
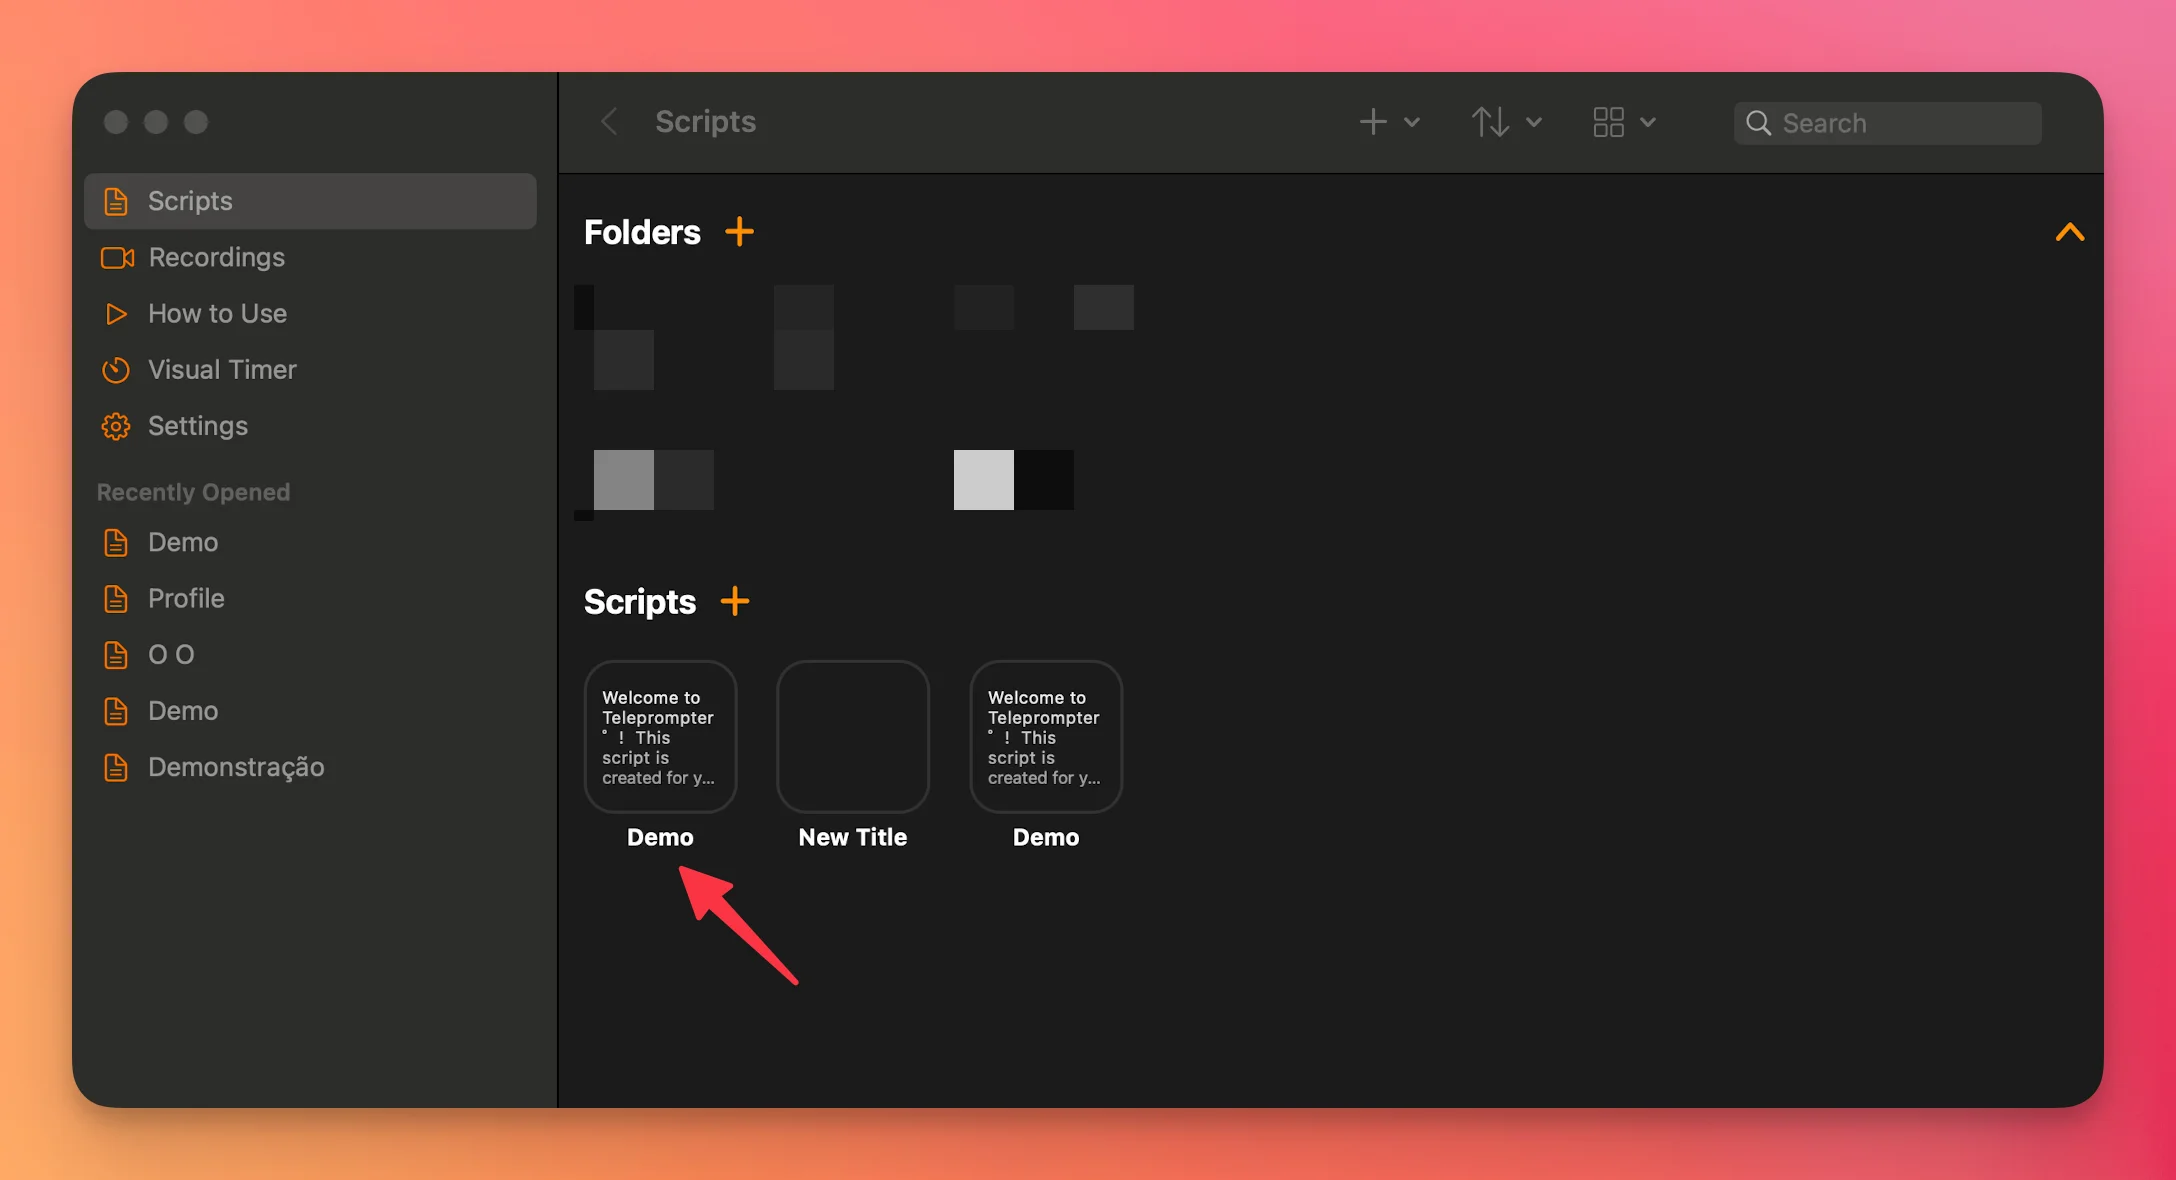
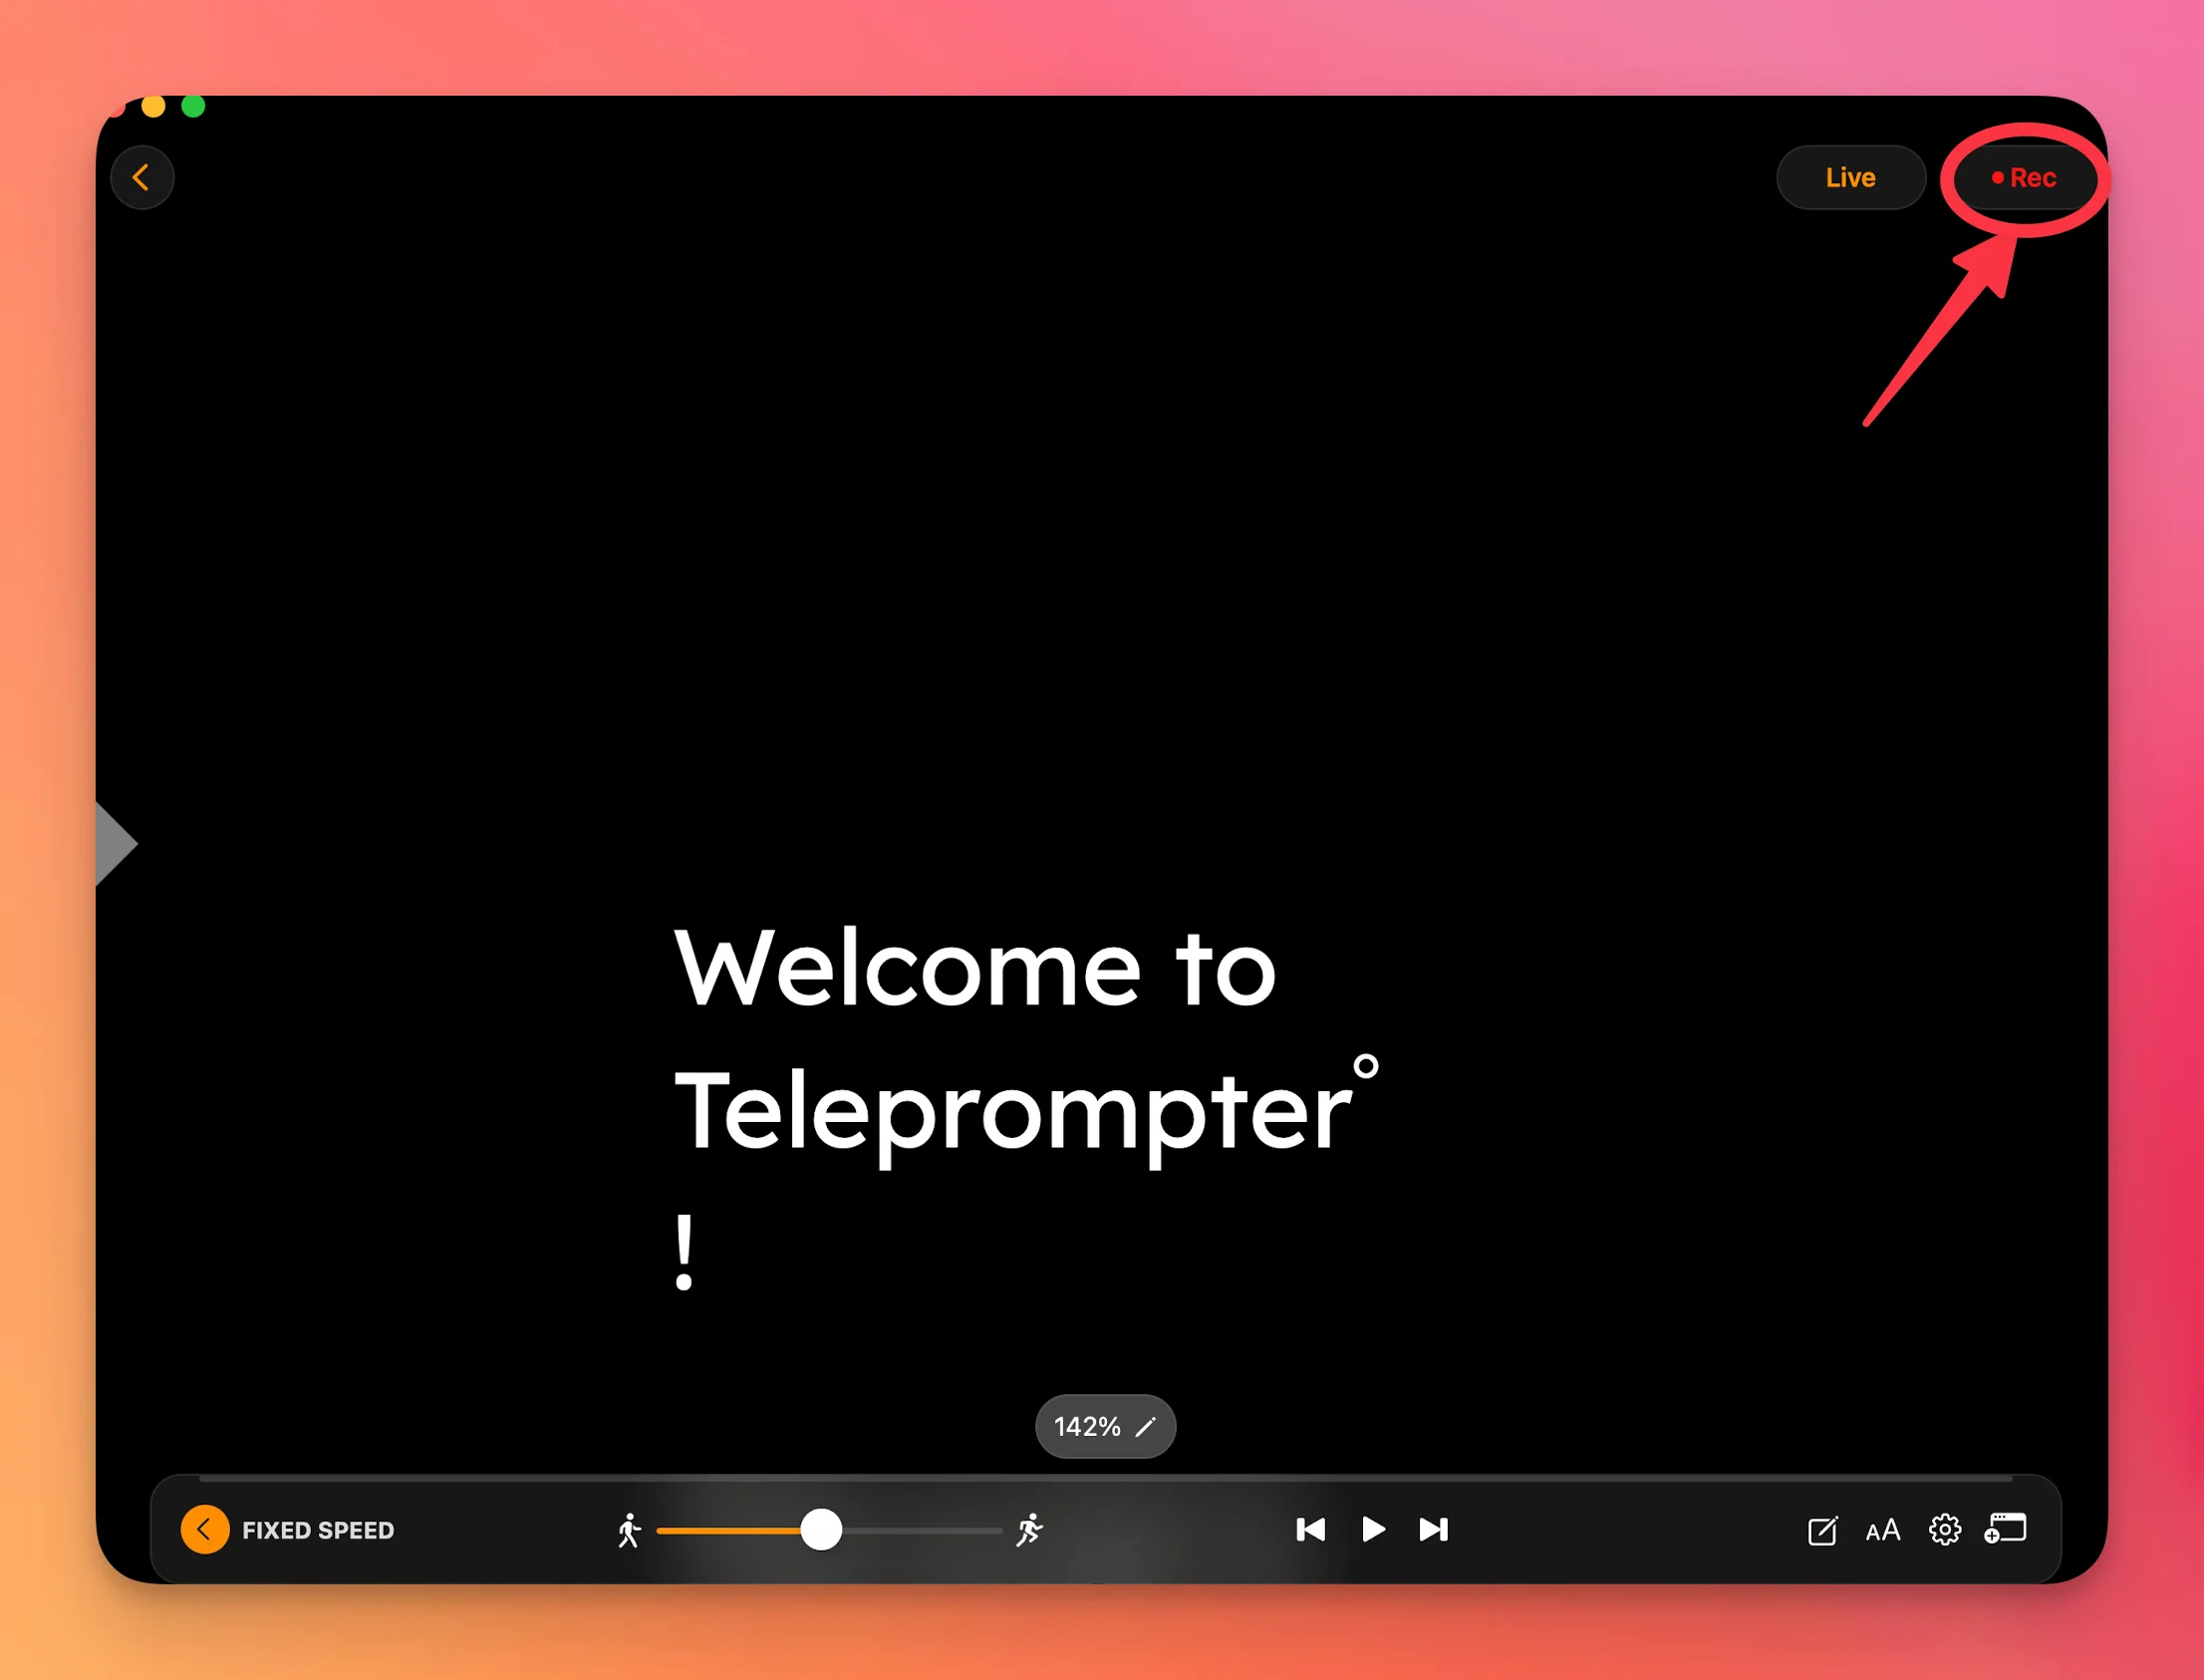
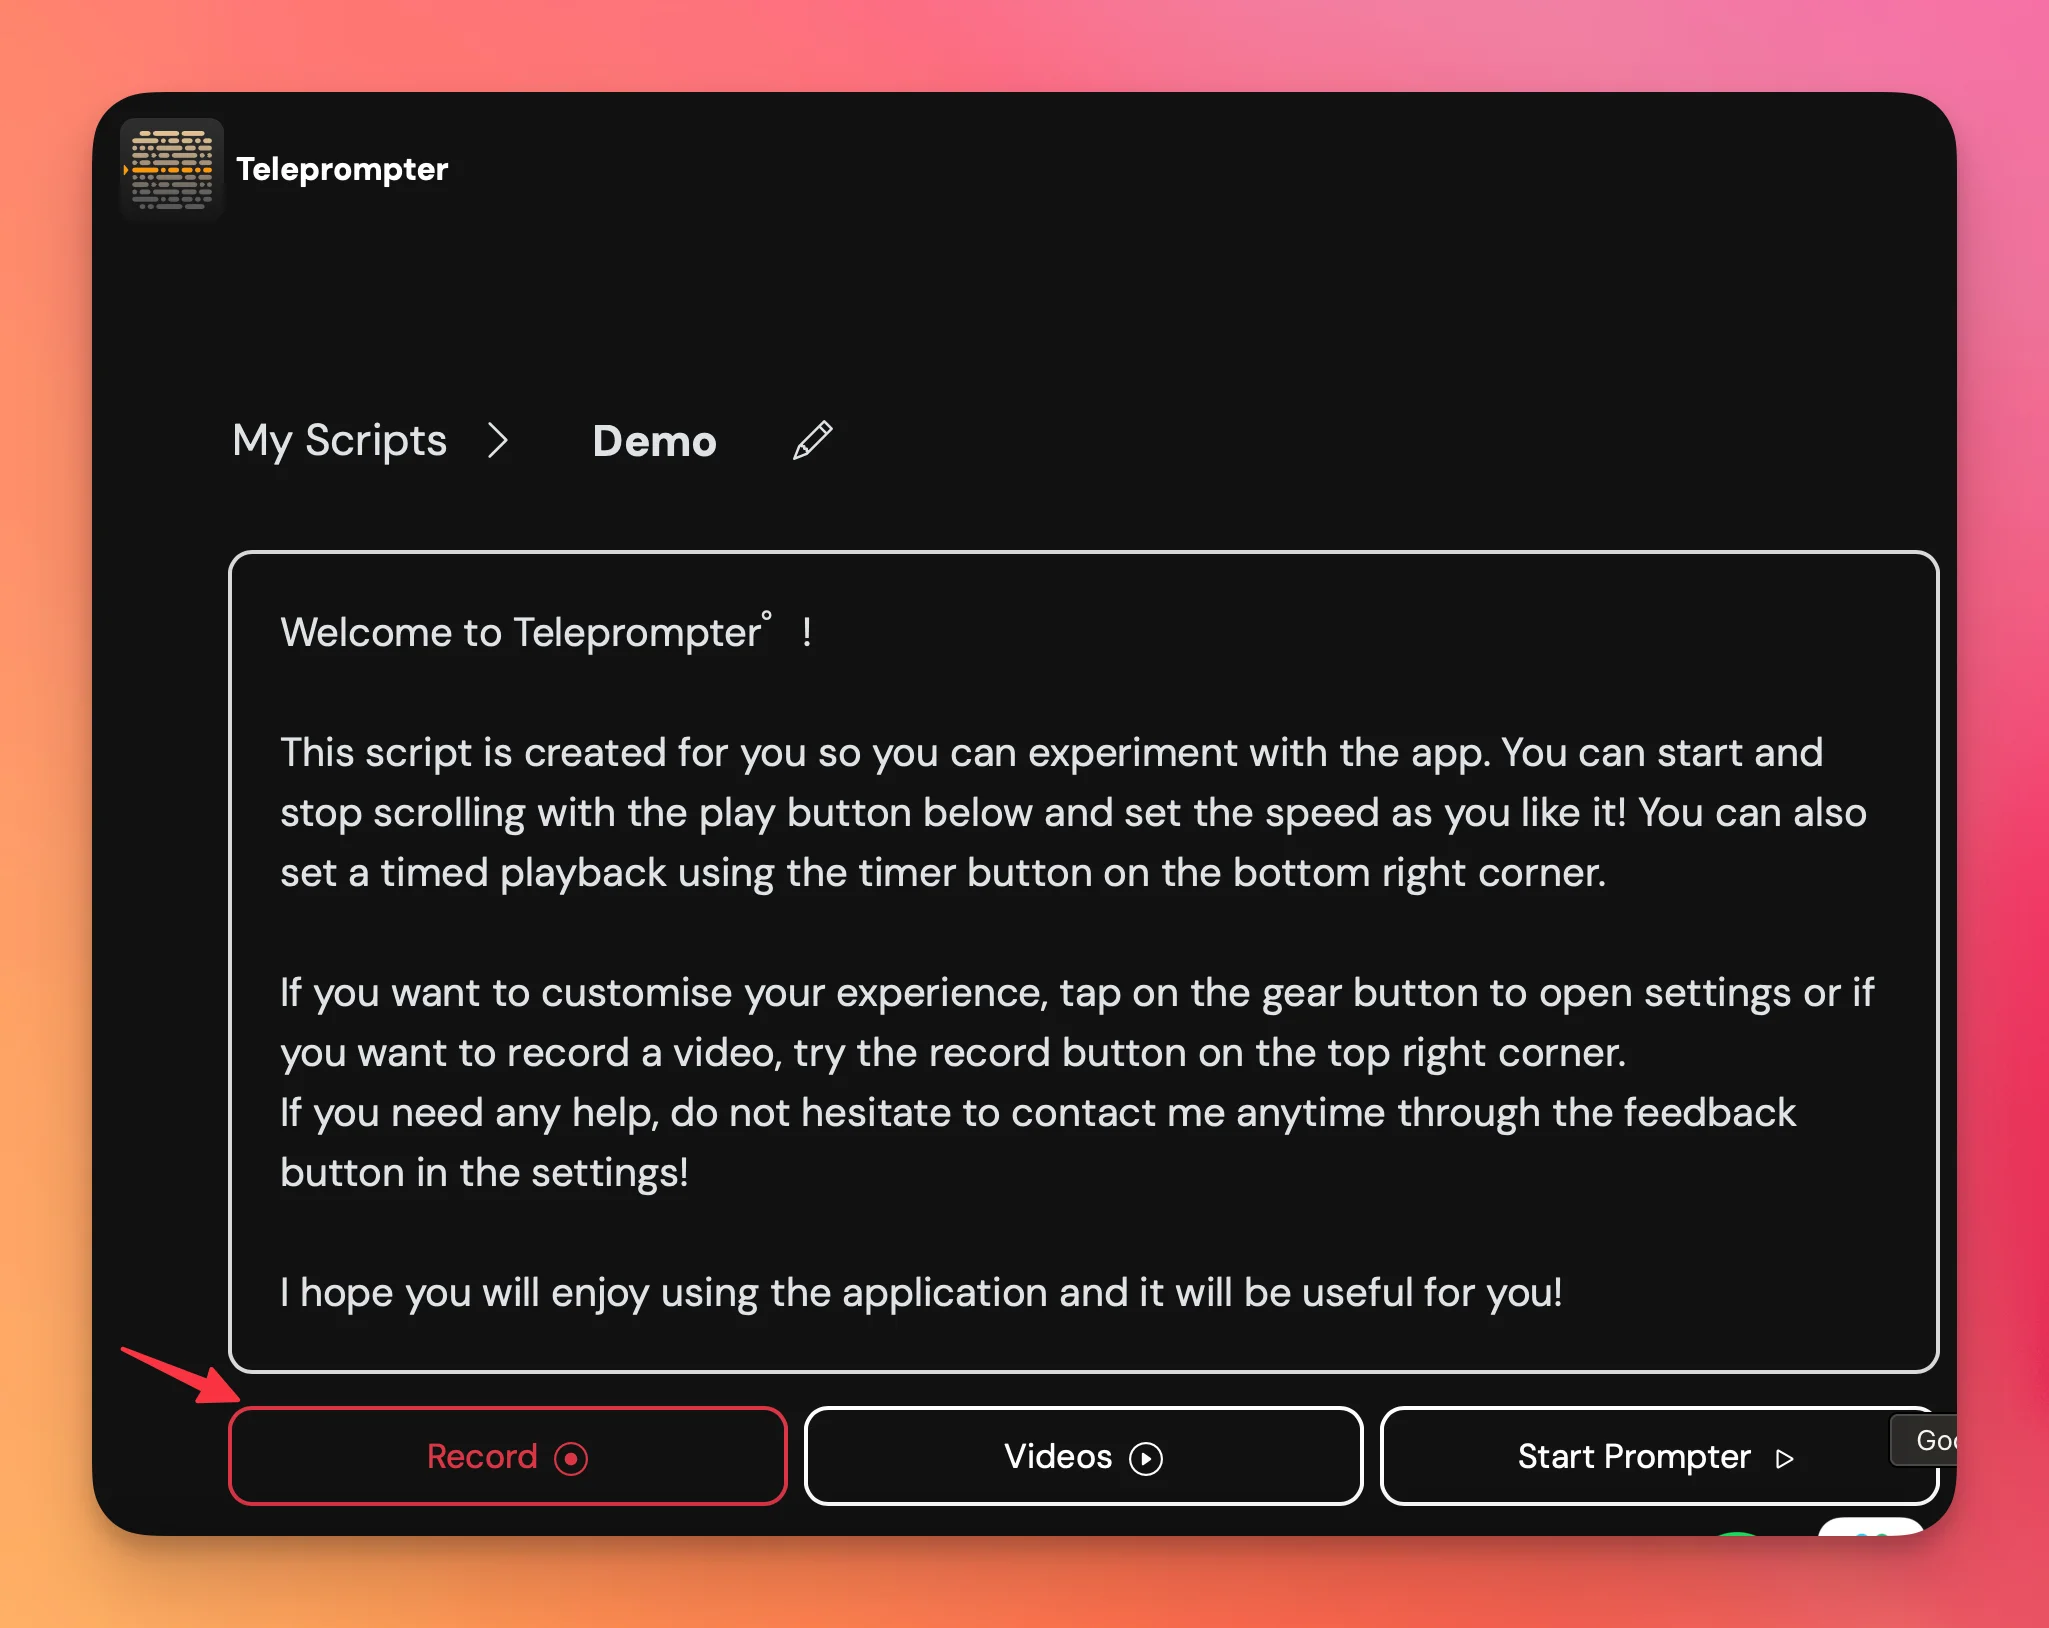
For more on pausing part-way through a take and picking up where you left off, see How do I pause and resume a recording?
Recording with Teleprompter.com ensures your message stays clear and polished—all while keeping eye contact with your audience.
We understand how frustrating it can be when your camera doesn’t function properly—especially when you're ready to record. In the meantime, here’s a reliable workaround that can help resolve the issue.
Once Portrait Mode is off, you can go back to Settings and re-enable 4K if desired.
If you're still encountering issues:
This often clears out temporary bugs and restores camera functionality.
If none of the above solutions work, don’t hesitate to contact us at support@teleprompter.com or go to Settings > Contact Support in the app. We're here to help you get back to creating smoothly!
We understand that for self tapes you should not look directly into the camera, so a the normal way of recording with teleprompter might not be the best choice for you. Luckily our app has a solution for you! If you go to Settings > Precision Settings and turn Place Script Further from Camera on, it'll place the script on the recording screen to the opposite side of the camera. Note that this feature only works when you are recording a horizontal video.

If you have any more questions, please contact us with the contact button on the bottom right corner!
Our teleprompter app is designed to make recording horizontal videos a breeze, whether you're creating content for presentations, social media, or any other platform. In this guide, we'll walk you through the process of recording horizontal videos, addressing common concerns and potential issues, including navigating iOS's portrait orientation lock.
To begin recording a horizontal video with the teleprompter app, simply turn your phone to its side (landscape orientation) before you start recording. The app's user interface (UI) will adjust accordingly, allowing you to record in landscape mode with ease.
If you're using an iOS device and find that the app's UI isn't adjusting to landscape orientation, it's likely that the portrait orientation lock is enabled. To disable the lock, follow these steps:

It's important to note that the teleprompter app locks the orientation once you start recording. This is done to ensure a consistent viewing experience for your audience. If you wish to change the orientation, you will need to finish the current take first. Keep in mind that tapping Stop recording only pauses your recording—tapping record again simply resumes into the same file. To actually end and save the take, tap the Done button that appears while the recording is paused. Once the take is saved, adjust your phone's orientation and start a new recording.
Upon completing your recording, the teleprompter app will automatically save your videos inside the app. From there, you can view, edit, or share the video according to your needs.
The teleprompter app is designed to support both portrait (vertical) and landscape (horizontal) orientations. To switch between the two, simply adjust your phone's orientation before starting your recording, and the app will take care of the rest.
Recording horizontal videos with our teleprompter app is a straightforward and user-friendly process. By ensuring your phone is in landscape orientation and disabling the portrait orientation lock on iOS devices when necessary, you can create professional-looking horizontal videos with ease. If you have any further questions or need assistance, please don't hesitate to reach out to our support team. Happy recording!
The referral program is available across all versions: iOS, macOS, Android and the web browser version.
The idea is simple. You share your personal referral link, someone signs up through it, and you both get 50% off for the first year. Not one of you — both. The person doing the referring and the person joining get the same discount.
If you already recommend the app — to a colleague who films weekly updates, to someone in a creator community, to a team that has just started making video — the referral link means that recommendation is worth something to both of you. There is nothing to apply for and no separate account to manage. It is the same link every time.
Once your friend has signed up, they will probably want How do I make a video recording with a script? to get going, and How can I sync my scripts between all my devices? so their library follows them from phone to desktop.
Questions about a referral discount that has not appeared, or about your billing in general? Email support@teleprompter.com or use Settings > Contact Support in the app and we will take a look at your account.
We understand that sometimes things don’t go as expected, and you may need a refund. The process to request a refund depends on the platform through which you made your purchase. Here's how to proceed based on your device:
If you subscribed through the App Store on an iPhone, iPad, or Mac, we’re unable to issue the refund directly. Apple handles all payment processing and refund requests.
Please follow the steps provided on Apple’s official support page:
This link includes step-by-step instructions on how to submit a refund request, check its status, and find any additional information you may need.
Note: This is the only possible method to request a refund for purchases made through iOS/macOS. When you purchase or subscribe to an app through the App Store, all payment details are handled exclusively by Apple and linked directly to your Apple ID. For privacy reasons, Apple does not share any billing information with app developers—including us. This means we are unable to process, track, or approve any refund requests.
In some situations, Apple Support may mistakenly suggest that you contact the app developer for a refund, but please be aware that only Apple has the authority to review and issue refunds for purchases made on their platform. If Apple has rejected the same application twice in a row, that decision is unfortunately final.
If you purchased your subscription through the Google Play Store, please follow the instructions provided by Google at this link:
👉 Request a refund on Google Play
The guide is simple and easy to follow.
If you subscribed using the web version of our app (outside of Apple or Google Play), here's how to request a refund:
Refunds can only be processed if all the above conditions are met.
Need to upgrade, downgrade, or switch your billing cycle? Changing your subscription plan on Teleprompter.com depends on where you initially subscribed—either through the App Store, Google Play.
All subscriptions made through Apple are managed directly through your Apple ID. To change your plan:
For full step-by-step instructions, visit Apple Support:
👉 Change your subscription plan on iOS
If your current plan has already been renewed or paid, you won’t be able to switch plans immediately.
In this case, you’ll need to:
Apple handles all billing decisions independently, and approval is required before a plan switch becomes available.
Google Play allows you to switch between subscription tiers or billing cycles directly from your account.
To do that:
For detailed help, refer to this section on Google's support page:
👉 Change between subscription plans or billing cycles
Need help with something else or can’t find your subscription? Contact us at support@teleprompter.com or via Settings > Contact Support in the app. We’re here to assist!
Need to update your payment information? No problem! Here's how you can manage your payment method depending on where you subscribed:
Apple manages all billing and payment details for subscriptions made through the App Store. To update your payment method, follow Apple’s official guide:
👉 Update your payment method on the App Store
If you subscribed via the Google Play Store, payment methods are managed through your Google account. You can update them by following this link:
👉 Change your Google Play payment method
If you subscribed using our web version:

Still have questions? We’re here to help! Feel free to reach out at support@teleprompter.com or through Settings > Contact Support inside the app.
If you're eligible for a sales tax exemption when subscribing to Teleprompter, here's a simplified process to get a sales tax refund through our payment provider, Paddle:
Please ensure your documentation is valid and sent promptly after purchase. For any questions, contact Paddle's support directly through the provided email.
If you need an invoice for company reimbursement, tax purposes, or to include business details and VAT, the steps will depend on where you originally purchased your Teleprompter.com subscription.
If you need an invoice with company information, VAT ID, or other details required by your local tax regulations, we highly recommend purchasing your subscription through our website:
After subscribing, your invoice will be issued by Paddle, our payment provider, and sent to your email. You can also:

Apple is the sole payment processor for subscriptions made through the App Store. This means:
However, you can access your purchase receipt through your Apple ID:
For more details, you can also refer to the instructions provided in this link: https://support.apple.com/en-us/118212
When you buy something from Google Play, Google sends a receipt to the Google account email you used for the purchase.
Alternatively:
⋮ next to the purchase and choose "View receipt"Google's receipts usually include tax details, but if you’re a business and need a VAT-compliant invoice:
If you’re looking to cancel your subscription, the process varies depending on the platform you used to sign up. Follow the instructions below based on your device or platform.
If your subscription was purchased through the Apple App Store, you’ll need to manage or cancel it using Apple’s official process. Follow their detailed guide here: Cancel or Manage Subscription on iOS. This process must be done 24 hours before the trial ends, in accordance with Apple's own policies. Please note that, in this case, we are unable to cancel subscriptions on behalf of customers. You will need to follow the instructions provided below.
If your subscription was made via Google Play, you can cancel it by following Google’s step-by-step instructions. Learn more here: Cancel, pause, or change subscription on Google Play.
If you subscribed directly through our website, you can cancel your subscription as follows:
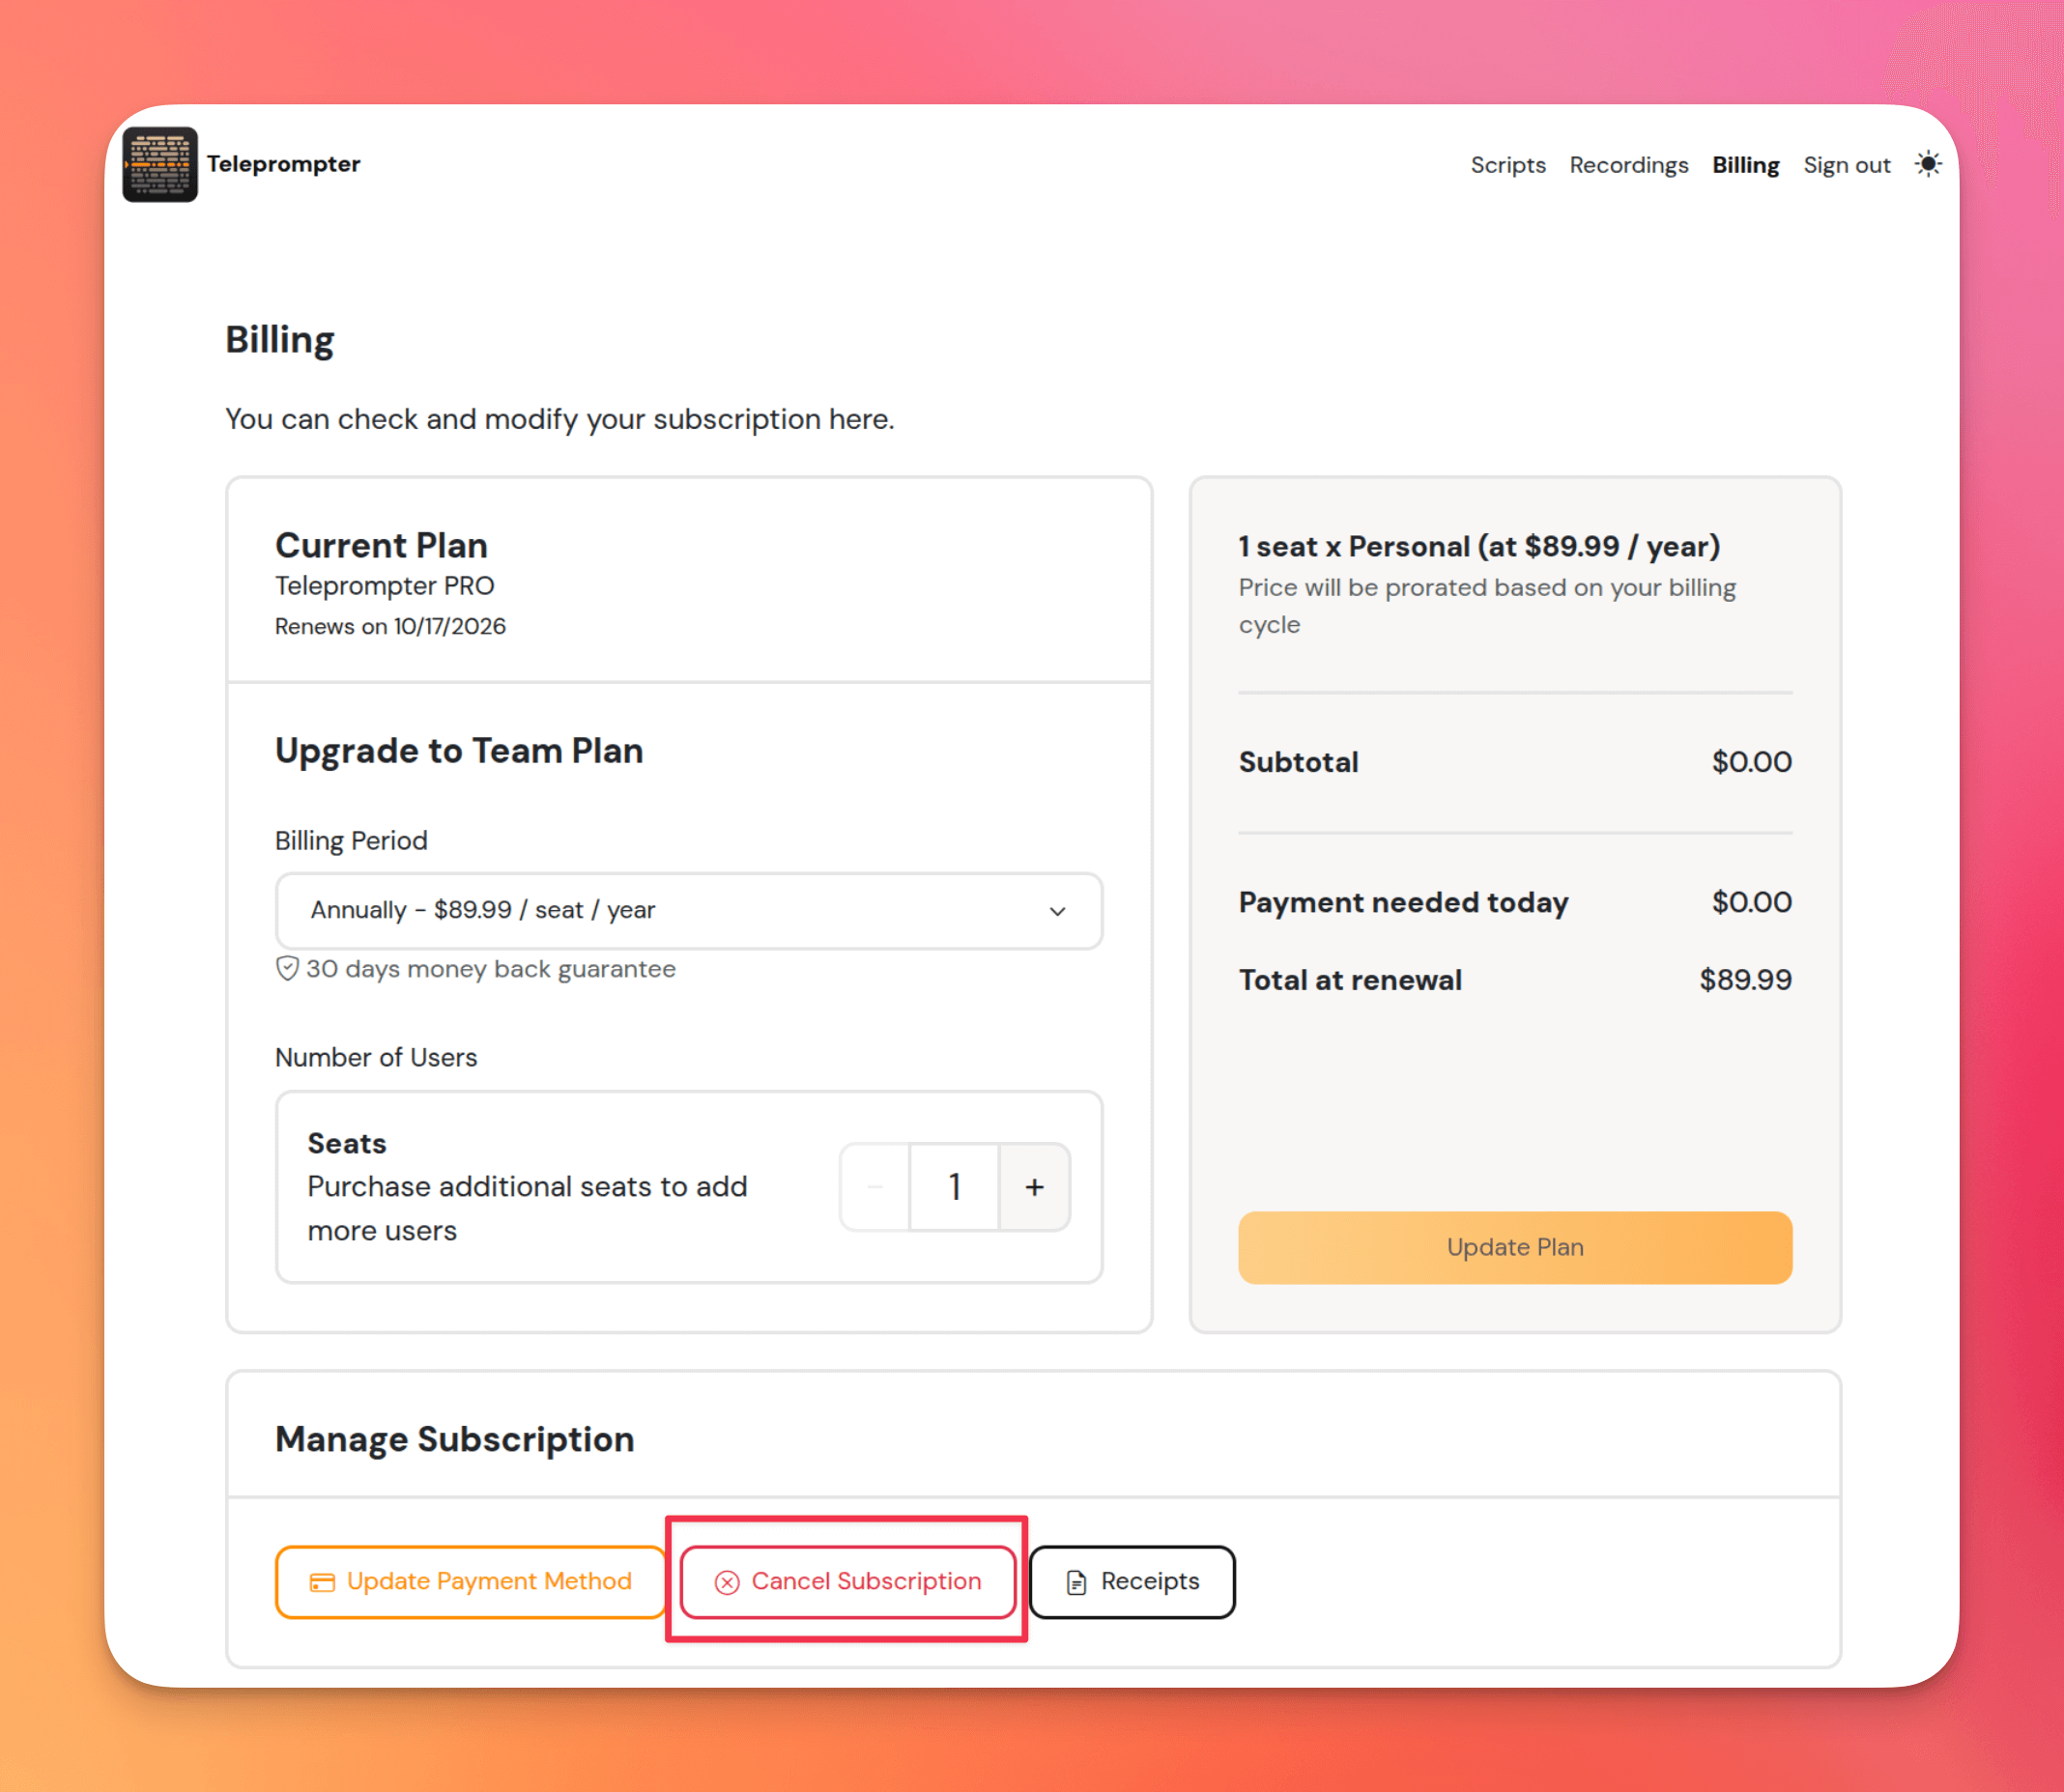
If you experience any difficulties or need further assistance, don’t hesitate to contact us. The Teleprompter.com team is here to ensure your experience is as smooth as possible.
Thank you for choosing Teleprompter.com — we truly value your support!
Connecting a game controller to your Android device can transform your mobile gaming experience, turning a handheld phone into a portable console. Whether you're using a dedicated mobile controller, an Xbox Wireless Controller, or a PlayStation DualSense, the process is generally straightforward.
Here is a comprehensive guide to getting connected.
This is the most common method and works for most modern controllers, including the Xbox One/Series X|S, PS4 DualShock, and PS5 DualSense.
Before your phone can see the controller, you must make it "discoverable."
If you have an older controller or want to eliminate "input lag" (the tiny delay between pressing a button and the action happening), a wired connection is best.
Most Android phones use USB-C. Unless your controller has a USB-C to USB-C cable, you will likely need a USB OTG (On-The-Go) Adapter.
Map Your Buttons
If the buttons feel "swapped" (e.g., A and B are reversed), go to Settings > System > Languages & input > Physical keyboard (this location varies by phone model). Some Android versions allow you to remap buttons natively.
Teleprompter.com supports a variety of remote control options so you can scroll your script hands-free—perfect for presentations, video recordings, or live events. You can connect via Bluetooth or a Web connection, depending on your needs.

Then, select how you’d like to connect.
If you're having trouble connecting your remote to Teleprompter.com on an iPhone or iPad, try the following steps:
If you have an Apple Watch, the remote on the watch should work automatically. All you need to do is open a script on your phone and open the Teleprompter app on your Apple Watch. Once you open a script on the phone or tablet, the remote options should appear.
On your watch you are able to start and stop the playback, scroll back, scroll forward, go to the beginning of the script, and adjust the speed of the playback. In addition, if you want to adjust the speed more precisely, you can do that with the digital crown on your Apple Watch.
There are a few reasons that could cause that.
If none of these solved your problem, please contact support for further assistance.
If you're looking for a more versatile way to control our teleprompter app, consider using a game controller. Our recommended game controller is the Xbox Wireless Controller, which provides a comfortable and responsive experience. In this article, we'll show you how to control our teleprompter app with a game controller.
In general, any game controller that supports Bluetooth and can be paired to your device should work as the Xbox controller, using a similar layout display above.
Game controllers, such as the Xbox Wireless Controller, offer a comfortable and precise way to control various aspects of your teleprompter experience. They provide multiple buttons and triggers, which can be customized to perform specific actions within our app.
Once you have connected your game controller to your iOS device via Bluetooth, you can see the action performed by each button marked on the image with the numbers:
If you are still not sure, just check out apple's guide how to connect a game controller here.
In conclusion, using the Xbox Wireless Controller or another compatible game controller can provide a versatile and comfortable way to control our teleprompter app. With a little customization, you can use your game controller to control various aspects of your teleprompter experience.
If you're looking for a foot pedal to use with our teleprompter app, we recommend the AirTurn Duo 500 and the AirTurn Quad 500. The Duo 500 features 2 pedals, while the Quad 500 has 4 pedals. We have tested these foot pedals with our app, and they work perfectly.
In general, any foot pedal that supports Bluetooth 5.0 connectivity should work with our app. However, it's important to note that 2.4GHz foot pedals will not work on iOS devices due to compatibility issues.
Foot pedals typically have two or four buttons, and you can customize the buttons to correspond with arrow keys on a keyboard. In the case of the AirTurn devices, you need to put the pedals to mode 2 by pressing and holding the mode selector button until 2 light flashes.
Once you have connected your foot pedal to your iOS device via Bluetooth, you can customize the action performed by each button in our app. Here are some examples of what you can do with your foot pedal in our app:
To customize the action performed by each button, open our app and go to the settings menu. From there, select the foot pedal option, and you'll be able to assign the desired action to each button on your foot pedal.
With this level of customization, you can use your foot pedal to control various aspects of your teleprompter experience with ease.
If you're having trouble connecting your foot pedal, try these troubleshooting tips:
In conclusion, the AirTurn Duo 500 and AirTurn Quad 500 are our recommended foot pedals for use with our teleprompter app. However, any foot pedal that supports Bluetooth 5.0 connectivity should work with our app. With a little customization, you can use your foot pedal to control various aspects of your teleprompter experience.
If you're looking for a presentation remote to use with our teleprompter app, we recommend the Satechi R1 Bluetooth Presentation Remote and the Logitech R500s Laser Presentation Remote. We have tested these remotes with our app, and they work perfectly.
In general, any presentation remote that supports Bluetooth 5.0 connectivity should work with our app. However, it's important to note that 2.4GHz remotes will not work on iOS devices due to compatibility issues.
Presentation remotes typically have two buttons, and you can tell which direction each button corresponds to by looking at the arrows on the remote. In most cases, the buttons correspond to left and right arrow directions. However, in rare cases, a presentation remote may have four buttons with all directional arrows.
Once you have connected your presentation remote to your iOS device via Bluetooth, you can customize the action performed by each button in our app. Here are some examples of what you can do with your presentation remote in our app:
To customize the action performed by each button, open our app and go to the settings menu. From there, select the presentation remote option and you'll be able to assign the desired action to each button on your remote.
With this level of customization, you can use your presentation remote to control various aspects of your teleprompter experience with ease.
In conclusion, the Satechi R1 Bluetooth Presentation Remote and Logitech R500s Laser Presentation Remote are our recommended remotes for use with our teleprompter app. However, any presentation remote that supports Bluetooth 5.0 connectivity should work with our app. With a little customization, you can use your remote to control various aspects of your teleprompter experience.


.png)


.png)
